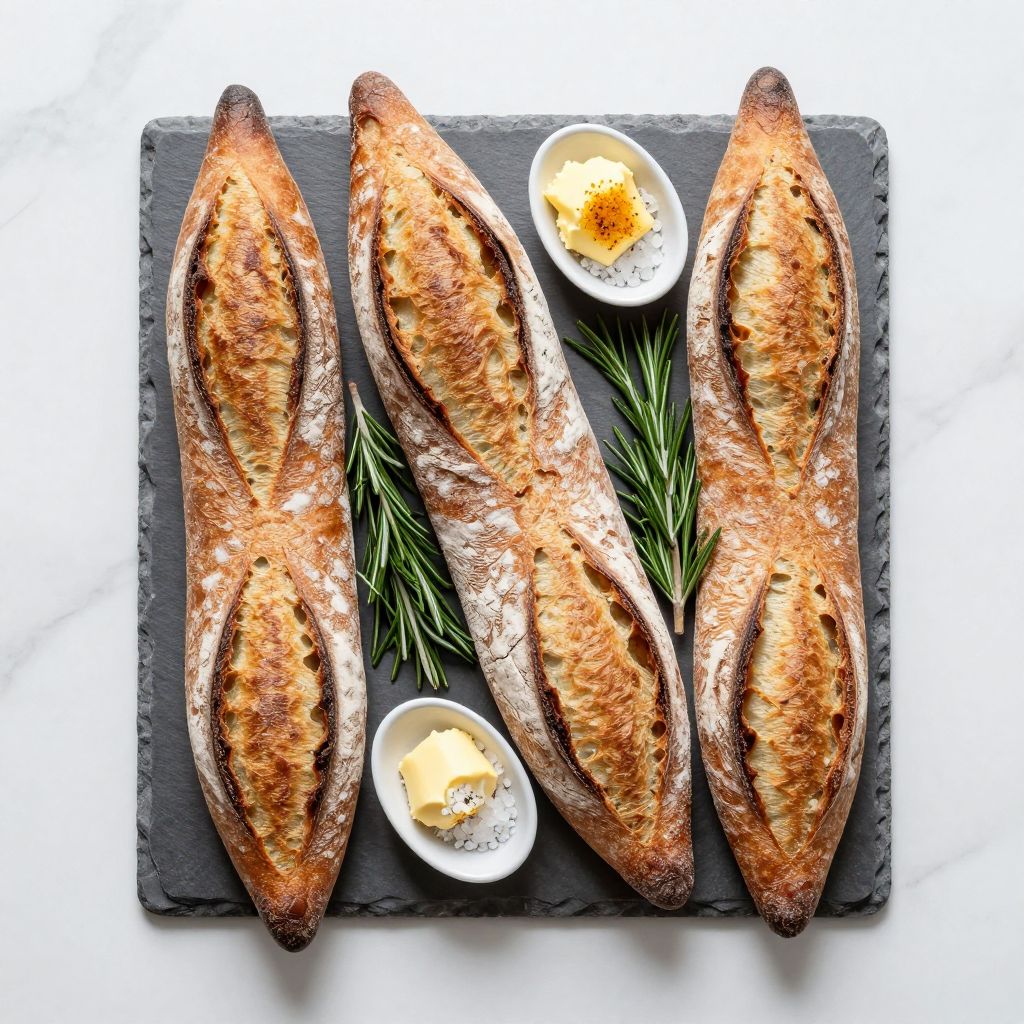
The crackle of a just-baked baguette crust breaking under your fingers might be one of the most satisfying sounds in the kitchen. If you’ve been feeding your sourdough starter and dreaming of creating those iconic golden loaves with their paper-thin, shattering crust and airy crumb, this sourdough baguette recipe will get you there.
This recipe transforms your bubbly starter into elegant French-style baguettes with a complex, tangy flavor that puts store-bought bread to shame. The open crumb structure and distinctive grigne (that beautiful ear along the score line) make these loaves as stunning to look at as they are to eat.
You’ll need a bit of patience for the fermentation, but the hands-on work is surprisingly manageable. Let’s turn your kitchen into a Parisian boulangerie.
Why You’ll Love This Recipe
These sourdough baguettes deliver bakery-quality results at home without any commercial yeast. The natural fermentation creates layers of flavor that simply can’t be rushed.
- Incredible crust that crackles and shatters with every bite, revealing a tender, hole-filled interior
- Deep, complex flavor from the long fermentation that develops nutty, slightly tangy notes
- No commercial yeast needed, just your active sourdough starter doing all the work
- Impressive presentation that makes any meal feel special, from soup to cheese boards
- Freezes beautifully so you can have fresh-baked baguettes whenever the craving hits
My Experience Making This Recipe
The first time I pulled these baguettes from my oven, I actually laughed out loud at the crackling sounds they made as they cooled. That audible symphony told me everything had gone right: the steam had worked its magic, and the crust had developed properly.
I’ve made these baguettes dozens of times now, and each batch teaches me something new about dough handling. The dough feels alive in your hands, slightly sticky but manageable, and shaping them into those classic elongated forms becomes meditative after a few tries.
My family now requests these for every gathering, and guests always ask if I bought them from a fancy bakery. The look on their faces when I say I made them from scratch never gets old.
Recipe Overview
- Recipe Name: Sourdough Baguettes
- Servings: 3 baguettes (about 12 servings total)
- Prep Time: 45 minutes (active work)
- Cook Time: 25 minutes
- Total Time: 14-16 hours (including fermentation)
- Course: Bread, Side
- Cuisine: French
- Calories per Serving: 165 calories
Equipment You Will Need
- Large mixing bowl for combining ingredients
- Kitchen scale for accurate measurements
- Bench scraper or dough cutter for dividing and handling dough
- Baguette pan or baking sheet with parchment paper
- Linen couche or heavily floured kitchen towels for proofing
- Sharp blade, lame, or razor for scoring
- Spray bottle for misting
- Oven thermometer to verify temperature
- Baking stone or steel (optional but recommended)
Ingredients for Sourdough Baguettes
- 500g bread flour (about 4 cups), plus extra for dusting
- 350g water (1.5 cups), at room temperature
- 100g active sourdough starter (fed and bubbly)
- 10g fine sea salt (about 2 teaspoons)
Ingredient Notes and Substitutions
- Bread flour: The higher protein content (around 12-13%) creates the strong gluten network needed for an open crumb and chewy texture. You can substitute all-purpose flour, but expect a slightly less chewy crumb and less structure.
- Active sourdough starter: Must be fed 4-8 hours before mixing and should have doubled in size with lots of bubbles. If your starter is sluggish, the fermentation will take longer and flavor development may be weaker.
- Fine sea salt: Controls fermentation speed and strengthens gluten while adding essential flavor. Kosher salt works but use 12g since it’s less dense by volume.
- Water temperature: Room temperature water (around 70-75°F) keeps fermentation at a steady, manageable pace. Warmer water speeds things up but can make the dough harder to handle.
How to Make Sourdough Baguettes
Step 1: Mix the Dough
Combine the bread flour and water in a large bowl, stirring until no dry flour remains and you have a shaggy, sticky mass. Let this mixture rest for 30-60 minutes in a process called autolyse, which allows the flour to fully hydrate and begins gluten development without any kneading.
Add your active sourdough starter and salt to the dough, then use wet hands to squeeze and fold the mixture until everything is fully incorporated, about 3-4 minutes. The dough will feel sticky and loose at this stage, which is exactly what you want for those characteristic holes in the final crumb.
Step 2: Bulk Fermentation with Stretch and Folds
Cover the bowl and let the dough rest at room temperature (ideally 70-75°F) for 4-5 hours for bulk fermentation. During the first 2 hours, perform a stretch and fold every 30 minutes: wet your hands, grab one side of the dough, stretch it up, and fold it over itself, then rotate the bowl 90 degrees and repeat until you’ve worked all four sides.
These folds build strength in the dough without aggressive kneading, creating the gluten structure that will trap fermentation gases. After the final fold, let the dough ferment undisturbed until it has increased in volume by about 50% and shows bubbles on the surface and sides.
Step 3: Divide and Pre-Shape
Turn the dough out onto a lightly floured work surface and use a bench scraper to divide it into three equal pieces, each weighing about 320g. Gently pre-shape each piece into a loose rectangle by folding the sides toward the center, then let them rest uncovered for 20-30 minutes.
This rest period, called the bench rest, allows the gluten to relax so the dough will be easier to shape into long baguettes without springing back. You’ll notice the pieces spread out slightly and feel less taut after this rest.
Step 4: Shape the Baguettes
Take one piece of dough and gently press it into a rectangle about 8 inches long with the long side facing you. Fold the top third down to the center and press the seam with your fingertips to seal, then fold the bottom third up and over, sealing again to create a log shape.
Using both hands, roll the log back and forth with gentle, even pressure, starting from the center and working outward to elongate it to about 14-15 inches long. The gentle rolling motion distributes the dough evenly and creates surface tension that helps the baguettes hold their shape during baking.
Step 5: Final Proof
Place the shaped baguettes seam-side up on a well-floured linen couche or kitchen towel, creating pleats between each one to keep them separated. Cover loosely with plastic wrap or another towel and let proof at room temperature for 2-3 hours, or refrigerate for 8-12 hours for a cold proof.
The baguettes are ready when they look puffy and a gentle poke with your finger leaves an impression that slowly springs back halfway. Cold proofing develops more complex flavors and makes scoring easier since the cold dough is firmer to work with.
Step 6: Preheat and Prepare for Baking
Place your baking stone or steel on the middle rack and a metal pan on the bottom rack of your oven, then preheat to 500°F for at least 45 minutes. This long preheat ensures your baking surface is thoroughly heated, which is critical for achieving that dramatic oven spring and crispy crust.
Cut a piece of parchment paper large enough to hold all three baguettes with a bit of space between them. Having everything ready before you score prevents the dough from over-proofing while you scramble to get organized.
Step 7: Score the Baguettes
Carefully flip each baguette seam-side down onto the parchment paper, spacing them about 3 inches apart. Hold your blade or lame at a 30-45 degree angle to the surface and make one long, swift cut down the length of each baguette, about 1/4 inch deep, or create 3-4 diagonal slashes that slightly overlap.
The angled blade creates the distinctive ear that peels back during baking, and the quick, confident motion prevents dragging that can deflate the dough. Hesitation is the enemy here, so commit to each cut with smooth, deliberate strokes.
Step 8: Bake with Steam
Slide the parchment paper with the baguettes onto your preheated baking stone or a baking sheet, then quickly pour 1 cup of boiling water into the hot pan on the bottom rack and immediately close the oven door. The steam keeps the crust soft during the first part of baking, allowing maximum expansion and creating that glossy, crackly crust.
Bake for 10 minutes with the steam, then carefully remove the water pan and reduce the temperature to 450°F. Continue baking for another 12-15 minutes until the baguettes are deep golden brown and sound hollow when tapped on the bottom, then transfer to a cooling rack where they’ll continue their crackling symphony.
Pro Tip: Resist cutting into your baguettes for at least 20 minutes after baking. The interior is still cooking from residual heat, and cutting too early releases steam that makes the crumb gummy instead of light and airy.
Tips for the Best Sourdough Baguettes
- Use a kitchen scale to weigh your ingredients for consistent results every time. Volumetric measurements for flour can vary by as much as 20% depending on how you scoop, which throws off hydration levels.
- Watch the dough, not the clock, during bulk fermentation since room temperature affects timing significantly. A 75°F kitchen ferments much faster than a 68°F one, so look for visual cues like volume increase and bubble formation.
- Keep your work surface only lightly floured during shaping to maintain some traction. Too much flour prevents the dough from sticking to itself as you shape, making it harder to create the surface tension needed for good structure.
- Score with confidence using a very sharp blade held at an angle, committing to smooth, swift cuts. Tentative sawing motions deflate the dough and create ragged scores instead of clean openings.
- Create maximum steam in your oven by preheating a pan and using boiling water rather than cold. The instant steam burst at the moment of baking gives you the best oven spring and crust development.
- Don’t skip the long oven preheat, especially if using a baking stone or steel. An insufficiently heated surface leads to poor oven spring and pale, leathery crusts instead of crispy, golden ones.
Common Mistakes to Avoid
- Using starter that isn’t fully active and bubbly results in sluggish fermentation, dense crumb, and flat flavor. Your starter should have doubled in size and pass the float test (a small spoonful floats in water) before you mix your dough.
- Over-proofing the dough makes it lose structure and creates a flat baguette that spreads instead of rising up. If your dough feels slack, looks overly bubbly, or a finger poke doesn’t spring back at all, it’s gone too far.
- Skipping or rushing the bench rest between pre-shaping and final shaping leads to tight, springy dough that fights you and won’t elongate properly. Those 20-30 minutes of rest are non-negotiable for workable dough.
- Baking without sufficient steam prevents the crust from staying pliable during oven spring, causing it to set too early and limiting rise. This creates dense baguettes with thick, pale crusts instead of light, airy ones with thin, crispy exteriors.
- Scoring too deeply or too shallowly affects how the baguette expands: too deep and it spreads wide and flat, too shallow and it bursts randomly. Aim for about 1/4 inch depth and a 30-45 degree blade angle for the classic ear.
Serving Suggestions
Sourdough baguettes shine as the foundation of memorable meals and snacks, from simple butter and jam to elaborate cheese plates. Their sturdy crust and tangy flavor complement both delicate and bold ingredients beautifully.
- Slice thickly and serve warm with salted butter and good quality jam for breakfast or a simple afternoon snack
- Make classic French sandwiches with ham, brie, cornichons, and Dijon mustard on sliced baguette
- Toast slices and rub with garlic, then drizzle with olive oil for the perfect bruschetta base or soup dipper
- Serve alongside French onion soup, using slices to top the bowls before broiling with cheese
- Create a cheese board centerpiece by tearing the baguette into rustic chunks and pairing with soft cheeses, cured meats, and fruit
Variations to Try
- Whole Wheat Sourdough Baguettes: Replace 100g of the bread flour with whole wheat flour for a nuttier flavor and heartier texture. The bran in whole wheat flour absorbs more water, so you may need to add 10-15g extra water to maintain the proper dough consistency.
- Seeded Baguettes: After shaping, mist the baguettes with water and roll them in a mixture of sesame seeds, poppy seeds, and flax seeds before final proofing. The seeds add crunch and visual appeal while contributing healthy fats and extra flavor.
- Herb and Olive Baguettes: Fold 100g of chopped kalamata olives and 2 tablespoons of chopped fresh rosemary into the dough during the final stretch and fold. This Mediterranean variation pairs beautifully with Italian meals and antipasto spreads.
- Mini Baguettes: Divide the dough into 6 pieces instead of 3 and shape into 8-inch mini baguettes that bake in 15-18 minutes. Perfect for individual servings at dinner parties or for making personal-sized sandwiches.
- Poolish-Boosted Baguettes: Mix 50g flour, 50g water, and 5g starter the night before and let ferment 12 hours, then incorporate into your main dough. This preferment adds even more complex flavor and improves crust color.
Dietary Adaptations
- Gluten-Free: Traditional baguettes rely entirely on gluten structure, making a true gluten-free version extremely challenging. Gluten-free bread flours with xanthan gum can produce a bread-like product, but it won’t have the characteristic crust, crumb, or chew of authentic baguettes.
- Dairy-Free: This recipe is already dairy-free since traditional French baguettes contain no milk, butter, or other dairy products. Just flour, water, salt, and your sourdough starter are all you need.
- Vegan: Sourdough baguettes are naturally vegan, containing only plant-based ingredients with no eggs, dairy, or animal products. Your sourdough starter, being a culture of wild yeast and bacteria, fits perfectly into vegan baking.
- Low-Carb/Keto: Authentic baguettes cannot be made low-carb since they’re fundamentally bread made from wheat flour. Almond or coconut flour substitutions produce entirely different products that won’t resemble traditional baguettes in texture, flavor, or appearance.
Storage and Reheating
Refrigerator
Refrigerating baguettes accelerates staling and creates a tough, leathery texture within 24 hours. If you must refrigerate leftovers, wrap tightly in plastic wrap and plan to toast or refresh them in the oven before eating.
- Store for no more than 2 days before quality deteriorates significantly
- Bring to room temperature and refresh in a 350°F oven for 5 minutes before serving
Freezer
Freezing is the best storage method for maintaining quality beyond day two. Wrap cooled baguettes tightly in plastic wrap, then in aluminum foil or a freezer bag to prevent freezer burn.
- Freeze for up to 3 months with minimal quality loss
- Thaw wrapped baguettes at room temperature for 1-2 hours
- Refresh thawed baguettes in a 350°F oven for 7-10 minutes to restore crust crispness
- For best results, slice before freezing so you can toast individual pieces as needed
Reheating
Proper reheating revives the crust and makes day-old or frozen baguettes taste freshly baked. A quick blast of high heat reactivates moisture in the crumb and re-crisps the exterior.
- Whole baguettes: Mist lightly with water and bake at 350°F for 8-10 minutes
- Sliced pieces: Toast directly in a toaster or under the broiler for 2-3 minutes
- Microwave only as a last resort, as it makes the crust rubbery and tough
Nutrition Information
| Nutrient | Amount |
|---|---|
| Calories | 165 |
| Total Fat | 0.5g |
 Sourdough BaguettesTransform your bubbly sourdough starter into elegant French-style baguettes with a complex, tangy flavor, paper-thin shattering crust, and airy crumb. These bakery-quality baguettes require patience for fermentation but deliver stunning results without any commercial yeast.
IngredientsEquipmentMethod
NotesWatch the dough, not the clock, during bulk fermentation since room temperature affects timing significantly. Your sourdough starter must be fed 4-8 hours before mixing and should have doubled in size with lots of bubbles. Use a kitchen scale to weigh your ingredients for consistent results every time. Resist cutting into your baguettes for at least 20 minutes after baking to allow the interior to finish cooking. These baguettes freeze beautifully for up to 3 months when wrapped tightly in plastic wrap and aluminum foil. |


