Sirloin tip roast recipe delivers a tender, flavorful centerpiece perfect for Sunday dinners or holiday gatherings without breaking the bank. This lean cut of beef transforms into a succulent roast with the right technique, proving you don’t need an expensive prime rib to impress your guests.
What makes this recipe special is how simple ingredients and straightforward cooking methods yield restaurant-quality results at home. You’ll learn exactly how to season, sear, and roast this cut to juicy perfection every single time.
Why You’ll Love This Recipe
This sirloin tip roast combines affordability with impressive presentation, making it ideal for feeding a crowd. The technique works every time, giving you confidence in the kitchen.
- Budget-friendly cut that tastes like a much pricier roast when cooked correctly
- Feeds 6 to 8 people easily, perfect for family gatherings
- Minimal hands-on time with most of the work happening in the oven
- Leftover slices make incredible sandwiches and salads for days
- Versatile seasoning options let you customize flavors to your preference
My Experience Making This Recipe
I still remember the first time I attempted a sirloin tip roast, nervously checking the thermometer every five minutes like it might lie to me. The result shocked me because this affordable cut delivered flavor that rivaled cuts costing twice as much.
The aroma that fills your kitchen during roasting is absolutely intoxicating, with garlic and herbs creating waves of savory goodness. My family now requests this roast for every major gathering, and I’ve stopped counting how many times I’ve made it.
The best part is watching guests take that first bite and immediately ask for the recipe. Slicing into a perfectly pink center never gets old, especially when you know how simple the process actually is.
Recipe Overview
- Recipe Name: Sirloin Tip Roast
- Servings: 8 servings
- Prep Time: 15 minutes
- Cook Time: 75 minutes
- Total Time: 90 minutes (plus 15 minutes resting)
- Course: Main Course
- Cuisine: American
- Calories per Serving: 285
Equipment You Will Need
- Large oven-safe skillet or cast iron pan
- Roasting pan with rack
- Meat thermometer
- Sharp carving knife
- Cutting board with juice groove
- Kitchen twine
- Small mixing bowl
- Aluminum foil
Ingredients for Sirloin Tip Roast Recipe
- 3 to 4 pounds sirloin tip roast
- 2 tablespoons olive oil
- 4 cloves garlic, minced
- 2 teaspoons kosher salt
- 1 teaspoon black pepper, freshly ground
- 1 teaspoon dried rosemary
- 1 teaspoon dried thyme
- 1 teaspoon onion powder
- 1/2 teaspoon smoked paprika
- 1 cup beef broth
- 2 tablespoons butter
Ingredient Notes and Substitutions
- Sirloin tip roast: This lean cut comes from the round and benefits from careful temperature monitoring to prevent drying. You can substitute with top round roast, though it will be slightly less tender.
- Olive oil: Used for searing to create a flavorful crust on the exterior. Avocado oil or vegetable oil work equally well for high-heat cooking.
- Fresh garlic: Provides aromatic depth that penetrates the meat during roasting. Garlic powder can substitute at a ratio of 1/4 teaspoon per clove, but fresh tastes better.
- Dried herbs: Rosemary and thyme create a classic roast flavor profile. Fresh herbs can replace dried at triple the amount, or try Italian seasoning for convenience.
- Beef broth: Keeps the roast moist and creates pan drippings for gravy. Chicken broth or red wine mixed with water work as alternatives.
How to Make Sirloin Tip Roast Recipe
Step 1: Prepare the Roast
Remove the sirloin tip roast from the refrigerator and let it sit at room temperature for 45 minutes before cooking. Pat the entire surface completely dry with paper towels, as moisture prevents proper browning.
Bringing meat to room temperature helps it cook more evenly throughout. Excess moisture creates steam instead of a sear, which you definitely don’t want.
Step 2: Create the Seasoning Rub
Combine the minced garlic, kosher salt, black pepper, rosemary, thyme, onion powder, and smoked paprika in a small bowl. Mix thoroughly to distribute all the spices evenly.
This dry rub creates a flavorful crust that locks in juices during cooking. The combination of herbs and spices complements beef without overpowering its natural flavor.
Step 3: Season and Tie the Roast
Rub the olive oil all over the roast, then apply the seasoning mixture generously to all sides, pressing it into the meat. Use kitchen twine to tie the roast at 2-inch intervals to help it maintain a uniform shape.
Tying ensures even cooking since the roast will be the same thickness throughout. Uniform shape means no overcooked ends and raw centers.
Step 4: Sear the Roast
Preheat your oven to 325°F. Heat a large oven-safe skillet over medium-high heat and sear the roast on all sides until deeply browned, about 3 to 4 minutes per side.
Searing creates the Maillard reaction, which develops complex flavors and that beautiful crust everyone loves. Don’t rush this step or you’ll miss out on serious flavor.
Step 5: Transfer to Roasting Pan
Place the seared roast on a rack in your roasting pan. Pour the beef broth into the bottom of the pan, being careful not to pour it over the roast itself.
The rack elevates the meat so hot air circulates underneath for even cooking. The broth adds moisture to the oven environment and becomes the base for an incredible pan sauce later.
Step 6: Roast to Temperature
Insert a meat thermometer into the thickest part of the roast and place it in the preheated oven. Roast for approximately 60 to 75 minutes, checking the internal temperature after 50 minutes.
Target 135°F for medium-rare or 145°F for medium, as the temperature will rise another 5 degrees during resting. Cooking by temperature rather than time is the only reliable method for perfect doneness.
Step 7: Add Butter and Rest
When the roast reaches your desired temperature, remove it from the oven and place the butter on top. Tent loosely with aluminum foil and let it rest for 15 minutes before carving.
Resting allows the juices to redistribute throughout the meat instead of spilling onto your cutting board. The butter melts into the roast, adding richness and extra moisture to every slice.
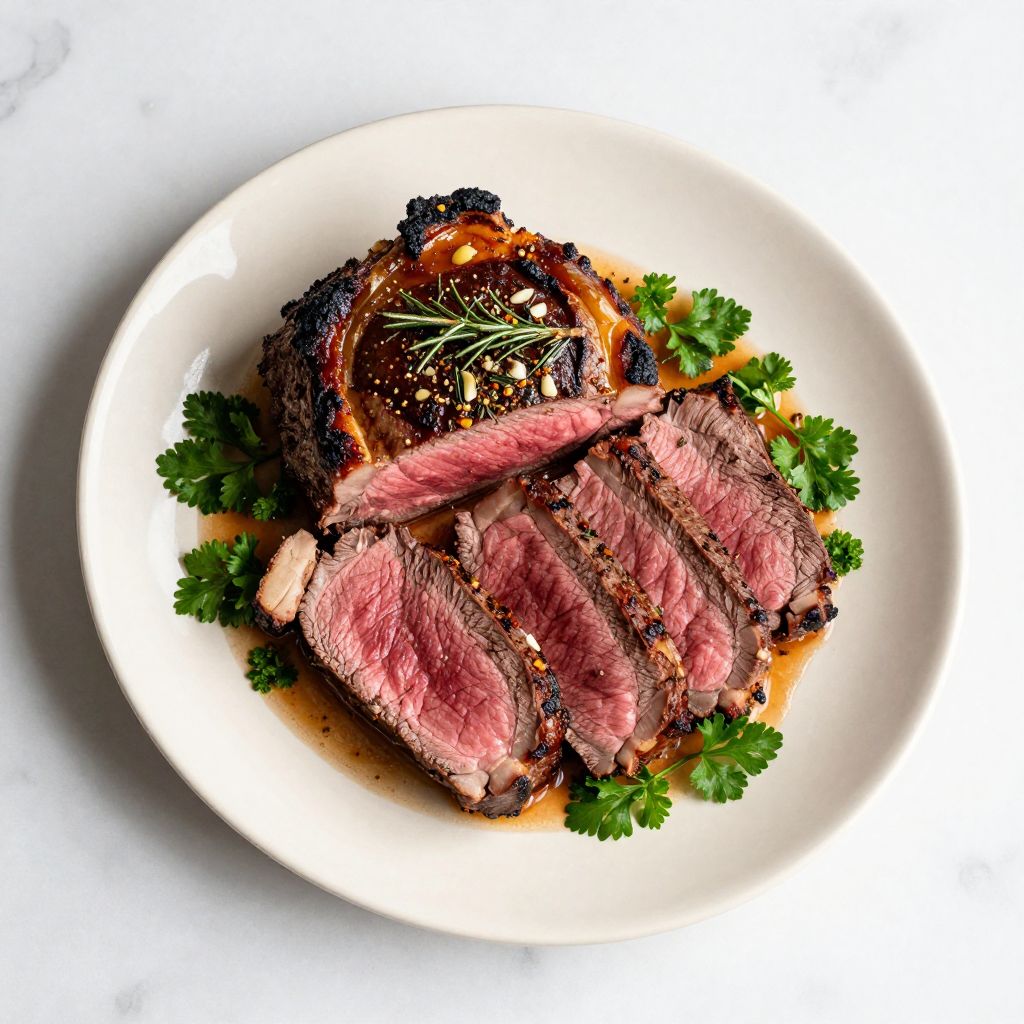
Step 8: Slice and Serve
Remove the kitchen twine and transfer the roast to a cutting board. Slice against the grain into 1/4 to 1/2 inch thick pieces using a sharp carving knife.
Slicing against the grain shortens the muscle fibers, making each bite more tender. A sharp knife gives you clean slices that look as good as they taste.
Pro Tip: Let your roast rest for the full 15 minutes no matter how tempting it is to cut into it early. This resting period is what separates a juicy roast from a disappointing dry one, and skipping it wastes all your careful cooking.
Tips for the Best Sirloin Tip Roast Recipe
- Invest in a reliable meat thermometer instead of guessing doneness by time alone. Oven temperatures vary wildly, and thickness affects cooking time significantly.
- Score the fat cap in a crosshatch pattern before seasoning to help rendering and allow flavors to penetrate. Just don’t cut into the actual meat below the fat.
- Save those pan drippings and whisk them with a bit of flour and extra broth for an incredible gravy. The concentrated flavors in the bottom of that pan are liquid gold.
- Position your oven rack in the center position for the most even heat distribution around the roast. Too high and the top overcooks, too low and the bottom does.
- Slice only what you plan to serve immediately and keep the rest of the roast intact. Whole pieces retain moisture much better than pre-sliced meat.
- Use a carving fork to steady the roast while slicing to get even, professional-looking pieces. Wobbly meat leads to uneven, ragged slices.
Common Mistakes to Avoid
- Cooking straight from the refrigerator results in uneven doneness with a cold center and overcooked exterior. Always allow time for the meat to come to room temperature.
- Opening the oven door repeatedly to check on the roast releases heat and extends cooking time. Trust your thermometer and only check once or twice maximum.
- Cutting the roast immediately after removing it from the oven causes all those precious juices to run out. Patience during resting pays off dramatically.
- Using high heat to speed up cooking dries out this lean cut terribly. Low and slow wins the race with sirloin tip roast every time.
- Slicing with the grain instead of against it makes even perfectly cooked meat taste tough and chewy. Always identify the direction of the muscle fibers first.
Serving Suggestions
This roast pairs beautifully with classic sides that complement its rich, savory flavors without competing. Think creamy, starchy, or fresh and bright to balance the beef.
- Creamy garlic mashed potatoes that soak up the pan juices perfectly
- Roasted root vegetables like carrots, parsnips, and Brussels sprouts
- Horseradish cream sauce for a sharp, tangy contrast
- Simple arugula salad with lemon vinaigrette to cut through the richness
- Yorkshire pudding for a traditional British-style presentation
Variations to Try
- Coffee-crusted version using finely ground espresso mixed with brown sugar and chili powder creates an unexpected depth. The coffee enhances the meat’s natural flavors without tasting like your morning brew.
- Mediterranean style with oregano, lemon zest, and fennel seeds brings bright, sunny flavors. Serve with tzatziki sauce for a Greek-inspired feast.
- Asian-inspired with five-spice powder, ginger, and a soy-based basting liquid transforms the flavor profile completely. Slice thin and serve over rice or in lettuce wraps.
- Herb-crusted variation using fresh parsley, cilantro, and mint pressed onto a Dijon mustard coating. The fresh herbs create an aromatic crust that stays vibrant green.
- Smoky chipotle rub with cumin and coriander gives Tex-Mex flair perfect for fajitas or burrito bowls. The heat level is adjustable based on how much chipotle you use.
Dietary Adaptations
- Gluten-free: This recipe is naturally gluten-free as written, just confirm your beef broth contains no gluten additives. Most pure broths are safe, but always check labels.
- Dairy-free: Skip the butter finish and use olive oil instead for basting during the final minutes. You’ll lose a bit of richness but the roast will still be delicious.
- Low-carb/Keto: This recipe fits perfectly into low-carb eating plans with its high protein and zero carbs. Pair with cauliflower mash instead of potatoes.
- Paleo: Already paleo-compliant when you use ghee instead of butter and ensure your broth has no additives. Serve with roasted vegetables for a complete paleo meal.
Storage and Reheating
Refrigerator
Store leftover roast in an airtight container or wrapped tightly in plastic wrap and aluminum foil for up to 4 days. Keep it whole if possible rather than pre-sliced to maintain moisture.
- Place a damp paper towel over sliced meat before sealing to prevent drying
- Store pan drippings separately in a sealed jar for reheating or making gravy
- Label with the date so you track freshness accurately
Freezer
Freeze the roast for up to 3 months by wrapping it tightly in plastic wrap, then aluminum foil, then placing in a freezer bag. Slice before freezing if you want to grab individual portions easily.
- Remove as much air as possible from the freezer bag to prevent freezer burn
- Place parchment paper between slices if freezing pre-sliced meat
- Thaw in the refrigerator overnight before reheating
Reheating
Reheat slices gently in a covered skillet with a splash of beef broth over low heat for 5 to 7 minutes. Avoid microwaving if possible, as it toughens the meat significantly.
- Oven reheating at 250°F wrapped in foil with broth works well for larger portions
- Bring meat to room temperature before reheating for more even warming
- Don’t overheat past 120°F or you’ll continue cooking the meat
Nutrition Information
| Nutrient | Amount |
|---|---|
| Calories | 285 |
| Total Fat | 14g |
| Saturated Fat | 5g |
| Carbohydrates | 2g |
| Fiber | 0g |
| Sugar | 0g |
| Protein | 36g |
| Sodium | 685mg |
| Cholesterol | 105mg |
Nutritional values are approximate and vary based on specific ingredients used and portion sizes. These calculations assume a 4-pound roast divided into 8 servings.
Frequently Asked Questions
Can I use a different cut of beef for this recipe?
Top round, bottom round, or eye of round can substitute for sirloin tip roast using the same method. Each is similarly lean and benefits from low-temperature roasting, though texture will vary slightly.
Can I make this roast ahead of time?
You can cook the roast up to 2 days ahead, then slice and reheat gently in broth before serving. The flavor actually improves as the seasonings have more time to penetrate the meat.
Why is my roast tough even though I cooked it to the right temperature?
You likely sliced with the grain instead of against it, or didn’t let it rest long enough before cutting. Both mistakes make even perfectly cooked meat seem tough and chewy.
How do I know which direction the grain runs?
Look at the surface of the meat and you’ll see parallel lines running in one direction, like wood grain. Slice perpendicular to those lines for maximum tenderness.
Can I cook this roast in a slow cooker instead?
Slow cookers work but create a pot roast texture rather than a true roast with a crust. If you prefer fall-apart tender meat, cook on low for 6 to 8 hours with vegetables and broth.
What should I do if my roast is cooking faster than expected?
Lower your oven temperature by 25 degrees and continue monitoring closely. Every oven runs differently, and a smaller roast naturally cooks faster than a larger one.
Is the pink center safe to eat?
Yes, beef is safe at 145°F internal temperature according to food safety guidelines, and it will have a pink center at that temperature. That’s medium doneness and perfectly safe for whole muscle cuts.
Final Thoughts
This sirloin tip roast recipe proves that impressive meals don’t require expensive ingredients or complicated techniques. With proper seasoning, careful temperature control, and patience during resting, you’ll create a centerpiece that rivals anything from a steakhouse.
The beauty of this recipe lies in its reliability and the incredible leftovers it provides for days of delicious meals. Give it a try for your next gathering, and you might just find yourself with a new signature dish that everyone requests.
Sirloin Tip Roast
Ingredients
Equipment
Method
- Remove the sirloin tip roast from the refrigerator and let it sit at room temperature for 45 minutes before cooking. Pat the entire surface completely dry with paper towels.
- Combine the minced garlic, kosher salt, black pepper, rosemary, thyme, onion powder, and smoked paprika in a small bowl. Mix thoroughly to distribute all the spices evenly.
- Rub the olive oil all over the roast, then apply the seasoning mixture generously to all sides, pressing it into the meat. Use kitchen twine to tie the roast at 2-inch intervals to help it maintain a uniform shape.
- Preheat your oven to 325°F. Heat a large oven-safe skillet over medium-high heat and sear the roast on all sides until deeply browned, about 3 to 4 minutes per side.
- Place the seared roast on a rack in your roasting pan. Pour the beef broth into the bottom of the pan, being careful not to pour it over the roast itself.
- Insert a meat thermometer into the thickest part of the roast and place it in the preheated oven at 325°F. Roast for approximately 60 to 75 minutes, checking the internal temperature after 50 minutes. Target 135°F for medium-rare or 145°F for medium.
- When the roast reaches your desired temperature, remove it from the oven and place the butter on top. Tent loosely with aluminum foil and let it rest for 15 minutes before carving.
- Remove the kitchen twine and transfer the roast to a cutting board. Slice against the grain into 1/4 to 1/2 inch thick pieces using a sharp carving knife.


