There’s something almost magical about the moment you crack open a jar of homemade peach preserves in the dead of winter and taste summer all over again.
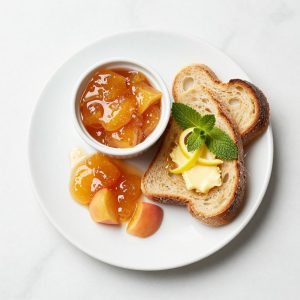
Peach preserves are the perfect way to capture that fleeting season when peaches hit their peak. This recipe transforms ripe, juicy peaches into a thick, spreadable jam that works on toast, swirled into yogurt, or spooned over ice cream.
What makes this version special is the balance of sweetness and fruit flavor without any artificial pectin or complicated canning equipment. You’ll have beautiful, homemade preserves ready to gift or hoard in about an hour.
Why You’ll Love This Recipe
This recipe delivers real peach flavor with minimal fuss, and the results taste infinitely better than store-bought jars.
- Uses just four ingredients: peaches, sugar, lemon juice, and butter
- No special canning equipment or knowledge required
- Ready to eat in under two hours from start to finish
- Naturally thickens without artificial pectin or cornstarch
- Makes perfect gifts for neighbors, friends, or yourself
My Experience Making This Recipe
I first made peach preserves on a whim after picking up a flat of slightly bruised peaches at the farmer’s market. My kitchen filled with the most incredible aroma within minutes of the fruit hitting the pot, and honestly, that alone made it worth the effort.
The whole process felt meditative in a way I didn’t expect. Stirring the bubbling mixture and watching it transform from loose fruit to glossy jam kept me hovering over the stove, completely mesmerized.
When I spread the first jar on warm toast the next morning, my partner actually stopped talking mid-sentence. That’s when I knew this recipe was a keeper worth making again and again.
Recipe Overview
- Recipe Name: Peach Preserves
- Servings: Makes about 4 cups (eight 8-ounce jars)
- Prep Time: 20 minutes
- Cook Time: 40 minutes
- Total Time: 1 hour
- Course: Condiment, Spread
- Cuisine: American
- Calories per Serving: 60 calories per tablespoon
Equipment You Will Need
- Large heavy-bottomed stainless steel pot
- Wooden spoon for stirring
- Peeler or paring knife
- Cutting board
- Large bowl for ice water bath
- Food mill or potato masher
- Candy thermometer
- Clean glass jars with lids
- Ladle for filling jars
- Kitchen towels
Ingredients for Peach Preserves
- 4 pounds fresh peaches, ripe but still firm
- 3 cups granulated sugar
- 1/4 cup fresh lemon juice
- 2 tablespoons unsalted butter
Ingredient Notes and Substitutions
- Fresh peaches: Ripe peaches release the most juice and flavor during cooking. If peaches aren’t perfectly ripe, add an extra tablespoon of lemon juice to brighten the flavor.
- Granulated sugar: Sugar acts as a preservative and helps set the jam to the right consistency. Honey or maple syrup can replace half the sugar for a different flavor profile, but the preserves may set differently.
- Lemon juice: Lemon juice adds brightness and helps trigger natural pectin activation for thickening. Lime juice works as a substitute and adds a subtle tartness that pairs surprisingly well with peaches.
- Unsalted butter: Butter reduces foaming during cooking and makes the final texture silkier. You can omit it if you prefer, though it won’t affect the flavor significantly.
How to Make Peach Preserves
Step 1: Prepare the Peaches
Bring a large pot of water to a rolling boil and have an ice water bath ready in a large bowl. Boiling the peaches briefly loosens the skins, making them peel away effortlessly without damaging the delicate fruit.
Cut a small X into the bottom of each peach with a paring knife, then carefully lower them into the boiling water for 30 to 45 seconds. The hot water softens the skin just enough to release from the flesh.
Step 2: Ice Bath and Peeling
Using a slotted spoon, transfer the peaches immediately to the ice water bath to stop the cooking process. The cold shock halts the cooking and makes handling the hot fruit safe and easier.
Once cooled slightly, gently peel away the skin with your fingers or a small knife. The skin should slip off without any real effort if you’ve blanched them correctly.
Step 3: Cut and Pit the Peaches
Place each peeled peach on a cutting board and slice it in half along the natural seam. The pit sits right in the middle and pops out with minimal effort once you reach the center.
Discard the pits and roughly chop the peach flesh into bite-sized pieces. You should end up with about 6 to 7 cups of chopped peaches once everything is prepped.
Step 4: Combine Ingredients in the Pot
Pour the chopped peaches, sugar, and lemon juice into your large pot and stir everything together gently. The sugar immediately begins drawing moisture from the peaches, which is exactly what you want.
Let the mixture sit for about 10 minutes before turning on the heat. This maceration period allows the sugar to fully penetrate the fruit and helps break down the cell walls.
Step 5: Bring to a Rolling Boil
Set the pot over medium-high heat and stir frequently until the mixture comes to a vigorous rolling boil. You want big, rolling bubbles that don’t subside when you stir, which indicates the temperature is climbing steadily.
The mixture will foam up quite a bit at first, which is completely normal. Skim off any foam that rises to the surface with a spoon, as it can make the final preserves cloudy.
Step 6: Monitor Temperature and Texture
Insert your candy thermometer into the pot, making sure it doesn’t touch the bottom or sides. You’re aiming for the mixture to reach 220 degrees Fahrenheit, which is the setting point for jam.
Stir occasionally and watch carefully as the mixture reduces and thickens. At around 15 to 20 minutes into cooking, add the butter to reduce foaming and improve the silky mouthfeel.
Step 7: Test for Proper Setting
When the thermometer reads 220 degrees, remove the pot from heat and perform a plate test to confirm the setting point. Place a small amount of the hot preserves onto a cold plate and let it cool for one minute.
Tilt the plate and push the jam with your finger. If it wrinkles and moves slowly, you’ve reached the proper consistency and the preserves will set perfectly as they cool.
Step 8: Jar and Cool
Using a ladle, carefully pour the hot preserves into clean glass jars, leaving about half an inch of headspace at the top. Pour slowly and steadily to minimize air bubbles and prevent splashing hot jam on yourself.
Place the lids on the jars and let them cool to room temperature at least 4 to 6 hours before moving them. As the preserves cool, they’ll continue to thicken and the lids will seal with a satisfying pop.
Pro Tip: The preserves continue to thicken as they cool, so don’t panic if they seem slightly loose when you first jar them. They’ll reach perfect spreading consistency by the next day.
Tips for the Best Peach Preserves
- Choose peaches that yield slightly to pressure but aren’t mushy or bruised. Ripe peaches at their peak offer maximum flavor and natural pectin for proper setting.
- Use a heavy-bottomed stainless steel pot to prevent scorching on the bottom. Thin pots heat unevenly and can cause the preserves to brown in spots.
- Don’t skip the lemon juice, even if it seems like a small amount. It brightens the peach flavor and provides the acid needed to activate pectin for proper thickening.
- Keep a damp kitchen towel nearby while cooking and jarring, since hot jam can splash and cause burns. Safety comes first, and you’ll be working with very hot liquid.
- Let the preserves rest undisturbed for at least a day before opening a jar. This resting period allows the gel structure to fully set and develop its final texture.
- Wash your jars and lids in hot soapy water and rinse well just before filling. Warm, clean containers help the hot jam set a better seal and keep your preserves fresh longer.
Common Mistakes to Avoid
- Using underripe peaches: Green or hard peaches won’t break down properly and lack the flavor and natural pectin you need for a good set. Wait for peaches that smell fragrant and yield to gentle pressure.
- Skipping the thermometer: Relying only on visual cues can lead to preserves that are either too thin or too thick. A candy thermometer removes the guesswork and guarantees consistent results.
- Stirring too aggressively: Overstirring can break down the peaches too much and trap excess air bubbles. Gentle, occasional stirring keeps the texture chunky and appealing.
- Cooking at too high a temperature: Cranking the heat to speed things up can scorch the bottom and create a burnt flavor. Medium-high heat cooks the preserves evenly without damage.
- Filling jars while still too hot: Pouring boiling preserves immediately into room-temperature jars can cause them to crack. Let the preserves cool slightly to around 180 degrees before jarring.
Serving Suggestions
Peach preserves shine on warm buttered toast, but there’s so much more you can do with them. Spread them thick or use them thin depending on what you’re topping.
- Swirled into plain or vanilla yogurt with a sprinkle of granola for breakfast
- Spooned over vanilla ice cream or pound cake for a simple dessert
- Thumbprints pressed into the top of sugar cookies before baking
- Glazed over grilled chicken or pork chops for a sweet-savory dinner sauce
- Mixed into cream cheese as a filling for pastries or croissants
Variations to Try
- Spiced peach preserves: Add one teaspoon of ground ginger, half a teaspoon of cinnamon, and a pinch of nutmeg to the pot in Step 4. The warm spices complement peach beautifully and add a cozy depth to the flavor.
- Peach and raspberry preserves: Replace one pound of peaches with fresh raspberries for a tart, berry-forward version. The raspberries add natural pectin and their tartness cuts the sugar nicely.
- Bourbon peach preserves: Add three tablespoons of bourbon whiskey after removing the pot from heat in Step 7. The alcohol adds a subtle complexity and pairs wonderfully with the sweetness.
- Peach and vanilla preserves: Split a vanilla bean lengthwise and scrape the seeds into the pot along with the bean itself. Vanilla adds sophistication and a subtle floral note that makes the peaches taste even more refined.
- Low-sugar peach preserves: Use two cups of sugar instead of three and add one tablespoon of powdered pectin mixed with a tablespoon of water. The result is less sweet but still sets properly.
Dietary Adaptations
- Gluten-free: This recipe is naturally gluten-free, though always verify that your sugar source hasn’t been cross-contaminated if you’re highly sensitive.
- Dairy-free: Simply omit the butter or replace it with coconut oil for the same mouthfeel without any dairy content.
- Vegan: This recipe is already vegan since it uses only fruit, sugar, lemon juice, and butter, which you can easily replace with coconut oil or vegan butter.
- Low-carb or keto: Use erythritol or monk fruit sweetener in a 1:1 ratio for sugar, though the preserves may not set as thickly and will have a slightly different texture.
Storage and Reheating
Refrigerator
Properly sealed jars of peach preserves keep in the pantry for up to one year in a cool, dark place. Once opened, store the jar in the refrigerator.
- Opened jars last about three to four weeks in the refrigerator
- Always use a clean spoon when scooping preserves to prevent contamination
- If mold appears on the surface, discard the entire jar rather than trying to scoop it out
Freezer
You can freeze peach preserves for up to one year, though the texture may become slightly grainy when thawed. Transfer to freezer-safe containers and leave about half an inch of headspace for expansion.
- Thaw overnight in the refrigerator before using
- The preserves will separate slightly as they thaw, so stir well before serving
- Frozen preserves work beautifully in baking, where texture matters less than flavor
Reheating
Peach preserves don’t typically need reheating since they’re enjoyed cold or at room temperature. If you want to warm them for glazing or saucing a warm dessert, heat gently in a small saucepan over low heat.
- Warm preserves for about two to three minutes, stirring occasionally
- Never microwave in a sealed jar, as pressure can build and cause splattering
- Transfer to a microwave-safe dish and heat in 30-second intervals if using a microwave
Nutrition Information
| Nutrient | Amount |
|---|---|
| Calories | 60 |
| Total Fat | 0.2g |
| Saturated Fat | 0.1g |
| Carbohydrates | 15g |
| Fiber | 0.3g |
| Sugar | 14g |
| Protein | 0.2g |
| Sodium | 2mg |
| Cholesterol | 0mg |
Nutrition values are calculated per tablespoon serving based on a standard homemade batch. Individual results may vary based on exact ingredients used and batch size.
Frequently Asked Questions
Can I use frozen peaches instead of fresh?
Yes, you can use frozen peaches, though fresh peaches offer better flavor and texture. Thaw frozen peaches completely and drain excess liquid, then use about four and a half cups since some volume is lost during freezing.
Why didn’t my preserves set properly?
The most common reason is not reaching 220 degrees Fahrenheit on the thermometer. If the jam is still loose after cooling, you can reheat it, add one tablespoon of powdered pectin mixed with water, and cook again until setting point.
Can I make this recipe in smaller batches?
Yes, you can halve all the ingredients for a smaller batch, though cooking time will be slightly shorter. Use the same 220-degree thermometer test and plate test method to determine doneness.
Should I peel the peaches or leave the skin on?
Peeling creates a smoother, more refined preserves, but leaving the skin on adds rustic texture and fiber. If you prefer unpeeled, skip Steps 1 and 2 and just chop the peaches after pitting.
What’s the difference between jam and preserves?
Preserves contain larger chunks of fruit suspended in a thick gel, while jam is smoother and more spreadable. This recipe makes traditional preserves with visible fruit pieces.
How do I know if my sealed jars are properly sealed?
The lids should pop down as they cool, and you should hear a clear popping sound. Once fully cooled, the center of the lid should be concave and not flex when you press it.
Final Thoughts
Making peach preserves at home connects you to a tradition that stretches back centuries. There’s something deeply satisfying about transforming simple summer fruit into something you’ll enjoy all year long.
The next time peaches are at their peak, block out an hour and make a batch. Your morning toast will thank you, and you’ll find yourself with a kitchen that smells absolutely divine.

Peach Preserves
Ingredients
Equipment
Method
- Bring a large pot of water to a rolling boil and prepare an ice water bath in a large bowl. Cut a small X into the bottom of each peach with a paring knife, then carefully lower them into the boiling water for 30 to 45 seconds.
- Using a slotted spoon, transfer the peaches immediately to the ice water bath to stop the cooking process. Once cooled slightly, gently peel away the skin with your fingers or a small knife.
- Place each peeled peach on a cutting board and slice it in half along the natural seam. Discard the pits and roughly chop the peach flesh into bite-sized pieces. You should have about 6 to 7 cups of chopped peaches.
- Pour the chopped peaches, sugar, and lemon juice into your large pot and stir everything together gently. Let the mixture sit for about 10 minutes before turning on the heat to allow the sugar to fully penetrate the fruit.
- Set the pot over medium-high heat and stir frequently until the mixture comes to a vigorous rolling boil. Skim off any foam that rises to the surface with a spoon.
- Insert your candy thermometer into the pot, making sure it doesn't touch the bottom or sides. You're aiming for the mixture to reach 220 degrees Fahrenheit. At around 15 to 20 minutes into cooking, add the butter to reduce foaming.
- When the thermometer reads 220 degrees Fahrenheit, remove the pot from heat and perform a plate test. Place a small amount of the hot preserves onto a cold plate and let it cool for one minute. Tilt the plate and push the jam with your finger. If it wrinkles and moves slowly, it has reached the proper consistency.
- Using a ladle, carefully pour the hot preserves into clean glass jars, leaving about half an inch of headspace at the top. Place the lids on the jars and let them cool to room temperature for at least 4 to 6 hours before moving them.