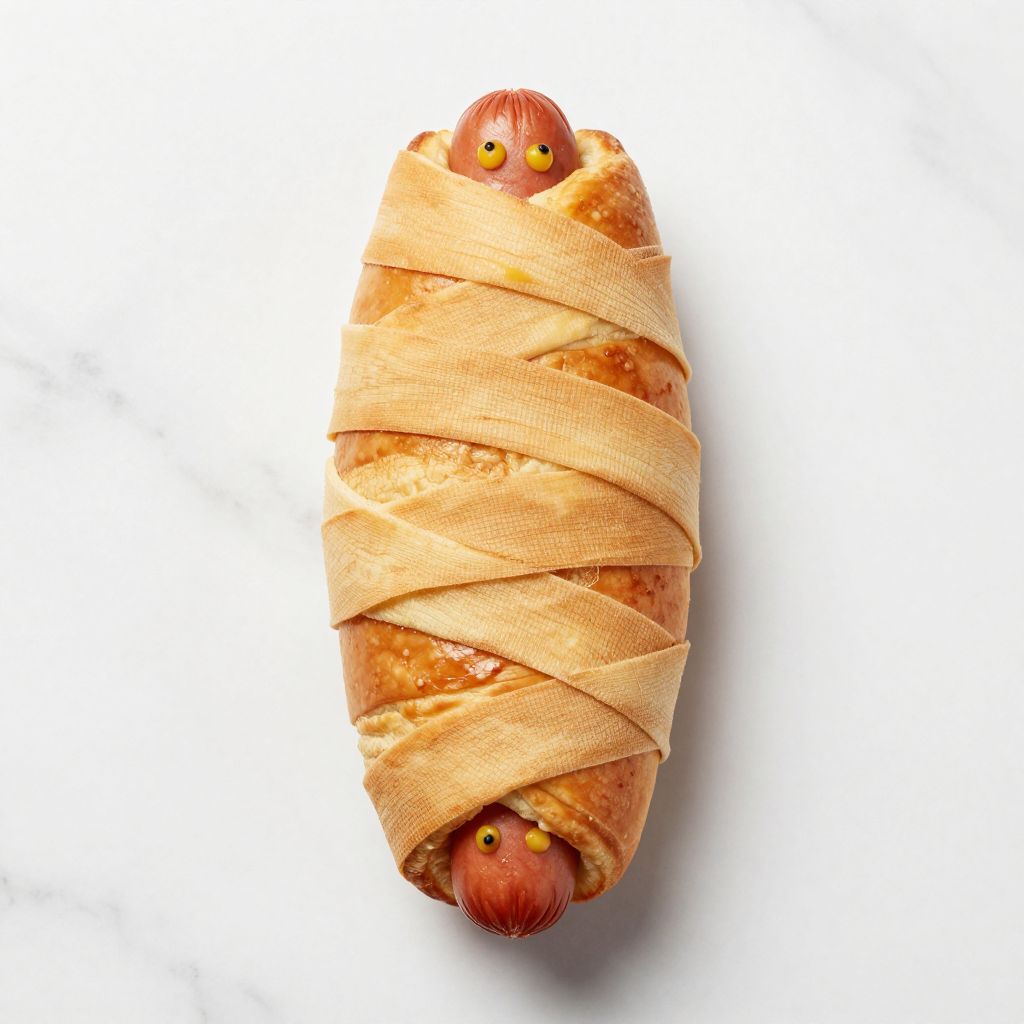
Picture this: Halloween night, your kitchen smells like toasted bread and melted cheese, and the kids are gathered around the counter waiting to unwrap their favorite spooky treat.
Mummy dogs are a timeless party favorite that requires almost no skill but delivers maximum fun and flavor. These simple hot dogs wrapped in crescent roll “bandages” transform an ordinary snack into something that feels festive and special, whether you’re hosting a Halloween party or just want to make dinner more entertaining for picky eaters.
The beauty of this recipe lies in its simplicity: you get crispy, golden pastry wrapping around juicy hot dogs in about 20 minutes total. Kids love the hands-on element of helping “mummify” the dogs, and adults appreciate how ridiculously easy they are to pull together.
Why You’ll Love This Recipe
Mummy dogs tick every box for a crowd-pleasing appetizer or main course. They require minimal ingredients, come together in minutes, and taste absolutely delicious.
- Super quick: ready in under 25 minutes from start to finish
- Minimal ingredients: just hot dogs, crescent roll dough, and optional mustard for eyes
- Kid-friendly: fun to assemble and exciting to eat
- Versatile: works for parties, lunch boxes, or quick dinners
- Crowd-pleaser: almost universally loved by kids and nostalgic adults
My Experience Making This Recipe
I first made mummy dogs for my nephew’s school Halloween party, and honestly, I was skeptical about how much fun they’d actually be. But watching a room full of second graders lose their minds over these silly little things changed my perspective entirely.
The best part? The hands-on assembly process gets everyone involved. I’ve made them with my family, and the kids fight over who gets to wrap each dog and place the olive “eyes.” The golden-brown result feels fancy enough to serve at parties but casual enough for a weeknight dinner.
When they come out of the oven, the crescent roll wrapping is crispy and buttery, and the hot dogs are juicy inside. Serve them with mustard for dipping, and you’ve got a complete crowd-winner.
Recipe Overview
- Recipe Name: Mummy Dogs
- Servings: 12 mummy dogs (makes 2 batches per can of crescent rolls)
- Prep Time: 10 minutes
- Cook Time: 12 minutes
- Total Time: 22 minutes
- Course: Appetizer or Light Main Course
- Cuisine: American
- Calories per Serving: 140 calories
Equipment You Will Need
- Baking sheet
- Parchment paper or foil
- Knife (sharp serrated knife works best for cutting dough strips)
- Oven preheated to 375 degrees Fahrenheit
- Small bowl (for mustard if using for eyes)
- Toothpick or small spoon (for placing mustard eyes)
Ingredients for Mummy Dogs
- 1 can refrigerated crescent roll dough (8 oz, which contains 8 rolls)
- 12 hot dogs (standard size, any brand you prefer)
- 2 teaspoons yellow mustard (optional, for mummy eyes)
- Cooking spray or butter (to prevent sticking on the baking sheet, optional)
Ingredient Notes and Substitutions
- Crescent roll dough: This creates the signature flaky, buttery bandage texture that makes mummy dogs irresistible. If you can’t find crescent rolls, pizza dough (thinly rolled and cut into strips) or phyllo dough works as a substitute, though the texture and appearance will differ slightly.
- Hot dogs: Standard beef hot dogs are traditional, but feel free to use turkey, chicken, or even veggie hot dogs if you prefer. The cooking time remains the same regardless of type.
- Yellow mustard for eyes: This adds the spooky character to your mummies, but you can skip it entirely if you prefer a simpler presentation. Alternatively, use small olive slices, dabs of ketchup, or even tiny pieces of cheese instead.
How to Make Mummy Dogs
Step 1: Preheat Your Oven and Prepare Your Baking Sheet
Set your oven to 375 degrees Fahrenheit and allow it to fully preheat. This temperature ensures the crescent dough rises and browns beautifully without the hot dogs drying out.
Line your baking sheet with parchment paper or foil to make cleanup effortless. You can skip this step if your sheet has a non-stick coating, but parchment definitely makes things easier.
Step 2: Remove the Crescent Roll Dough from the Refrigerator
Take your can of crescent rolls out of the fridge and let it sit at room temperature for about 2 minutes. This makes the dough slightly easier to work with and less likely to tear apart.
Don’t open the can yet if you’re not ready to start immediately. Cold dough is harder to manipulate, so a quick warm-up helps tremendously.
Step 3: Unroll and Separate the Dough
Open the crescent roll can and carefully unroll the dough onto your work surface. You’ll see perforated lines dividing the dough into 8 triangles.
Gently separate each triangle along the perforations. Work slowly to avoid tearing the delicate dough, but don’t stress if a tear happens; you can patch it during wrapping.
Step 4: Cut the Dough into Thin Strips for Bandages
Using a sharp knife, cut each triangle of dough into thin strips (roughly 1/4 inch wide). These strips will become the “bandages” wrapping around your mummy dogs.
Don’t worry about making them perfectly uniform. Uneven strips actually look more authentically mummy-like and give each dog character.
Step 5: Arrange Hot Dogs on the Baking Sheet
Place all 12 hot dogs on your prepared baking sheet, spacing them about 2 inches apart. This gives you room to wrap them without the bandages touching and sticking together.
If you’re only making half a batch, you can refrigerate the extra dough strips for up to 24 hours to use later.
Step 6: Wrap Each Hot Dog with Dough Strips
Starting at one end of a hot dog, wrap dough strips around it in a crisscross or spiral pattern, leaving a small unwrapped section at the top (this is where the mummy’s “head” shows). Vary the spacing and angles of the strips so it looks like actual mummy bandages rather than a perfectly neat package.
Press each strip gently against the hot dog to ensure it stays in place. Don’t wrap too tightly, as the dough will expand during baking. Repeat with all remaining hot dogs.
Step 7: Add Mustard Eyes for Character
If using mustard for eyes, place a tiny dot of yellow mustard in the unwrapped section at the top of each hot dog where the “face” is. Use a toothpick or the back of a small spoon to apply the mustard in two small spots.
This step is completely optional, but it transforms these from plain wrapped hot dogs into actual spooky mummies that make people smile.
Step 8: Bake Until Golden Brown
Bake the mummy dogs at 375 degrees Fahrenheit for 12 to 15 minutes, until the crescent dough is puffed up and golden brown. The exact time depends on your oven, so start checking around the 12-minute mark.
The bandages should look crispy and lightly caramelized on the edges. If they’re still pale after 12 minutes, give them another 2 to 3 minutes.
Step 9: Remove from the Oven and Cool Slightly
Take the baking sheet out of the oven and let the mummy dogs cool for 2 to 3 minutes before serving. They’ll be extremely hot, and the dough continues to set during this cooling period.
Transfer them to a serving platter and serve warm with mustard, ketchup, or your favorite dipping sauce on the side.
Pro Tip: If you’re making these ahead for a party, wrap them completely before baking and refrigerate for up to 4 hours, then pop them straight into the oven when you’re ready to serve. This saves you time on the day of the event.
Tips for the Best Mummy Dogs
- Don’t stretch the dough too much while wrapping. Gentle handling keeps the crescent rolls flaky instead of tough and rubbery.
- Leave some hot dog visible at the top and bottom for visual interest and so you can see what you’re eating. Totally wrapped mummies look cool, but the exposed hot dog at the top reads better as a face.
- If your oven runs hot, start checking at 10 minutes to prevent the dough from browning too quickly. Every oven behaves differently, so getting familiar with yours matters.
- Vary the spacing and angles of your bandage strips for an authentic, slightly chaotic mummy look. Perfect lines look less fun.
- Serve immediately after baking while the crescent rolls are still crispy. They stay good for a few hours at room temperature, but texture degrades the longer they sit.
- If you’re making a huge batch, use two baking sheets and stagger them in the oven so both batches finish around the same time.
Common Mistakes to Avoid
- Wrapping too tightly: The dough needs room to puff and expand, so if you squeeze the strips too firmly against the hot dog, the final result will be dense and tough instead of flaky.
- Oven too hot: Temperatures above 400 degrees cause the crescent dough to brown before the hot dog heats through. Stick to 375 for best results.
- Not leaving an opening at the top: Completely mummifying the entire hot dog looks neat but makes it harder to see that distinctive hot dog shape. The exposed “face” is part of the charm.
- Using dough strips that are too thick: Thick strips don’t cook through properly and taste doughy. Cut them thin (roughly 1/4 inch) for the best texture.
Serving Suggestions
Mummy dogs shine as a standalone appetizer, but they’re even better when paired with the right sides and dipping sauces. Serve them warm straight from the oven for maximum crispiness and flavor.
- Classic mustard and ketchup for dipping
- Marinara sauce for a pizza-inspired twist
- Spicy sriracha mayo for adults who want heat
- Cheese dip or beer cheese sauce for a richer option
- Alongside a simple green salad to balance the richness
Variations to Try
- Jalapeño Popper Mummies: Wrap each hot dog with a strip of bacon before applying crescent dough, then add a small slice of jalapeño and cream cheese into the gap at the top. This adds heat and richness.
- Cheese-Filled Mummies: Before wrapping with crescent dough, wrap a thin slice of cheddar or American cheese around each hot dog. The melted cheese oozes out during baking for extra flavor.
- Pizza Mummies: Brush each strip of crescent dough with a bit of marinara sauce before wrapping, then top the finished mummy with a sprinkle of mozzarella and a piece of pepperoni on top. Feels like pizza night meets Halloween.
- Veggie Mummies: Substitute the hot dogs with veggie sausages, plant-based hot dogs, or even long mozzarella sticks wrapped in a hot dog bun. The cooking time stays the same.
- Mini Mummies: Use cocktail-sized hot dogs and cut the crescent dough into even thinner strips for bite-sized appetizers. They cook in about 8 to 10 minutes.
Dietary Adaptations
- Gluten-Free: Use gluten-free crescent roll dough (brands like Udi’s or Simple Mills make versions that work well). The texture will be slightly different but still delicious.
- Dairy-Free: Dairy-free crescent rolls are harder to find, but you can use pizza dough or phyllo sheets brushed with olive oil as a substitute. The flavor profile changes, but the concept remains fun.
- Vegan and Vegetarian: Swap the hot dogs for plant-based versions (Lightlife or Field Roast brands work great) and verify your crescent rolls contain no lard or animal products. Most modern versions do, but always check the label.
- Low-Carb/Keto: Use keto-friendly crescent roll alternatives (like those made with almond flour) or wrap hot dogs in thin slices of cheese and bake until crispy. You lose the pastry element but keep the fun.
Storage and Reheating
Refrigerator
Store cooled mummy dogs in an airtight container in the fridge for up to 3 days. They stay safe to eat beyond that, but the crescent dough quality declines.
- Keep them in a single layer if possible to prevent squishing
- If stacking is necessary, use parchment paper between layers
Freezer
Mummy dogs freeze beautifully for up to 2 months, whether raw or cooked. Raw mummies actually freeze better because the dough texture holds up more reliably.
- Freeze on a baking sheet for 2 hours, then transfer to a freezer bag to save space
- Label with the date so you remember how long they’ve been frozen
- No need to thaw before baking; just add 5 extra minutes to the bake time
Reheating
Reheated mummy dogs taste best when you restore their crispiness. A toaster oven or regular oven works much better than a microwave for this purpose.
- Oven method: Preheat to 350 degrees Fahrenheit and bake for 5 to 7 minutes until warm and the dough re-crisps
- Toaster oven: Same as above, but watch carefully since they heat faster
- Avoid the microwave, which makes the dough soggy and chewy
Nutrition Information
| Nutrient | Amount |
|---|---|
| Calories | 140 |
| Total Fat | 9g |
| Saturated Fat | 3.5g |
| Carbohydrates | 8g |
| Fiber | 0g |
| Sugar | 1g |
| Protein | 6g |
| Sodium | 510mg |
| Cholesterol | 20mg |
This nutritional breakdown assumes one mummy dog made with a standard beef hot dog and crescent roll dough, without additional dipping sauces. Actual values vary slightly depending on the brand of hot dogs and dough you use.
Frequently Asked Questions
Can I Make Mummy Dogs Without Crescent Rolls?
Yes, you can use pizza dough rolled thin, puff pastry, or even phyllo sheets cut into strips. The texture changes, but the concept works with any thin, pastry-like dough that can wrap around the hot dog.
How Far in Advance Can I Prepare Mummy Dogs?
You can wrap them up to 24 hours ahead and refrigerate, or freeze them for up to 2 months. This makes them perfect for party prep since you can do the assembly work whenever you have time.
Why Are My Mummy Dogs Coming Out Soggy?
Soggy mummies usually result from either too low an oven temperature or using a microwave to reheat. Make sure your oven is actually at 375 degrees, and always use a regular or toaster oven for reheating.
Can I Use Cocktail Hot Dogs Instead of Full-Size Ones?
Absolutely, and they cook faster (about 8 to 10 minutes). Cut the dough strips thinner to match the smaller size, and you’ve got perfect bite-sized appetizers.
What’s the Best Way to Add Eyes if I Don’t Have Mustard?
Small olive slices work great, or you can use dabs of cream cheese, tiny pieces of cheese, or even peppercorns held in place with a tiny dab of mayo. Get creative with what you have on hand.
How Long Do Leftover Mummy Dogs Stay Good?
Refrigerated mummy dogs last about 3 days, and frozen ones stay good for 2 months. After 3 days in the fridge, the dough begins to lose its texture and the hot dog quality declines.
Final Thoughts
Mummy dogs are one of those simple recipes that feels fancier than it actually is. They take maybe 20 minutes total, require ingredients you probably already have, and deliver smiles from everyone who eats them.
Whether you’re throwing a Halloween party, packing lunch boxes, or just want to make an ordinary dinner night feel special, give this recipe a try. The hands-on fun of wrapping them and the satisfaction of pulling golden-brown mummies from the oven makes this recipe worth repeating again and again.
Mummy Dogs
Fun Halloween-themed hot dogs wrapped in flaky crescent roll dough for a quick and crowd-pleasing snack.
- Baking sheet
- Parchment paper or foil
- Sharp serrated knife
- Oven (preheated to 375°F)
- Small bowl
- Toothpick or small spoon
Main
- 1 8 oz can refrigerated crescent roll dough
- 12 standard hot dogs
- 2 teaspoons yellow mustard (optional)
- Cooking spray or butter (for greasing the baking sheet)
- Preheat the oven to 375°F (190°C) and line a baking sheet with parchment paper or foil.
- Allow the crescent roll dough to rest at room temperature for 2 minutes, then open the can and unroll the dough on a work surface.
- Separate the dough into 8 triangles and cut each triangle into 1/4-inch (0.6 cm) wide strips.
- Arrange the 12 hot dogs on the prepared baking sheet, spacing them about 2 inches (5 cm) apart.
- Wrap each hot dog with dough strips in a crisscross pattern, leaving a small opening at the top for the mummy’s face.
- Use a toothpick or small spoon to dot two small mustard eyes in the opening.
- Bake in the preheated oven at 375°F (190°C) for 12 minutes, or until the dough is golden brown and puffed.
- Remove from the oven and let cool on the baking sheet for 2 to 3 minutes before serving.
Serve warm with mustard, ketchup, or your favorite dipping sauce.