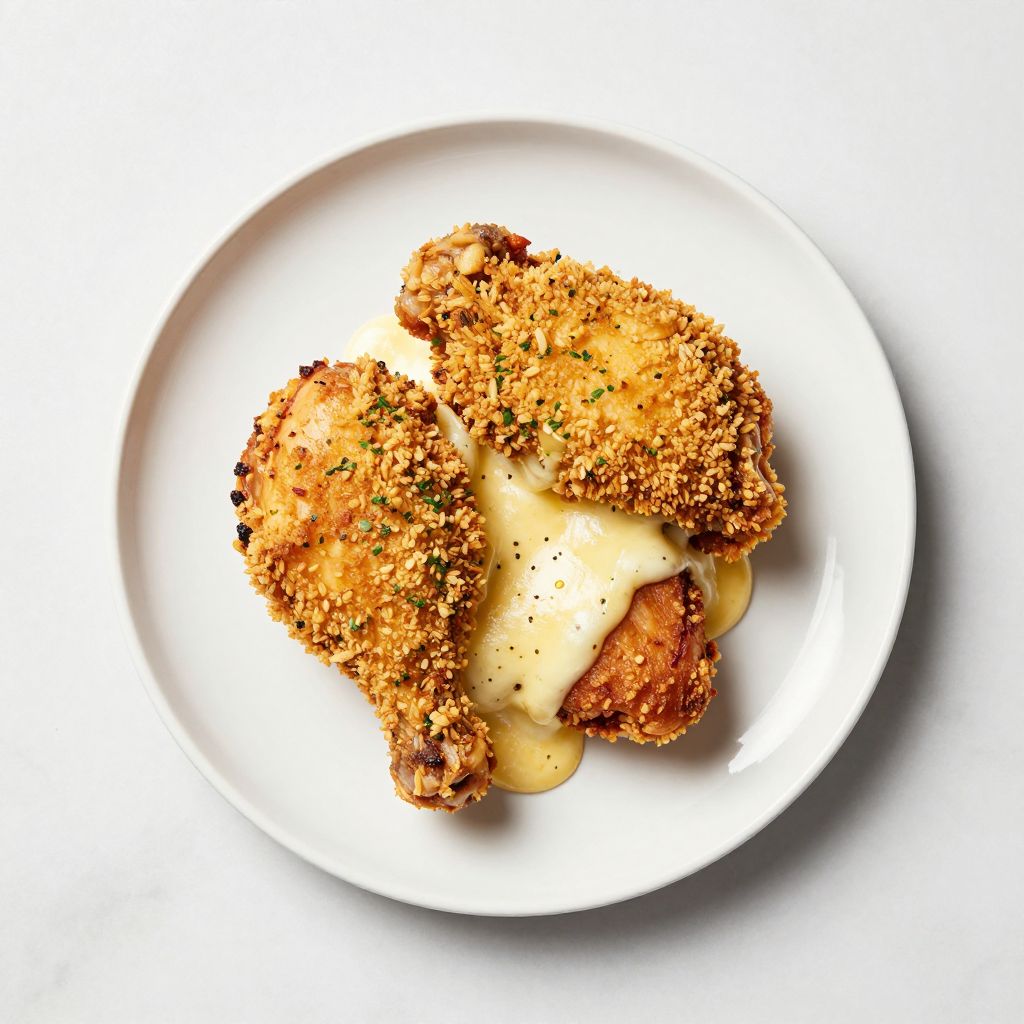
picture this: you slice into a piece of golden, herb-crusted chicken breast and molten cheese spills out like a delicious volcano, lava chicken transforms ordinary poultry into something theatrical and utterly craveable.
This recipe earns its dramatic name by stuffing chicken with a gooey cheese filling that erupts when you cut into the meat. It’s restaurant-quality food that tastes far more complicated than it actually is, making it perfect for impressing guests or treating yourself to something special on a Tuesday night.
What makes this dish truly special is how it combines simplicity with showstopping results. The crispy exterior gives way to juicy chicken and a molten center that feels indulgent without requiring hours in the kitchen.
Why You’ll Love This Recipe
This dish delivers restaurant-quality results with minimal fuss, and the visual drama never gets old. It’s naturally protein-packed, versatile enough for weeknight dinners and fancy entertaining, and remarkably forgiving to make.
- The cheese filling stays locked inside, creating that signature lava effect when you cut through
- Takes just 30 minutes from prep to plate for a weeknight win
- Works with nearly any melting cheese you have on hand
- Impresses family and guests without tying you to the kitchen all evening
- Naturally gluten-free and adaptable to most dietary preferences
My Experience Making This Recipe
I first made lava chicken on a whim after seeing it on a cooking show, skeptical that the cheese would actually stay inside. The moment I plated the first batch and that molten center revealed itself, I became a believer.
My kids actually asked for seconds, which in our house is basically a Michelin star. The texture contrast between the crispy outside and tender, juicy inside kept everyone at the table engaged, and honestly, the visual payoff made even cleanup feel worthwhile.
Since that first attempt, I’ve made it at least a dozen times, tweaking seasonings and trying different cheese combinations. Each version turns out beautifully, and I’ve never had the filling leak or the chicken dry out when I follow the simple technique of butterflying and pounding correctly.
Recipe Overview
- Recipe Name: Lava Chicken
- Servings: 4
- Prep Time: 15 minutes
- Cook Time: 20 minutes
- Total Time: 35 minutes
- Course: Main Dish
- Cuisine: American
- Calories per Serving: 380
Equipment You Will Need
- Sharp chef’s knife
- Cutting board
- Meat mallet or rolling pin
- Large skillet or frying pan
- Meat thermometer
- Shallow bowl for breading
- Paper towels
- Tongs or spatula
Ingredients for Lava Chicken
- 4 boneless, skinless chicken breasts (about 6 to 8 ounces each)
- 1 cup shredded mozzarella cheese
- 4 tablespoons cream cheese, softened
- 2 cloves garlic, minced
- 1 teaspoon Italian seasoning
- Salt and black pepper to taste
- 1 cup all-purpose flour (or gluten-free blend)
- 2 large eggs
- 1 cup panko breadcrumbs
- 3 tablespoons olive oil
- 1 tablespoon butter
Ingredient Notes and Substitutions
- Mozzarella cheese: Its high melting point and mild flavor make it ideal for the lava effect. Swap with provolone or fontina for a sharper taste.
- Cream cheese: It binds the filling and prevents the mozzarella from leaking before cooking. Use mascarpone if you want a richer filling, though you’ll need slightly less.
- Panko breadcrumbs: They create that crispy, textured crust better than regular breadcrumbs. Use crushed crackers or regular breadcrumbs if panko isn’t available, though the texture will be slightly less crunchy.
- Olive oil: It prevents sticking and helps achieve even browning. Vegetable or canola oil works equally well and won’t burn as easily at high heat.
- All-purpose flour: It helps the egg coating stick to the chicken. Use cornstarch for a crispier crust or skip it entirely if you’re going gluten-free with a certified flour blend.
How to Make Lava Chicken
Mix the softened cream cheese, shredded mozzarella, minced garlic, and Italian seasoning in a small bowl. Stir until fully combined, then season with a pinch of salt and pepper. Having the filling ready before you start on the chicken means you can move quickly once you butterfly the breasts.
Step 1: Prepare the Cheese Filling
Mix the softened cream cheese, shredded mozzarella, minced garlic, and Italian seasoning in a small bowl. Stir until fully combined, then season with a pinch of salt and pepper. Having the filling ready before you start on the chicken means you can move quickly once you butterfly the breasts.
Step 2: Butterfly the Chicken Breasts
Place one chicken breast on your cutting board and, with your hand flat on top, use a sharp knife to carefully slice horizontally through the thickest part, being careful not to cut all the way through. You want to create a pocket, not two separate pieces, so stop about half an inch from the edge. Repeat with all four breasts.
Step 3: Pound the Chicken Flat
Place each butterflied breast between two pieces of plastic wrap or in a zip-top bag. Using a meat mallet or the bottom of a heavy pan, gently pound the chicken to an even thickness of about half an inch. Even thickness ensures the chicken cooks uniformly and the filling distributes evenly throughout.
Step 4: Stuff the Chicken
Divide the cheese filling equally among the four breasts, spooning it directly into the pocket you created. Leave about a half-inch border around the edges so the filling doesn’t squeeze out during cooking. Don’t overstuff; the goal is a thin layer of cheese that melts into the chicken, not a cheese bomb.
Step 5: Set Up Your Breading Station
Pour flour into one shallow bowl, beat the eggs in another bowl with a splash of water, and combine panko breadcrumbs with a teaspoon of salt in a third bowl. Arranging these in a line saves time and prevents cross-contamination when breading the chicken.
Step 6: Bread the Stuffed Chicken
Working with one breast at a time, dredge it in flour, coating both sides and tapping off the excess. Dip it into the egg mixture, then press it firmly into the panko, coating evenly on both sides. The breading creates a seal that helps keep the cheese inside and creates that golden, crispy exterior.
Step 7: Heat Your Pan
Heat olive oil and butter in a large skillet over medium-high heat until the butter melts and the oil shimmers. The butter adds richness and helps with browning, while the oil prevents the butter from burning at higher temperatures. Test the heat with a small piece of bread; it should sizzle immediately when it hits the pan.
Step 8: Cook the Chicken
Carefully place the breaded chicken into the hot pan and cook for 8 to 10 minutes on the first side without moving it. This creates the golden crust without disrupting the breading. Flip each breast gently using tongs and cook for another 8 to 10 minutes on the second side until the internal temperature reaches 165 degrees Fahrenheit at the thickest part.
Step 9: Rest and Serve
Remove the chicken from the pan and let it rest on a plate for 3 to 5 minutes before serving. Resting allows the juices to redistribute throughout the meat and the cheese to set slightly, making that lava effect even more pronounced when you cut into it. This brief pause makes all the difference in texture and presentation.
Pro Tip: Don’t skip the resting period and don’t cut into the chicken immediately; patience here guarantees that molten cheese center everyone craves.
Tips for the Best Lava Chicken
- Keep your cheese filling cold before stuffing by refrigerating it for at least 10 minutes. Cold filling stays intact better during cooking and gives you a more dramatic lava effect when you plate.
- Pound your chicken to an even thickness so it cooks uniformly and the cheese has time to melt completely. Thicker spots will cook slowly while thinner areas might dry out, so consistency matters.
- Use a meat thermometer to check doneness rather than guessing by color or touch. The chicken is perfectly cooked at 165 degrees Fahrenheit, which keeps it juicy without any food safety risk.
- Don’t flip the chicken more than once during cooking as constant flipping disrupts the breading and slows browning. Let it sit undisturbed on the first side to build that golden crust.
- If your pan starts smoking or your breading is browning too fast, lower the heat slightly and continue cooking. Every stovetop is different, so adjust accordingly to prevent burnt breadcrumbs while the inside cooks through.
- Pat the breaded chicken dry with a paper towel before it hits the hot pan to ensure better browning. Excess moisture prevents proper crust formation and can cause splattering.
Common Mistakes to Avoid
- Overstuffing the chicken: Too much filling causes it to leak out during cooking and prevents the cheese from staying concentrated in the center. Stick to about 2 tablespoons per breast.
- Skipping the resting period: Cutting into the chicken too quickly causes the juices to run everywhere, and the heat causes the cheese to splatter. Those 3 to 5 minutes make a huge difference in presentation and safety.
- Cooking at too low a temperature: Your pan needs to be hot enough to brown the breading in the allotted time without drying out the chicken. Medium-high heat is your sweet spot; medium alone takes too long.
- Not sealing the edges properly: If cheese leaks out during cooking, your filling becomes exposed to direct heat and can burn. Press the seams gently after stuffing to encourage them to stay closed.
- Flipping too often: Each flip disrupts the breading and slows the browning process. Cook until golden on the first side before flipping just once.
Serving Suggestions
Lava chicken pairs beautifully with bright, fresh sides that complement the richness of the melted cheese. Choose accompaniments that add color and contrast to make the plate visually appealing and balanced.
- Creamy mashed potatoes to catch the flowing cheese and create a decadent bite
- Roasted asparagus or green beans for a crisp, fresh vegetable contrast
- Garlic butter pasta to soak up any extra cheese that spills onto the plate
- Simple arugula salad with lemon vinaigrette to cut through the richness with brightness
- Roasted cherry tomatoes and zucchini for a colorful, light vegetable medley
Variations to Try
- Spinach and feta filling: Sauté fresh spinach with garlic, mix with crumbled feta and a touch of cream cheese, then stuff. This gives you a Mediterranean flavor profile that feels lighter than the classic cheese version.
- Bacon and cheddar: Add crispy bacon bits and sharp cheddar cheese to the filling for a smokier, more robust flavor. Cheddar has a lower melting point than mozzarella, so keep a close eye on cooking time to prevent overcharring.
- Sun-dried tomato and basil: Mix sun-dried tomatoes with fresh basil, cream cheese, and mozzarella for a bright, herbaceous filling. This version pairs beautifully with lighter pasta dishes.
- Mushroom and goat cheese: Sauté chopped mushrooms with thyme, then combine with creamy goat cheese and a small amount of mozzarella. Goat cheese adds tang and earthiness that elevates the dish into dinner party territory.
- Jalapeño and pepper jack: Mix diced jalapeños with pepper jack cheese and cream cheese for a spicy version. This kicks up the heat considerably, so adjust the amount of jalapeño based on your heat tolerance.
Dietary Adaptations
- Gluten-free: Replace all-purpose flour with certified gluten-free flour blend and use gluten-free panko breadcrumbs. The cooking time and technique remain exactly the same; you’ll get the same delicious results.
- Dairy-free: Substitute dairy-free mozzarella and dairy-free cream cheese, though note that the melting quality may differ slightly. The filling will still work, though the texture might be less creamy and the lava effect less dramatic.
- Low-carb or keto: Skip the breading entirely and pan-sear the stuffed chicken in butter and olive oil at the same temperature. You’ll lose the crispy texture but keep all the flavor and the lava effect, with a fraction of the carbs.
- Vegan: Use vegan mozzarella and vegan cream cheese, then bread with gluten-free panko and dredge in aquafaba instead of eggs. The result won’t be identical, but quality vegan cheeses have improved dramatically in recent years.
Storage and Reheating
Refrigerator
Store leftover lava chicken in an airtight container for up to three days. The breading softens slightly when refrigerated, so the texture won’t be quite as crispy on day three as it was fresh.
- Keep the chicken in a single layer to prevent it from crushing under its own weight
- Store any extra filling separately if you have it, as it keeps the same three days
Freezer
You can freeze uncooked stuffed chicken breasts for up to two months by wrapping each one individually in plastic wrap, then placing them in a freezer bag. The stuffed but uncooked version freezes better than cooked chicken.
- Thaw overnight in the refrigerator before cooking using the same method
- Cooked leftover chicken also freezes well for up to two months, though texture will suffer slightly
Reheating
Reheat refrigerated lava chicken in a 350-degree Fahrenheit oven for 8 to 10 minutes until warmed through. This method keeps the breading relatively crispy better than microwaving, though it won’t be quite as crispy as fresh.
- Avoid the microwave if possible, as it makes the breading soggy and unappetizing
- Cover with foil during reheating to prevent the breading from drying out or burning
- For frozen cooked chicken, add a few extra minutes to the reheating time
Nutrition Information
| Nutrient | Amount |
|---|---|
| Calories | 380 |
| Total Fat | 18g |
| Saturated Fat | 7g |
| Carbohydrates | 22g |
| Fiber | 1g |
| Sugar | 0g |
| Protein | 38g |
| Sodium | 520mg |
| Cholesterol | 145mg |
These values are estimates based on standard ingredients and serving sizes. Actual nutrition will vary based on specific brands and preparation methods you use.
Frequently Asked Questions
Can I use chicken thighs instead of breasts?
Yes, boneless, skinless chicken thighs work beautifully and stay juicier than breasts since they have more fat. Pound them slightly thinner and reduce the cooking time by a minute or two per side since they’re typically smaller.
What if the cheese starts leaking while cooking?
A little seepage is normal, but if significant leaking occurs, lower the heat slightly and let the chicken finish cooking more slowly. The cheese inside will still melt, though the lava effect won’t be as dramatic on the plate.
Can I make these ahead of time?
Absolutely; bread the stuffed chicken up to eight hours ahead and refrigerate until you’re ready to cook. You can also freeze uncooked breaded chicken for up to two months, then cook straight from frozen by adding just a few extra minutes to the cooking time.
Why is my chicken dry even though it reached 165 degrees?
Overcooking happens when the pan is too hot or the chicken cooks too long after reaching the target temperature. Use a meat thermometer and remove the chicken as soon as it hits 165 degrees, then let it rest while you’re plating to carry over cooking.
Can I cook this in the oven instead of a skillet?
You can bake it at 375 degrees Fahrenheit for 18 to 22 minutes, but you’ll miss out on that golden, crispy breading that makes the dish special. Consider searing it in a skillet for 3 minutes per side, then finishing in the oven to get the best of both methods.
Final Thoughts
Lava chicken transforms your dinner routine from ordinary to extraordinary with just a few simple steps and ingredients you likely already have. The impressive presentation and satisfied reactions from your family or guests make the minimal extra effort completely worthwhile.
Give this recipe a try this week, and let yourself enjoy that moment when you plate it and that molten cheese center reveals itself. Once you master this technique, you’ll find yourself making it regularly because it’s that good and that easy.
If you enjoyed this recipe, explore more spectacular chicken dishes on our site. Try our bourbon chicken recipe for a sweet and savory flavor profile, or venture into chicken al pastor recipe for a vibrant, spiced twist on poultry that delivers restaurant quality at home.
Lava Chicken
Crispy breaded chicken breasts stuffed with a gooey melting cheese filling that erupts when cut, perfect for an impressive weeknight dinner.
- Sharp chef’s knife
- Cutting board
- Meat mallet or rolling pin
- Large skillet or frying pan
- Meat thermometer
- Shallow bowl for breading
- Paper towels
- Tongs or spatula
Main
- 4 boneless (skinless chicken breasts (about 6 to 8 ounces each))
- 1 cup shredded mozzarella cheese
- 4 tablespoons cream cheese (softened)
- 2 cloves garlic (minced)
- 1 teaspoon Italian seasoning
- Salt and black pepper to taste
- 1 cup all-purpose flour (or gluten-free blend)
- 2 large eggs
- 1 cup panko breadcrumbs
- 3 tablespoons olive oil
- 1 tablespoon butter
- In a small bowl, mix 1 cup shredded mozzarella cheese, 4 tablespoons softened cream cheese, 2 cloves minced garlic, 1 teaspoon Italian seasoning, and salt and pepper to taste until smooth.
- Place each chicken breast on a cutting board and slice horizontally through the thickest part without cutting all the way through to create a pocket.
- Place each butterflied breast between plastic wrap and gently pound with a meat mallet to an even thickness of about 1/2 inch.
- Divide the cheese filling evenly among the four breasts, spooning it into the pocket and leaving a 1/2-inch border to prevent leakage.
- Set up three shallow bowls: one with 1 cup flour, one with 2 beaten eggs (with a splash of water), and one with 1 cup panko breadcrumbs mixed with 1 teaspoon salt.
- Dredge each stuffed breast in flour, shake off excess, dip in the egg mixture, then press firmly into the panko to coat both sides.
- Heat 3 tablespoons olive oil and 1 tablespoon butter in a large skillet over medium-high heat until the butter melts and oil shimmers.
- Cook the chicken breasts for 8 to 10 minutes on the first side without moving to form a golden crust, then flip and cook for another 8 to 10 minutes until the internal temperature reaches 165°F.
- Transfer the chicken to a plate and let rest for 3 to 5 minutes before slicing to allow the cheese to set and juices to redistribute.
Store leftovers in an airtight container in the refrigerator for up to three days; reheat in a 350°F oven for 8 to 10 minutes to retain crispness.