Corn ribs are the viral TikTok sensation that transforms humble corn on the cob into crispy, tender strips that curl up like actual ribs. With just a few simple cuts and your choice of bold seasonings, you can create this showstopping side dish or snack that’s perfect for summer barbecues, game day gatherings, or any time you want to make vegetables feel like the main event.
The magic happens when you quarter corn lengthwise and roast it at high heat, causing the natural starches to caramelize while the strips curl into rib-like shapes. You’ll get addictively crispy edges with a sweet, juicy interior that holds onto whatever flavor profile you throw at it.
Why You’ll Love This Recipe
This recipe turns an ordinary vegetable into an extraordinary experience that even corn skeptics can’t resist. The technique is surprisingly simple once you get the hang of cutting the corn, and the results look incredibly impressive.
- Transforms corn into a fun, interactive eating experience that feels like eating ribs
- Achieves the perfect contrast of crispy caramelized edges and tender, sweet corn
- Works with endless seasoning combinations from smoky barbecue to spicy chili lime
- Naturally vegan and gluten-free without any modifications needed
- Ready in under 30 minutes with minimal hands-on work
My Experience Making This Recipe
The first time I quartered corn lengthwise, I’ll admit I was nervous about the cutting technique. But after the first ear, I found my rhythm and the rest came together quickly.
When I pulled these from the oven, the curled strips looked like they belonged in a restaurant, not my home kitchen. The edges had turned golden and crispy while the corn stayed juicy, and that first bite with the smoky spice rub made me understand why this recipe went viral.
I served them at a backyard cookout and watched grown adults fight over the last few pieces. Nobody could believe they were just corn, and three people asked for the recipe before the night ended.
Recipe Overview
- Recipe Name: Corn Ribs
- Servings: 4
- Prep Time: 10 minutes
- Cook Time: 18 minutes
- Total Time: 28 minutes
- Course: Side Dish, Appetizer
- Cuisine: American, Fusion
- Calories per Serving: 165
Equipment You Will Need
- Sharp chef’s knife or cleaver
- Stable cutting board with damp towel underneath
- Large baking sheet
- Parchment paper or silicone baking mat
- Small mixing bowl for seasoning blend
- Pastry brush or silicone brush
- Tongs for flipping
Ingredients for Corn Ribs
- 4 ears of fresh corn, husks and silk removed
- 3 tablespoons olive oil or melted butter
- 2 teaspoons smoked paprika
- 1 teaspoon garlic powder
- 1 teaspoon onion powder
- 1 teaspoon brown sugar
- 1/2 teaspoon cayenne pepper
- 1 teaspoon kosher salt
- 1/2 teaspoon black pepper
- Fresh lime wedges for serving
- Chopped fresh cilantro for garnish (optional)
Ingredient Notes and Substitutions
- Fresh corn: The natural sugars create the best caramelization and the kernels stay plump and juicy. Frozen corn won’t work for this recipe since you need the intact cob structure.
- Olive oil: Helps the seasonings stick and promotes crispy edges through high-heat roasting. Swap with melted coconut oil or avocado oil for different flavor profiles.
- Smoked paprika: Provides the smoky barbecue flavor that makes these taste like actual ribs. Regular paprika works but you’ll lose that depth, or use chipotle powder for extra heat.
- Brown sugar: Balances the spices and helps with caramelization for those crispy bits. Coconut sugar or regular white sugar work equally well.
- Cayenne pepper: Adds a subtle kick without overwhelming the sweet corn flavor. Reduce to 1/4 teaspoon for mild heat or omit completely for kid-friendly versions.
How to Make Corn Ribs
Step 1: Prepare the Corn
Preheat your oven to 400°F and line a large baking sheet with parchment paper. Remove all husks and silk from the corn, then rinse and pat the ears completely dry.
Moisture will prevent proper crisping, so make sure each ear is thoroughly dried before moving to the next step. A dry surface also helps the oil and seasonings adhere better.
Step 2: Cut the Corn Lengthwise
Stand one ear of corn upright on your cutting board with the wider end down. Using a sharp chef’s knife, carefully cut straight down through the center of the cob to halve it lengthwise.
Place each half cut-side down for stability, then cut each piece in half again lengthwise to create four long quarters from each ear. This cutting technique exposes the interior of the cob, which allows the strips to curl during roasting.
Step 3: Make the Seasoning Blend
In a small bowl, combine the smoked paprika, garlic powder, onion powder, brown sugar, cayenne pepper, salt, and black pepper. Mix thoroughly until no clumps of sugar remain and the spices are evenly distributed.
Creating a uniform blend beforehand prevents uneven seasoning and ensures every corn rib gets the same flavor coverage. You want each bite to deliver that perfect smoky-sweet-spicy balance.
Step 4: Season the Corn Ribs
Arrange all corn quarters on the prepared baking sheet with the cut sides facing up. Brush each piece generously with olive oil, making sure to coat all surfaces including the curved outer side.
Sprinkle the seasoning blend evenly over all the corn pieces, using your fingers to pat the spices into the kernels so they stick. The oil acts as glue, so be generous with it for maximum flavor adhesion.
Step 5: First Roast
Place the baking sheet on the middle rack of your preheated oven and roast for 10 minutes. During this time, the corn will start to release moisture and the seasonings will begin to toast and become fragrant.
The high heat starts the caramelization process that creates those irresistible crispy edges. Resist opening the oven door during this phase to maintain consistent temperature.
Step 6: Flip and Continue Roasting
Remove the baking sheet from the oven and use tongs to carefully flip each corn rib to expose the other cut side. You’ll notice the pieces have started to curl slightly, which is exactly what you want.
Return the pan to the oven and roast for an additional 8 minutes until the edges turn golden brown and crispy. The corn should be tender when pierced with a fork but still have some bite.
Step 7: Optional Broil for Extra Crispiness
If you want maximum crispiness and char, switch your oven to broil for the final 1 to 2 minutes. Watch closely because the sugars can burn quickly under the broiler.
This step creates those restaurant-quality charred spots that add visual appeal and a slight smokiness. Pull them out as soon as you see dark golden edges forming.
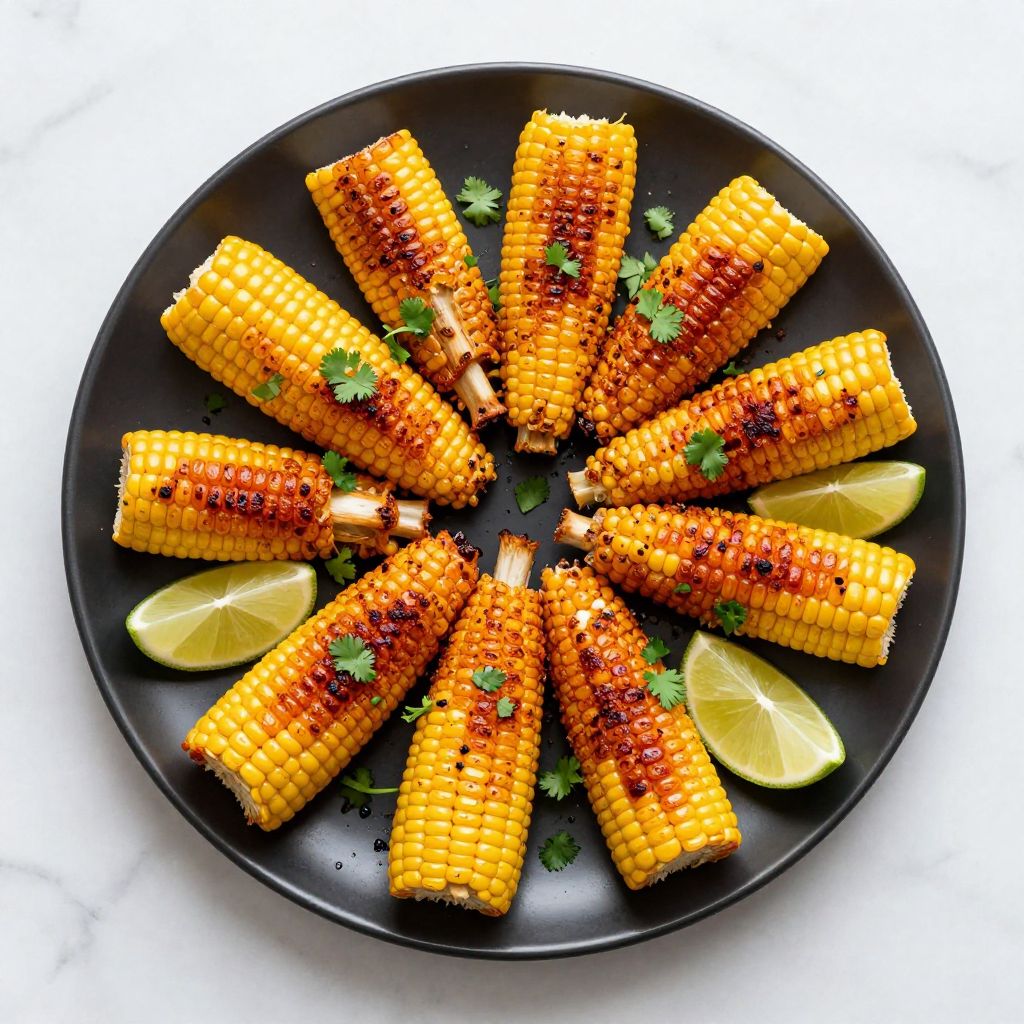
Step 8: Garnish and Serve
Transfer the corn ribs to a serving platter while they’re still hot. Squeeze fresh lime juice over the top and sprinkle with chopped cilantro if using.
The lime’s acidity cuts through the richness and brightens all the spices, making each bite more dynamic. Serve immediately while the edges are at their crispiest for the best texture experience.
Pro Tip: The key to perfectly curled corn ribs is cutting exactly through the center of the cob. If your cuts are off-center, the pieces won’t curl as dramatically, so take your time with the knife work and make sure each quarter is as even as possible.
Tips for the Best Corn Ribs
- Choose fresh corn with tight, plump kernels for the juiciest results. Older corn with shriveled kernels will be dry and starchy.
- Let the corn come to room temperature before cutting and seasoning. Cold corn straight from the fridge won’t absorb the oil and seasonings as effectively.
- Don’t overcrowd the baking sheet or the corn will steam instead of roast. Use two pans if needed to give each piece breathing room.
- Apply more oil than you think you need. The oil is what creates those crispy, caramelized edges everyone loves.
- Taste your seasoning blend before applying it to adjust the salt or heat level. Every brand of spices has different potency.
- Flip the corn ribs only once during cooking to develop a good crust. Too much flipping prevents proper browning.
Common Mistakes to Avoid
- Cutting the corn while it’s wet causes the knife to slip and makes dangerous cutting more likely. Always dry thoroughly first.
- Using a dull knife requires more pressure and increases the chance of the knife slipping off the round corn surface. Sharpen your blade before starting.
- Skipping the parchment paper leads to stuck-on corn that’s impossible to remove cleanly. The sugars caramelize and glue everything down.
- Setting the oven temperature too low results in steamed corn instead of roasted, and you’ll miss out on those crispy edges. High heat is non-negotiable.
- Pulling the corn ribs too early means they haven’t had time to curl and crisp properly. Wait for visible golden edges before removing them.
Serving Suggestions
These corn ribs work beautifully as a side dish for barbecue mains or as a standalone snack with dipping sauces. Their finger-food nature makes them perfect for casual gatherings where guests can grab and go.
- Serve alongside pulled pork sandwiches and coleslaw for a complete barbecue spread
- Pair with grilled chicken or steak and a fresh summer salad
- Offer with dipping sauces like chipotle mayo, ranch, or garlic aioli
- Add to a vegetarian platter with black bean burgers and grilled vegetables
- Serve as an appetizer before tacos or fajitas with extra lime wedges
Variations to Try
- Elote Style: Skip the dry rub and brush the roasted corn ribs with mayo, then sprinkle with cotija cheese, chili powder, and lime juice for Mexican street corn flavor.
- Buffalo Style: Toss the hot corn ribs with melted butter and hot sauce, then serve with blue cheese dressing for a spicy kick.
- Herb Butter: Replace the spice rub with a mixture of melted butter, minced garlic, fresh thyme, and parsley for an elegant, subtle flavor.
- Asian-Inspired: Brush with sesame oil and sprinkle with Chinese five-spice, then garnish with sesame seeds and sliced scallions after roasting.
- Parmesan Garlic: Toss the roasted corn ribs with grated Parmesan, garlic powder, and fresh parsley for an Italian twist.
Dietary Adaptations
- Gluten-Free: This recipe is naturally gluten-free as written. Just verify your spice blends don’t contain any hidden gluten-containing additives or anti-caking agents.
- Dairy-Free: The recipe uses olive oil instead of butter, making it completely dairy-free. Avoid the Parmesan variation unless using dairy-free cheese alternatives.
- Vegan: Already vegan-friendly when using olive oil. All the seasonings and the corn itself are plant-based with no modifications needed.
- Low-Carb/Keto: Corn is higher in carbs, so this recipe doesn’t fit strict keto macros. You can reduce the brown sugar to 1/2 teaspoon to lower the carb count slightly while maintaining caramelization.
Storage and Reheating
Refrigerator
Store leftover corn ribs in an airtight container in the refrigerator for up to 3 days. Place a paper towel in the container to absorb excess moisture and prevent sogginess.
- Let the corn ribs cool completely before storing to prevent condensation
- Separate layers with parchment paper if stacking to prevent sticking
Freezer
Freezing is not recommended for this recipe. The corn’s texture becomes mushy and mealy after thawing, and you’ll lose all that crispy exterior you worked to create.
- If you must freeze, do so before roasting rather than after
- Frozen roasted corn ribs will never regain their original texture
Reheating
Reheat corn ribs in a 375°F oven for 5 to 7 minutes to restore some crispiness. The microwave will make them soggy and chewy, so avoid that method.
- Place on a wire rack over a baking sheet for air circulation
- A quick broil for the last minute can help recrisp the edges
Nutrition Information
| Nutrient | Amount |
|---|---|
| Calories | 165 |
| Total Fat | 11g |
| Saturated Fat | 2g |
| Carbohydrates | 18g |
| Fiber | 2g |
| Sugar | 5g |
| Protein | 3g |
| Sodium | 490mg |
| Cholesterol | 0mg |
Nutritional values are approximate and will vary based on specific brands of ingredients used and exact measurements. Fresh corn naturally contains vitamins A and C along with beneficial antioxidants.
Frequently Asked Questions
Can I use frozen corn for this recipe?
No, frozen corn won’t work because you need the intact cob structure for cutting and curling. Frozen corn is already removed from the cob, so there’s no way to create the rib shape that makes this recipe special.
Can I make corn ribs ahead of time?
You can cut and season the corn up to 4 hours ahead, storing them covered in the refrigerator until ready to roast. However, the final roasting should happen right before serving for the best crispy texture.
Why didn’t my corn ribs curl?
Curling happens when you cut directly through the center of the cob, exposing the pith. If your cuts were off-center or the corn was too old and dried out, the pieces won’t curl as dramatically.
Can I grill corn ribs instead of roasting them?
Yes, place the seasoned corn ribs on a preheated grill over medium-high heat for 3 to 4 minutes per side. The direct heat creates excellent char, though you’ll need to watch them closely to prevent burning.
How do I know when the corn ribs are done?
Look for golden brown, crispy edges and a slight curl to the corn strips. The kernels should be tender when pierced with a fork but still have a bit of bite, not mushy.
Can I use sweet corn or regular field corn?
Always use sweet corn, which is the standard corn sold in grocery stores for eating fresh. Field corn is starchy and tough, meant for animal feed or processing, and won’t give you the sweet, tender results you want.
What’s the best way to cut corn safely?
Place a damp towel under your cutting board to prevent slipping, use a sharp knife, and keep your guide hand well away from the blade path. Some people find standing the corn in a bundt pan hole helps stabilize it during cutting.
Final Thoughts
Corn ribs prove that sometimes the simplest ingredients become the most memorable dishes with just a creative technique and bold seasonings. This recipe turns everyday corn into something that looks impressive, tastes incredible, and disappears faster than you can make it.
Give this viral sensation a try at your next gathering and watch as people reach for seconds and thirds. Once you master the cutting technique, you’ll find yourself making these corn ribs all summer long.
Corn Ribs
Ingredients
Equipment
Method
- Preheat your oven to 400°F and line a large baking sheet with parchment paper. Remove all husks and silk from the corn, then rinse and pat the ears completely dry.
- Stand one ear of corn upright on your cutting board with the wider end down. Using a sharp chef's knife, carefully cut straight down through the center of the cob to halve it lengthwise.
- Place each half cut-side down for stability, then cut each piece in half again lengthwise to create four long quarters from each ear. Repeat with remaining corn.
- In a small bowl, combine the smoked paprika, garlic powder, onion powder, brown sugar, cayenne pepper, salt, and black pepper. Mix thoroughly until no clumps of sugar remain and the spices are evenly distributed.
- Arrange all corn quarters on the prepared baking sheet with the cut sides facing up. Brush each piece generously with olive oil, making sure to coat all surfaces including the curved outer side.
- Sprinkle the seasoning blend evenly over all the corn pieces, using your fingers to pat the spices into the kernels so they stick.
- Place the baking sheet on the middle rack of your preheated oven and roast for 10 minutes.
- Remove the baking sheet from the oven and use tongs to carefully flip each corn rib to expose the other cut side.
- Return the pan to the oven and roast for an additional 8 minutes until the edges turn golden brown and crispy.
- Optional: Switch your oven to broil for the final 1 to 2 minutes for extra crispiness. Watch closely because the sugars can burn quickly.
- Transfer the corn ribs to a serving platter while they're still hot. Squeeze fresh lime juice over the top and sprinkle with chopped cilantro if using. Serve immediately.


