Rasta pasta brings the heat of Jamaican jerk seasoning together with creamy, cheesy comfort in a single skillet. This dish delivers bold flavors that wake up your taste buds while still being approachable enough for a weeknight dinner.
If you have been searching for a pasta recipe that breaks the routine, this one earns its spot in your regular rotation. Let me walk you through exactly how to make it right.
What Makes This Recipe Worth Your Time
This rasta pasta stands apart because it balances authentic Jamaican spice with a rich, velvety sauce that coats every strand of penne perfectly. You get restaurant quality without the restaurant price or the mystery ingredients.
- Ready in under 40 minutes from cutting board to table, making it realistic for busy nights
- One skillet cleanup because nobody wants to wash six pots after dinner
- Adjustable heat level so you can dial it up for adults or down for kids
- Protein packed with seasoned chicken that stays juicy in the creamy sauce
- Vibrant bell peppers add sweetness and crunch that cuts through the richness
A Little Background on This Dish
Rasta pasta emerged from the fusion of Caribbean and Italian cuisines, likely in Jamaican restaurants catering to tourists who wanted familiar comfort food with local flair. The dish takes traditional jerk seasoning, which originated with the Maroons of Jamaica, and marries it with Italian cream sauce techniques.
The name comes from the Rastafarian colors of red, gold, and green, represented by the bell peppers that define the dish visually. What started as a clever restaurant creation has become a beloved staple that home cooks across the world now claim as their own.
My Experience With This Recipe
I first made rasta pasta after my wife ordered it at a Caribbean spot downtown and could not stop talking about it for three days straight. I figured anything that memorable deserved a place in our home kitchen.
My early attempts were disasters. I burned the jerk seasoning twice, turned the sauce into a broken, greasy mess once, and somehow managed to overcook the chicken into rubber on what should have been an easy Tuesday dinner.
The night I finally nailed it, the kitchen smelled like a proper jerk shack and my kids asked for seconds before I even sat down. That moment of triumph made every failed batch worth the learning curve.
Before You Start: Key Things to Know
This recipe suits intermediate home cooks, though beginners can handle it with careful attention to the sauce stage. The biggest challenge is building the cream sauce without breaking it or scorching the fond.
- Difficulty level: Moderate, with one technique that requires close attention
- Active time vs passive time: About 25 minutes active, 10 minutes passive while pasta boils
- Most important equipment: A large, heavy bottomed skillet that holds heat evenly
- Step requiring most attention: Building the cream sauce after deglazing the pan
Recipe at a Glance
- Recipe Name: Rasta Pasta
- Yield: 4 servings
- Prep Time: 15 minutes
- Cook Time: 22 minutes
- Total Time: 37 minutes
- Resting Time: 3 minutes before serving
- Difficulty: Moderate
- Course: Main Dish
- Cuisine: Caribbean Fusion
- Calories per Serving: 685
How to Source the Best Ingredients
The jerk seasoning and the bell peppers carry this dish, so cutting corners on either will show in the final result. Quality chicken and fresh produce make the difference between good and memorable.
- Jerk seasoning: Look for brands listing scotch bonnet or habanero peppers, allspice, and thyme as primary ingredients; avoid blends where salt is listed first
- Bell peppers: Choose firm peppers with taut, glossy skin and no wrinkles; the stems should look freshly cut, not dried out
- Chicken breast: Buy chicken that is pink, not gray, with no off smell; air chilled chicken has better texture than water chilled
- Heavy cream: Use cream with at least 36% fat content for a sauce that thickens properly without separating
- Parmesan cheese: Buy a wedge and grate it yourself; the pre shredded stuff contains anti caking agents that make sauces grainy
Ingredients for Rasta Pasta
For the Chicken
- 1.5 pounds boneless skinless chicken breast, sliced into thin strips
- 2 tablespoons jerk seasoning
- 1 tablespoon olive oil
- 1/2 teaspoon kosher salt
For the Sauce and Pasta
- 12 ounces penne pasta
- 1 red bell pepper, sliced into thin strips
- 1 yellow bell pepper, sliced into thin strips
- 1 green bell pepper, sliced into thin strips
- 4 cloves garlic, minced
- 1.5 cups heavy cream
- 1/2 cup chicken broth
- 1 cup parmesan cheese, freshly grated
- 1 teaspoon smoked paprika
- 1/2 teaspoon black pepper
- 2 green onions, sliced for garnish
- Fresh thyme, 4 sprigs
Smart Substitutions and Swaps
- Jerk seasoning: This blend provides the signature heat and allspice flavor; substitute with a mix of 1 teaspoon allspice, 1/2 teaspoon cayenne, 1/2 teaspoon thyme, and 1/4 teaspoon cinnamon, but expect a less complex result
- Heavy cream: The fat content creates the silky sauce texture; substitute with full fat coconut cream for a dairy free version that adds subtle sweetness
- Chicken breast: Provides lean protein that absorbs the jerk seasoning well; substitute with chicken thighs for juicier meat, reducing cook time by 2 minutes
- Penne pasta: The ridges catch the creamy sauce perfectly; substitute with rigatoni or fusilli, but avoid long pasta shapes that do not hold sauce as well
- Parmesan cheese: Adds salty depth and helps thicken the sauce; substitute with pecorino romano for a sharper flavor or nutritional yeast for a dairy free option
- Bell peppers: Provide the signature tri color appearance and sweet crunch; substitute with one color if needed, but the visual appeal suffers
Tools and Equipment You Will Need
Having everything ready before you start prevents the scramble that leads to burned garlic and overcooked chicken. Mise en place is not just a fancy term; it saves dinner.
- Large 12 inch skillet with high sides (essential for building the sauce in the same pan as the chicken)
- Large pot for boiling pasta
- Sharp chef’s knife
- Cutting board
- Microplane or fine grater (freshly grated parmesan melts smoothly)
- Tongs for handling chicken and tossing pasta
- Wooden spoon for scraping fond
- Colander
- Measuring cups and spoons
How to Make Rasta Pasta
Read through all the steps before you start, then prep your ingredients completely. The chicken should be sliced and seasoned, peppers cut, garlic minced, and cheese grated before you turn on any heat.
Step 1: Season the Chicken
Place the sliced chicken strips in a bowl and add the jerk seasoning, salt, and a drizzle of olive oil. Use your hands to coat every piece evenly, working the seasoning into all surfaces.
Marinating allows the spices to penetrate the meat and builds flavor from the inside out rather than just on the surface. The oil helps the seasoning adhere and promotes better browning.
The chicken should look evenly coated with no dry white patches visible. Let it sit at room temperature for 10 minutes while you prep other ingredients.
Step 2: Start the Pasta Water
Fill a large pot with water, add enough salt to make it taste like the sea, and bring it to a rolling boil over high heat. You need about 4 quarts of water for 12 ounces of pasta.
Salted pasta water seasons the pasta from within, which matters more than most people realize. Undersalted pasta tastes flat no matter how good your sauce is.
The water should bubble vigorously when you test a drop on the surface. Keep it at a simmer with the lid ajar until you are ready to cook the pasta.
Step 3: Sear the Chicken
Heat the large skillet over medium high heat until a drop of water sizzles and evaporates immediately. Add one tablespoon of olive oil and swirl to coat, then add the chicken in a single layer without crowding.
High heat creates the Maillard reaction, which gives the chicken a caramelized crust and deep flavor. Crowding the pan drops the temperature and causes steaming instead of searing.
The chicken is ready to flip when it releases easily from the pan and has golden brown spots. Cook 3 to 4 minutes per side until cooked through, then transfer to a plate.
Step 4: Cook the Pasta
Drop the penne into the boiling water and stir immediately to prevent sticking. Set a timer for one minute less than the package directions to ensure al dente texture.
Slightly undercooking the pasta allows it to finish in the sauce, where it absorbs flavor and reaches the perfect texture. Mushy pasta cannot be fixed, so err on the side of firmness.
Test a piece by biting through it; you should see a thin white line in the center. Reserve one cup of pasta water before draining.
Step 5: Sauté the Peppers
Return the skillet to medium heat. Add a splash of oil if the pan looks dry, then add all the sliced bell peppers. Spread them in an even layer and let them cook without stirring for 2 minutes.
Allowing the peppers to sit develops char and sweetness through caramelization. Constant stirring prevents this and leaves you with steamed, soggy peppers.
Listen for the sizzle to remain consistent. The peppers should have some blackened edges but still hold their shape and have a slight crunch when you bite one.
Step 6: Add the Garlic
Push the peppers to the edges of the pan and add the minced garlic to the center. Let it cook for 30 to 45 seconds, stirring constantly to prevent burning.
Garlic burns quickly and turns bitter, but it needs direct heat to release its aromatic oils. The brief cook time activates flavor without crossing into acrid territory.
The garlic is ready when it turns fragrant and just barely golden. If you see dark brown spots, you have gone too far; start over with fresh garlic.
Step 7: Deglaze the Pan
Pour the chicken broth into the hot skillet and use a wooden spoon to scrape up all the browned bits stuck to the bottom. Let the liquid simmer and reduce by about half.
Those browned bits, called fond, contain concentrated flavor from the chicken and peppers. Deglazing captures all of it and builds the foundation of your sauce.
The liquid should go from thin and watery to slightly thickened and glossy. This takes about 2 minutes of active simmering.
Step 8: Build the Cream Sauce
Reduce the heat to medium low and pour in the heavy cream. Add the smoked paprika, black pepper, and thyme sprigs. Stir to combine and let the sauce simmer gently for 4 to 5 minutes.
Low heat prevents the cream from breaking, which happens when fat separates from liquid and leaves you with a greasy, curdled mess. Patience here pays off in texture.
The sauce should coat the back of a spoon and leave a clear trail when you drag your finger through it. Small bubbles around the edges are fine; a rolling boil is not.
Step 9: Add the Parmesan
Remove the pan from heat and add the grated parmesan cheese in three additions, stirring constantly after each addition until fully melted. Work quickly to incorporate the cheese smoothly.
Adding cheese off heat and in batches prevents it from clumping or turning stringy. The residual heat melts the cheese without overheating the proteins that cause graininess.
The sauce should look smooth, creamy, and uniform with no visible cheese clumps. It will thicken slightly as the cheese melts in.
Step 10: Combine Chicken, Pasta, and Sauce
Return the chicken and any accumulated juices to the skillet. Add the drained pasta and toss everything together using tongs, lifting and folding to coat every piece evenly.
Tossing rather than stirring distributes the sauce without breaking up the peppers or shredding the chicken. The motion also helps the pasta absorb the sauce.
Every strand of pasta should be visibly coated with the creamy sauce. If the mixture looks too thick, add reserved pasta water one tablespoon at a time.
Step 11: Adjust Seasoning and Consistency
Taste the pasta and add salt if needed; the parmesan and jerk seasoning contribute salt, so you may not need much. Adjust the heat with a pinch more jerk seasoning if desired.
Tasting and adjusting at the end is the mark of a thoughtful cook. Seasoning needs change based on specific ingredient brands and personal preference.
The sauce should cling to the pasta without pooling at the bottom of the pan. If it tightens up too much, another splash of pasta water brings it back.
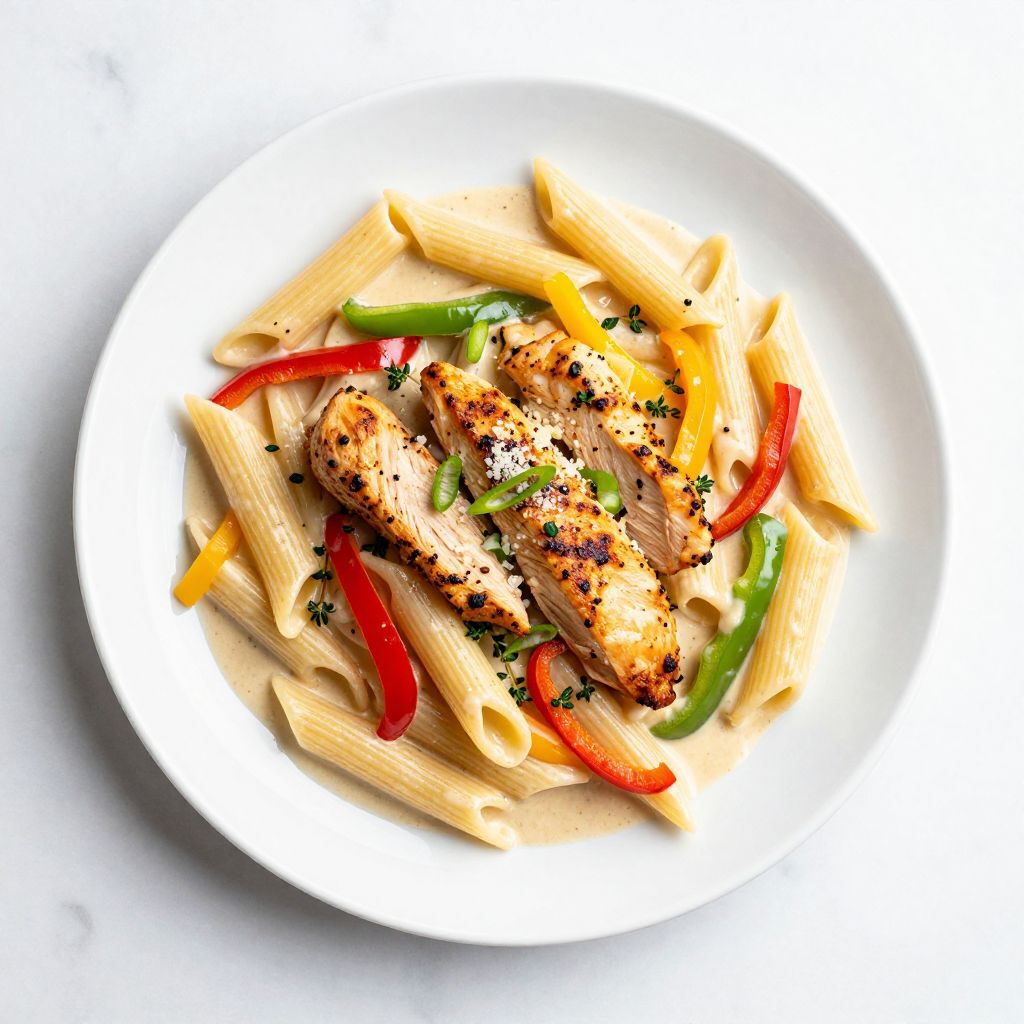
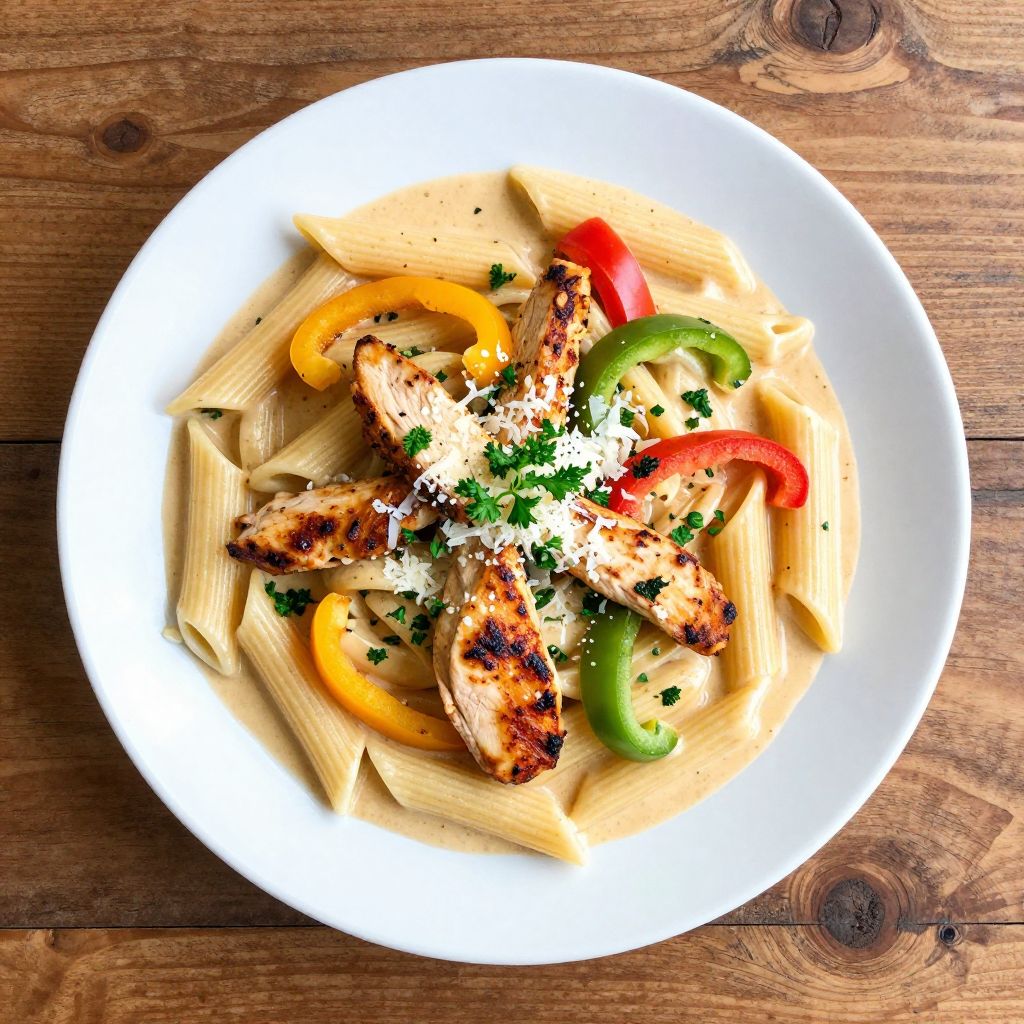
Step 12: Garnish and Serve
Remove the thyme sprigs and transfer the pasta to a serving dish or individual plates. Top with sliced green onions and an extra sprinkle of parmesan if desired.
Serving immediately matters because the sauce continues to thicken as it cools. The dish is best enjoyed within minutes of finishing.
The finished rasta pasta should have vibrant color from the peppers, a glossy sauce that clings without dripping, and a spicy, creamy aroma that makes everyone lean in.
Pro Tip: Save a ladle of pasta water before draining; it contains starch that rescues a sauce that has thickened too much or helps cheese melt more smoothly into the cream.
The Science Behind the Technique
The cream sauce relies on emulsification, where fat from the cream and cheese suspends evenly in the liquid rather than separating. Low heat and gradual additions keep this emulsion stable, which is why patience at the sauce stage matters so much.
The starch from the reserved pasta water acts as an additional emulsifier, helping bind the fat and liquid together. This is the same principle that makes a proper carbonara silky rather than scrambled.
Chef Note: If your sauce ever breaks and looks greasy, whisk in an ice cube over low heat; the sudden temperature drop and added water can sometimes rescue the emulsion.
Tips for Getting It Right Every Time
- Slice chicken uniformly so every piece cooks at the same rate and finishes at the same time
- Preheat your skillet fully before adding oil; a properly heated pan prevents sticking and ensures proper searing
- Remove the pan from heat before adding cheese to prevent graininess from overheated proteins
- Reserve pasta water before draining; forgetting this step leaves you without your best rescue tool
- Taste before serving because jerk seasoning brands vary wildly in salt and heat levels
- Work quickly once the pasta hits the sauce because the dish is best served immediately while the sauce is fluid
Mistakes That Will Ruin Your Dish
- Crowding the pan with chicken causes steaming instead of searing, leaving you with gray, rubbery meat without caramelization
- Boiling the cream sauce breaks the emulsion and creates a greasy, separated mess that cannot be fixed
- Overcooking the pasta results in mushy noodles that fall apart when tossed and cannot absorb the sauce properly
- Adding cheese over high heat causes proteins to seize and clump, leaving grainy, stringy patches in your sauce
- Skipping the fond by not deglazing means losing concentrated flavor that builds the sauce’s depth
Make Ahead and Meal Prep Tips
This dish tastes best fresh, but components can be prepped ahead to make weeknight cooking faster. The sauce does not reheat perfectly, so focus on front loading the prep work.
- Chicken: Slice and season up to 24 hours ahead; store covered in the refrigerator and bring to room temperature before cooking
- Bell peppers: Slice up to 2 days ahead and store in an airtight container with a paper towel to absorb moisture
- Parmesan: Grate up to 3 days ahead and store in a sealed container in the refrigerator
- Complete dish: Cook fully and store in portions; reheat gently with a splash of cream to restore sauce texture
What to Serve With Rasta Pasta
This dish works beautifully as a casual weeknight meal or as the centerpiece of a dinner party with Caribbean flair. The rich, spicy pasta pairs best with lighter sides that offer contrast.
- Garlic bread: The crispy, buttery texture provides a perfect vehicle for scooping up extra sauce
- Simple green salad: Lightly dressed greens with citrus vinaigrette cut through the richness of the cream sauce
- Roasted plantains: Sweet caramelized plantains echo the Caribbean roots and complement the jerk spices
- Steamed broccoli: The mild, fresh flavor balances the bold spices without competing for attention
- Fried festival dumplings: These slightly sweet Jamaican fritters make the meal feel like an authentic island experience
Drink Pairings
A crisp, slightly sweet Riesling handles the heat from the jerk seasoning while complementing the cream sauce’s richness. The wine’s acidity cuts through the fat without being overwhelmed by the spice.
- Wine: Off dry Riesling or Gewürztraminer, with enough sweetness to balance spice and enough acidity to refresh the palate
- Beer: Jamaican lager like Red Stripe, with its light body and clean finish that cleanses the palate between bites
- Non alcoholic: Ginger beer, where the spicy ginger echoes the jerk heat while carbonation refreshes
- Hot drink: Jamaican Blue Mountain coffee after the meal, with its smooth, low acid profile that complements the lingering spice
Flavour Variations Worth Trying
- Shrimp rasta pasta: Replace chicken with large shrimp, searing for just 2 minutes per side. The seafood version feels lighter and cooks even faster.
- Extra spicy version: Add one diced scotch bonnet pepper with the garlic for authentic Jamaican heat. Wear gloves when handling and start with half if you are unsure of your tolerance.
- Coconut cream variation: Replace heavy cream with full fat coconut cream for dairy free richness. The coconut adds subtle sweetness that pairs beautifully with jerk spices.
- Smoked chicken twist: Use leftover smoked chicken or add liquid smoke to the sauce. The smokiness amplifies the jerk seasoning’s depth.
- Vegetarian version: Replace chicken with firm tofu, pressed and cubed, seared until crispy on all sides. Season the tofu generously as it absorbs less than chicken.
How to Adapt This Recipe for Your Diet
- Gluten free: Use gluten free penne made from rice or chickpeas; the sauce is naturally gluten free, just verify your jerk seasoning contains no wheat fillers
- Dairy free: Replace heavy cream with full fat coconut cream and use nutritional yeast instead of parmesan; the sauce will be slightly thinner but still flavorful
- Vegetarian: Substitute chicken with extra firm tofu or chickpeas; press tofu for 20 minutes first and increase jerk seasoning by half
- Low carb or keto: Replace penne with zucchini noodles or hearts of palm pasta; add noodles at the very end and do not overcook
- High protein: Increase chicken to 2 pounds and add a quarter cup of Greek yogurt to the finished sauce for an extra protein boost
How to Store and Reheat
In the Refrigerator
Transfer cooled pasta to an airtight container and press plastic wrap directly onto the surface to prevent a skin from forming. Store for up to 3 days.
- Divide into individual portions for easier reheating and portion control
- Store sauce and pasta together; separating them makes recombining difficult
In the Freezer
This dish freezes acceptably but the peppers lose some crunch. Store in freezer safe containers for up to 2 months.
- Cool completely before freezing to prevent ice crystals from forming
- Leave half an inch of headspace as the sauce expands when frozen
Reheating
The stovetop method preserves texture best; use low heat and add liquid to restore the sauce. Rushing the reheat results in separated sauce and rubbery chicken.
- Oven reheating: Cover with foil and heat at 325 degrees for 15 to 20 minutes, adding a splash of cream before covering
- Stovetop reheating: Warm in a skillet over low heat with 2 tablespoons of cream or broth, stirring frequently until heated through
- Microwave reheating: Use 50% power in 1 minute intervals, stirring between each; acceptable for speed but sauce may separate slightly
Cost Breakdown
Making rasta pasta at home costs a fraction of restaurant prices while letting you control ingredients and portion sizes. The jerk seasoning and parmesan represent the biggest investments but last for multiple batches.
| Ingredient | Estimated Cost |
|---|---|
| Chicken breast (1.5 lbs) | $6.00 |
| Penne pasta (12 oz) | $1.50 |
| Bell peppers (3) | $3.00 |
| Heavy cream (1.5 cups) | $2.25 |
| Parmesan cheese (1 cup) | $3.00 |
| Jerk seasoning and other spices | $1.25 |
| Total Per Serving | $4.25 |
Nutrition Information
| Nutrient | Amount |
|---|---|
| Calories | 685 |
| Total Fat | 32g |
| Saturated Fat | 17g |
| Trans Fat | 0g |
| Cholesterol | 145mg |
| Sodium | 680mg |
| Total Carbohydrates | 52g |
| Dietary Fiber | 4g |
| Total Sugars | 6g |
| Added Sugars | 0g |
| Protein | 45g |
| Vitamin D | 1mcg |
| Calcium | 285mg |
| Iron | 3mg |
| Potassium | 620mg |
Nutritional values are estimates based on standard ingredients and may vary depending on specific brands, ingredient substitutions, and portion sizes used.
Frequently Asked Questions
Can I use store bought jerk marinade instead of dry jerk seasoning?
Yes, but reduce the amount by half since marinades are more concentrated. Pat the chicken dry before searing to ensure proper browning.
Can I make the sauce ahead of time?
The sauce does not hold well and should be made fresh. You can prep all ingredients ahead and assemble quickly when ready to cook.
How long does leftover rasta pasta last in the refrigerator?
Properly stored, it lasts 3 to 4 days. The texture changes slightly as the pasta absorbs sauce, but it reheats well with added cream.
Why did my cream sauce break and look greasy?
The heat was too high, causing the fat to separate from the liquid. Next time, reduce heat to medium low and add cheese off the heat entirely.
Can I double this recipe for a larger crowd?
Yes, but sear the chicken in batches to avoid crowding. Use a larger skillet or cook the sauce in a Dutch oven to accommodate the increased volume.
What if my jerk seasoning is too spicy for my family?
Start with half the amount and taste before adding more. The cream mellows the heat significantly, so the finished dish will be milder than the raw seasoning suggests.
Can I use a different pasta shape?
Rigatoni, fusilli, or farfalle all work well because their shapes hold sauce. Avoid long pasta like spaghetti, which does not capture the chunky sauce as effectively.
My Final Word
This rasta pasta brings together the bold, aromatic punch of jerk seasoning with the comfort of a creamy pasta dish in a way that just works. The colors pop, the flavors sing, and the whole thing comes together faster than ordering takeout.
I have made this recipe dozens of times now, tweaking and testing until every step was reliable. Give it a shot and make it your own by adjusting the heat to your family’s preference.
If you try this recipe, I would love to hear how it turned out. Drop a comment below or tag us on social media with your finished dish.
Rasta Pasta
Ingredients
Equipment
Method
- Place the sliced chicken strips in a bowl and add the jerk seasoning, salt, and a drizzle of olive oil. Use your hands to coat every piece evenly, working the seasoning into all surfaces. Let it sit at room temperature for 10 minutes while you prep other ingredients.
- Fill a large pot with about 4 quarts of water, add enough salt to make it taste like the sea, and bring it to a rolling boil over high heat.
- Heat the large skillet over medium high heat until a drop of water sizzles and evaporates immediately. Add one tablespoon of olive oil and swirl to coat, then add the chicken in a single layer without crowding. Cook 3 to 4 minutes per side until cooked through and golden brown, then transfer to a plate.
- Drop the penne into the boiling water and stir immediately to prevent sticking. Cook for one minute less than package directions for al dente texture. Reserve one cup of pasta water before draining.
- Return the skillet to medium heat. Add a splash of oil if the pan looks dry, then add all the sliced bell peppers. Spread them in an even layer and let them cook without stirring for 2 minutes until they have some blackened edges but still hold their shape.
- Push the peppers to the edges of the pan and add the minced garlic to the center. Cook for 30 to 45 seconds, stirring constantly until fragrant and just barely golden.
- Pour the chicken broth into the hot skillet and use a wooden spoon to scrape up all the browned bits stuck to the bottom. Let the liquid simmer and reduce by about half, approximately 2 minutes.
- Reduce the heat to medium low and pour in the heavy cream. Add the smoked paprika, black pepper, and thyme sprigs. Stir to combine and let the sauce simmer gently for 4 to 5 minutes until it coats the back of a spoon.
- Remove the pan from heat and add the grated parmesan cheese in three additions, stirring constantly after each addition until fully melted and the sauce is smooth and creamy.
- Return the chicken and any accumulated juices to the skillet. Add the drained pasta and toss everything together using tongs, lifting and folding to coat every piece evenly. If the mixture looks too thick, add reserved pasta water one tablespoon at a time.
- Taste the pasta and adjust salt and heat with additional jerk seasoning if needed. The sauce should cling to the pasta without pooling at the bottom.
- Remove the thyme sprigs and transfer the pasta to a serving dish. Top with sliced green onions and an extra sprinkle of parmesan if desired. Serve immediately.