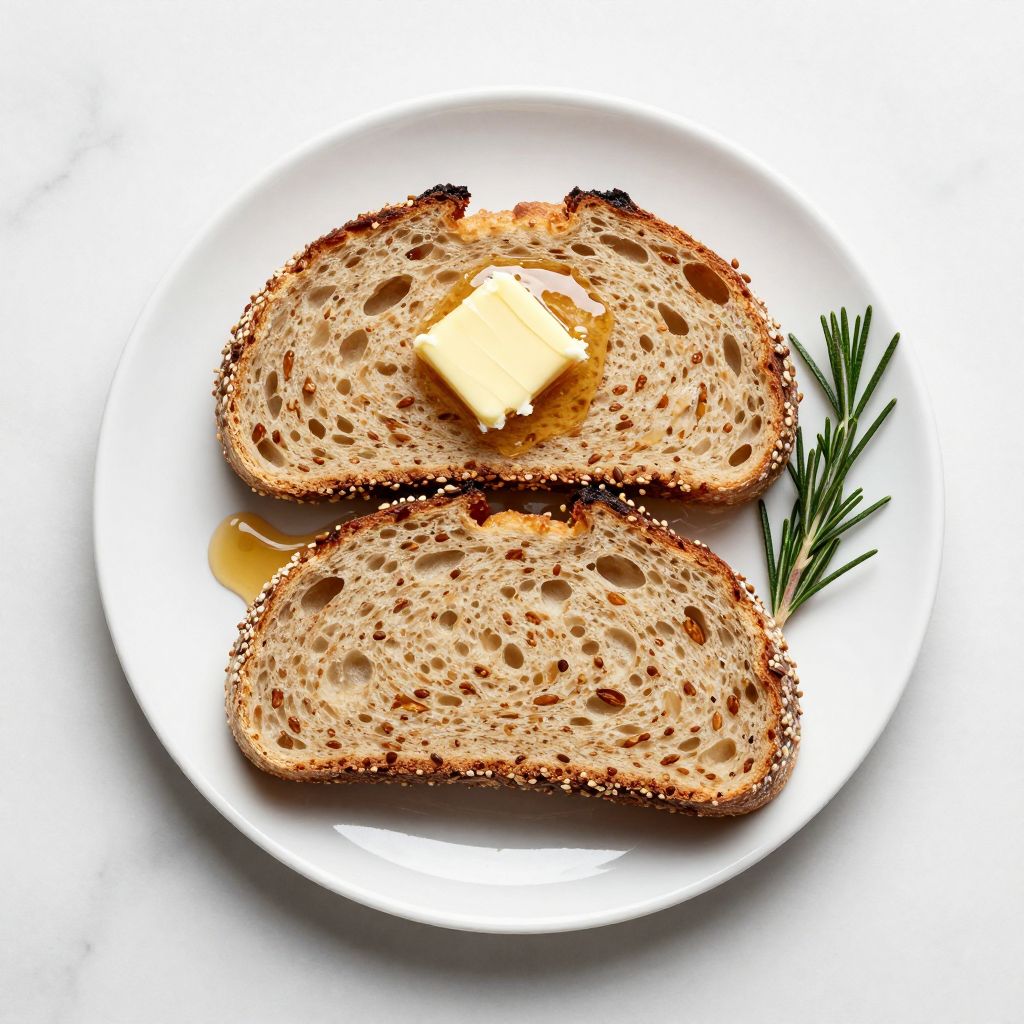
There’s nothing quite like the smell of fresh bread baking in your oven on a quiet morning. Honey wheat bread combines the nutty warmth of whole wheat with the subtle sweetness of honey, creating a loaf that’s tender, moist, and endlessly satisfying.
This recipe is special because it strikes the perfect balance between nutrition and flavor. You get the hearty texture of whole wheat without the dense, heavy crumb that often comes with it, plus a natural sweetness that means you don’t need to reach for store-bought sandwich bread loaded with extra sugars and preservatives.
The result is a loaf that slices cleanly, toasts beautifully, and tastes even better the next day. Whether you’re a seasoned baker or someone who’s intimidated by yeast, this recipe walks you through each step with confidence and clarity.
Why You’ll Love This Recipe
This bread delivers real flavor and texture without requiring professional baking skills or exotic ingredients.
- Naturally sweetened with honey, so no refined sugar needed.
- Whole wheat flour adds nutrition and a subtle nuttiness that white bread can’t match.
- Soft, moist crumb that stays fresh longer than most homemade loaves.
- Makes your kitchen smell incredible and impresses anyone who tastes it.
- Works equally well for sandwiches, toast, or just sliced warm with butter.
My Experience Making This Recipe
I first made this bread on a rainy Saturday when I wanted something comforting but not heavy. The dough came together smoothly, and watching it rise in the bowl was oddly meditative.
The baked loaf had a golden-brown crust with just the right crackle, and when I sliced into it, the steam rose off in those gorgeous wisps that make bread baking feel almost magical. My family devoured half the loaf before dinner, toasted with butter and a drizzle of honey.
What surprised me most was how long it stayed fresh. On day three, it was still soft enough to slice and toast without any staleness creeping in.
Recipe Overview
- Recipe Name: Honey Wheat Bread
- Servings: 1 loaf (12 slices)
- Prep Time: 20 minutes
- Cook Time: 35 minutes
- Total Time: 2 hours 45 minutes (including rising)
- Course: Bread
- Cuisine: American
- Calories per Serving: 165
Equipment You Will Need
- Stand mixer with dough hook attachment (or mixing bowl and wooden spoon)
- 9×5 inch loaf pan
- Kitchen scale (optional but helpful)
- Instant-read thermometer
- Bench scraper or dough knife
- Banneton or kitchen towel for proofing
- Dutch oven or covered baking vessel (optional, for crustier loaf)
- Measuring cups and spoons
Ingredients for Honey Wheat Bread
- Warm water: 1 1/4 cups (300 ml)
- Honey: 3 tablespoons
- Olive oil: 2 tablespoons
- Salt: 1 1/2 teaspoons
- Instant yeast: 2 1/4 teaspoons (one packet)
- Whole wheat flour: 1 1/2 cups (210 grams)
- All-purpose flour: 1 3/4 cups (220 grams)
- Sesame seeds or flax seeds (optional): 1 tablespoon, for topping
Ingredient Notes and Substitutions
- Honey: Honey adds moisture, natural sweetness, and helps brown the crust. You can swap it for maple syrup or agave nectar, though the flavor profile will shift slightly and agave may make the loaf less brown.
- Whole wheat flour: This provides fiber, minerals, and a nuttier flavor than white flour alone. If you want a lighter loaf, you can reduce it to 1 cup and increase all-purpose flour to 2 1/4 cups, though you’ll lose some nutritional depth.
- Olive oil: Olive oil keeps the crumb tender and moist. Melted coconut oil or vegetable oil work fine as substitutes with minimal flavor difference.
- Instant yeast: Instant yeast is reliable and forgiving. Active dry yeast works too, but use the same amount and expect slightly longer rising times.
- Water temperature: Warm water (around 110 degrees Fahrenheit) activates the yeast without killing it. Water that’s too hot will damage the yeast; water that’s too cold will slow fermentation dramatically.
How to Make Honey Wheat Bread
Step 1: Combine the Wet Ingredients
Pour 1 1/4 cups of warm water into your mixing bowl or stand mixer. Add 3 tablespoons of honey and 2 tablespoons of olive oil, stirring gently until the honey dissolves slightly into the water.
Warm water helps yeast activate faster and more predictably, while honey dissolves more evenly when added to liquid rather than directly to flour.
Step 2: Activate the Yeast
Sprinkle 2 1/4 teaspoons of instant yeast over the warm honey water and let it sit for about 2 minutes without stirring. You’ll notice the surface become foamy as the yeast begins to wake up.
This brief rest, called blooming, confirms your yeast is alive and active. If no foam appears after 5 minutes, your yeast is dead and you’ll need a fresh packet.
Step 3: Mix in the Dry Ingredients
Add 1 1/2 teaspoons of salt, then add 1 1/2 cups of whole wheat flour and 1 3/4 cups of all-purpose flour. Stir with a wooden spoon or use your stand mixer on low speed with the dough hook attachment.
Mixing incorporates flour evenly and develops the gluten structure that gives bread its chewy texture. In a stand mixer, this takes about 3 minutes on low speed; by hand, it takes about 2 minutes of firm stirring.
Step 4: Knead the Dough
If using a stand mixer, increase to medium speed and knead for 8 to 10 minutes until the dough becomes smooth and elastic. If kneading by hand, flour your counter lightly and knead for 12 to 15 minutes, pushing the dough away from you with the heel of your hand, folding it back, and repeating.
The dough should feel soft but not sticky. It should spring back slowly when you poke it with a floured finger.
Step 5: First Rise
Place the dough in a lightly oiled bowl and cover it with a damp kitchen towel or plastic wrap. Set it in a warm spot (around 75 degrees Fahrenheit) for 1 to 1 1/2 hours until it doubles in size.
A warm oven with just the light on, a proofing box, or a spot away from drafts all work well. The dough is ready when you can poke it and the indentation slowly springs back halfway.
Step 6: Shape the Dough
Turn the risen dough out onto a lightly floured surface and gently press out excess air with your hands. Shape it into a rough rectangle about the size of your loaf pan.
Starting from the short end, roll the dough tightly toward you, sealing the seam with the heel of your hand as you go. The tight shaping creates layers and tension that help the loaf rise upward rather than spreading sideways in the pan.
Step 7: Pan and Second Rise
Place the shaped dough seam-side down into a lightly oiled 9×5 inch loaf pan. Cover loosely with a damp towel and let it rise in a warm spot for 45 minutes to 1 hour until the dough reaches about 1 inch above the rim of the pan.
This second rise is shorter than the first. The dough should look puffy but not over-proofed; if you press it gently, it should spring back slowly but not immediately.
Step 8: Score and Bake
Preheat your oven to 375 degrees Fahrenheit. Using a sharp bread knife or lame, score the top of the loaf with a single diagonal slash or an “X” pattern about 1/4 inch deep.
Scoring controls where the bread expands and gives it that rustic, artisan look. It also helps steam escape evenly, which creates a better crust.
Step 9: Add Topping and Bake
If desired, lightly brush the top with water and sprinkle sesame seeds or flax seeds. Place the loaf in the preheated oven and bake for 35 to 40 minutes until the crust is a deep golden brown.
The loaf is done when the internal temperature reaches 205 to 210 degrees Fahrenheit measured in the center with an instant-read thermometer. The bottom should sound hollow when tapped.
Step 10: Cool the Bread
Remove the loaf from the oven and turn it out of the pan onto a wire cooling rack. Let it cool for at least 20 minutes before slicing.
Cooling allows the interior to set properly. Slicing too early traps steam inside the loaf, making it gummy.
Pro Tip: Let your loaf cool completely before wrapping it for storage; trapping steam while it’s still warm will soften the crust and make the bread go stale faster.
Tips for the Best Honey Wheat Bread
- Use a kitchen thermometer to check water temperature and internal bread temperature. This removes guesswork and gives you consistent results every time.
- Don’t skip the second rise. Even though it’s shorter than the first, it’s crucial for a light, fluffy crumb structure.
- Keep your rising dough in a draft-free spot. Cold air slows yeast activity, while hot spots can cause uneven rising.
- If your kitchen is cool, turn on the oven light and close the door for a warm proofing environment without turning on the heat.
- Whole wheat flour absorbs more water than white flour, so don’t be surprised if the dough feels slightly wetter than all-white dough. This is normal and desired.
- Store fresh honey wheat bread at room temperature for up to 3 days. Refrigeration actually speeds up staling, so avoid it unless you’re storing for longer.
Common Mistakes to Avoid
- Using water that’s too hot kills the yeast, and water that’s too cold activates it too slowly. Aim for 110 degrees Fahrenheit, roughly the temperature of a warm bath.
- Skipping the blooming step means you won’t know if your yeast is alive until the dough fails to rise. Always bloom your yeast in warm water for 2 minutes first.
- Over-kneading by hand can make you tired and actually toughen the dough. Machine mixing is more controlled, but 8 to 10 minutes is plenty.
- Under-proofing (not letting dough rise long enough) results in a dense, gummy loaf that doesn’t slice cleanly. Patient rising is worth the wait.
- Slicing into warm bread releases steam and creates a gummy crumb. Cooling for at least 20 minutes, ideally 1 hour, prevents this.
Serving Suggestions
Honey wheat bread is wonderfully versatile and deserves to shine in multiple ways. Serve it warm with butter, or let it cool and use it for sandwiches, toast, or bread pudding.
- Toasted with almond butter and sliced banana for a quick, nutritious breakfast.
- Sliced warm and topped with softened goat cheese and roasted red peppers for an elegant appetizer.
- As the foundation for hearty turkey or roast beef sandwiches.
- Turned into breadcrumbs or croutons for soups and salads after it’s a few days old.
- Sliced thick, brushed with garlic butter, and broiled for homemade garlic bread.
Variations to Try
- Seeded Honey Wheat: Add 1/4 cup of mixed seeds (sunflower, pumpkin, sesame) to the dough at the end of kneading. The seeds add crunch and extra nutrition without changing the basic technique.
- Cinnamon Raisin Honey Wheat: Add 1 teaspoon of ground cinnamon to the dry ingredients and 3/4 cup of raisins after kneading. This creates a subtly sweet loaf that works for breakfast or dessert.
- Herbed Honey Wheat: Stir in 1 tablespoon of fresh rosemary or thyme (or 1 1/2 teaspoons dried) into the dough before the first rise. Herbs add savory complexity that pairs beautifully with honey’s sweetness.
- Sourdough Honey Wheat: Replace 1/2 cup of water with 1/2 cup of active sourdough starter and reduce yeast to 1 1/2 teaspoons. This adds tang and depth while the starter helps the dough rise naturally.
- Sprouted Grain Honey Wheat: Substitute 1/2 cup of whole wheat flour with sprouted grain flour for added digestibility and a slightly different flavor. Sprouted grain flour may require slightly less water, so adjust as needed.
Dietary Adaptations
- Gluten-Free: Replace all-purpose and whole wheat flours with a 1:1 gluten-free flour blend that includes xanthan gum. Add 1 extra tablespoon of honey and expect a denser, more cake-like crumb since gluten-free doughs don’t develop the same structure.
- Dairy-Free: The recipe is already dairy-free, but make sure your honey is vegan if that’s important to you. Use the bread as-is or brush with vegan butter after baking.
- Vegan: The recipe is vegan as written since it contains no animal products. Double-check your yeast and honey sources if strict veganism is a concern.
- Low-Carb or Keto: Replace whole wheat and all-purpose flour with almond flour and psyllium husk powder in a 1:1 ratio by weight. Reduce honey to 1 tablespoon and expect a much denser loaf with a different texture.
Storage and Reheating
Refrigerator
Store cooled bread in an airtight container or wrapped tightly in plastic wrap. It keeps for up to 5 days but will gradually dry out.
- Slice as needed and toast to refresh texture.
- Whole loaves store better than pre-sliced bread.
Freezer
Wrap the completely cooled loaf in plastic wrap, then aluminum foil, and freeze for up to 3 months. Slice the loaf before freezing if you prefer to pull out individual slices.
- Frozen whole loaves thaw at room temperature in about 2 hours.
- Frozen slices can go straight into the toaster without thawing.
Reheating
Revive day-old or older bread by toasting it or wrapping the whole loaf in foil and warming it in a 350 degree Fahrenheit oven for 10 minutes. Do not microwave, as this makes bread rubbery.
- Toasting is the best method for individual slices.
- Oven warming works best for whole loaves you want to serve warm with butter.
Nutrition Information
| Nutrient | Amount |
|---|---|
| Calories | 165 |
| Total Fat | 2.5g |
| Saturated Fat | 0.5g |
| Carbohydrates | 31g |
| Fiber | 2g |
| Sugar | 3g |
| Protein | 5g |
| Sodium | 310mg |
| Cholesterol | 0mg |
Nutritional values are approximate and calculated per 1 of 12 slices. Actual values vary based on specific ingredients and measurements used.
Frequently Asked Questions
Can I use instant yeast and active dry yeast interchangeably?
Yes, you can swap them in equal amounts. Active dry yeast has larger granules, so it may take 1 to 2 minutes longer to hydrate and activate, but it works the same way.
Can I make this dough ahead and bake it the next day?
Absolutely. After shaping the loaf in the pan, cover it tightly with plastic wrap and refrigerate overnight. Let it come to room temperature and complete the second rise before scoring and baking, which may take an extra 30 minutes.
Why is my loaf dense and heavy?
This usually happens from under-proofing or using too much flour. Make sure your dough has doubled in size during both rises and that you’re measuring ingredients accurately.
Honey Wheat Bread
Ingredients
Equipment
Method
- Pour 1 1/4 cups of warm water (around 110°F) into your mixing bowl or stand mixer. Add 3 tablespoons of honey and 2 tablespoons of olive oil, stirring gently until the honey dissolves slightly into the water.
- Sprinkle 2 1/4 teaspoons of instant yeast over the warm honey water and let it sit for about 2 minutes without stirring. You'll notice the surface become foamy as the yeast begins to activate.
- Add 1 1/2 teaspoons of salt, then add 1 1/2 cups of whole wheat flour and 1 3/4 cups of all-purpose flour. Stir with a wooden spoon or use your stand mixer on low speed with the dough hook attachment for about 3 minutes until combined (or about 2 minutes by hand).
- If using a stand mixer, increase to medium speed and knead for 8 to 10 minutes until the dough becomes smooth and elastic. If kneading by hand, flour your counter lightly and knead for 12 to 15 minutes, pushing the dough away from you with the heel of your hand, folding it back, and repeating until smooth and elastic.
- Place the dough in a lightly oiled bowl and cover it with a damp kitchen towel or plastic wrap. Set it in a warm spot (around 75°F) for 1 to 1 1/2 hours until it doubles in size.
- Turn the risen dough out onto a lightly floured surface and gently press out excess air with your hands. Shape it into a rough rectangle about the size of your loaf pan. Starting from the short end, roll the dough tightly toward you, sealing the seam with the heel of your hand as you go.
- Place the shaped dough seam-side down into a lightly oiled 9x5 inch loaf pan. Cover loosely with a damp towel and let it rise in a warm spot for 45 minutes to 1 hour until the dough reaches about 1 inch above the rim of the pan.
- Preheat your oven to 375°F. Using a sharp bread knife or lame, score the top of the loaf with a single diagonal slash or an X pattern about 1/4 inch deep.
- If desired, lightly brush the top with water and sprinkle sesame seeds or flax seeds. Place the loaf in the preheated oven and bake for 35 to 40 minutes until the crust is a deep golden brown and the internal temperature reaches 205 to 210°F measured in the center with an instant-read thermometer.
- Remove the loaf from the oven and turn it out of the pan onto a wire cooling rack. Let it cool for at least 20 minutes before slicing.


