Elderberry syrup turns those dark purple berries into a thick, sweet remedy that tastes good enough to drizzle on pancakes. This recipe takes about an hour of your time and yields a potent homemade syrup that costs a fraction of store bought bottles.
Whether you want to boost your family’s immune system during cold season or simply love the deep, jammy flavor, this is the batch to make. Let me show you how I get it right every single time.
What Makes This Recipe Worth Your Time
This elderberry syrup delivers a concentrated, shelf stable product that you control from start to finish. No mystery ingredients, no preservatives you cannot pronounce, and no inflated health store prices.
- Cost savings of up to 80% compared to premium store bought elderberry syrups
- Full control over sweetness levels and added spices to suit your family’s taste
- Longer shelf life than most homemade versions when prepared and stored correctly
- Batch flexibility that lets you scale up for gift giving or scale down for small households
- Real elderberry concentration without the fillers and thickeners found in commercial products
A Little Background on This Dish
Elderberries have been used in folk medicine across Europe for centuries, with records of elderberry preparations dating back to ancient Egypt. The Sambucus nigra plant grows wild across temperate regions, and generations of home cooks have simmered its berries into syrups, wines, and cordials.
Modern interest in elderberry syrup spiked when research suggested the berries contain compounds that may support immune function. What was once a grandmother’s remedy became a mainstream wellness product, but the homemade version remains far superior in flavor and potency.
My Experience With This Recipe
I started making elderberry syrup five years ago when my kids kept catching every bug that went around their school. The store bought stuff worked fine, but at fifteen dollars for a tiny bottle, I knew there had to be a better way.
My first three batches were disasters. I scorched the berries twice because I walked away from the stove, and the third batch turned into a sticky paste when I reduced it too far.
The fourth batch came out perfect, and when I poured that deep purple syrup into jars, the whole kitchen smelled like warm berries and cinnamon. My kids actually asked for their daily spoonful instead of running from it.
Before You Start: Key Things to Know
This recipe suits confident beginners who can manage a slow simmer without constant supervision. The biggest challenge is patience during the reduction phase, where rushing leads to either weak syrup or a burnt mess.
- Difficulty level: Easy to moderate, requires attention but no advanced skills
- Time breakdown: 15 minutes active prep, 45 minutes passive simmering, 10 minutes finishing
- Critical equipment: A fine mesh strainer or cheesecloth for proper berry extraction
- Attention point: The final simmer after adding honey requires constant stirring to prevent scorching
Recipe at a Glance
- Recipe Name: Homemade Elderberry Syrup
- Yield: Approximately 16 ounces (32 tablespoon servings)
- Prep Time: 15 minutes
- Cook Time: 55 minutes
- Total Time: 1 hour 10 minutes
- Resting Time: 30 minutes cooling before adding honey
- Difficulty: Easy to Moderate
- Course: Remedy, Condiment
- Cuisine: European, American
- Calories per Serving: 35 calories per tablespoon
How to Source the Best Ingredients
The quality of your dried elderberries determines everything about the final syrup’s flavor and potency. Cheap, old berries produce a flat, musty syrup that nobody wants to take daily.
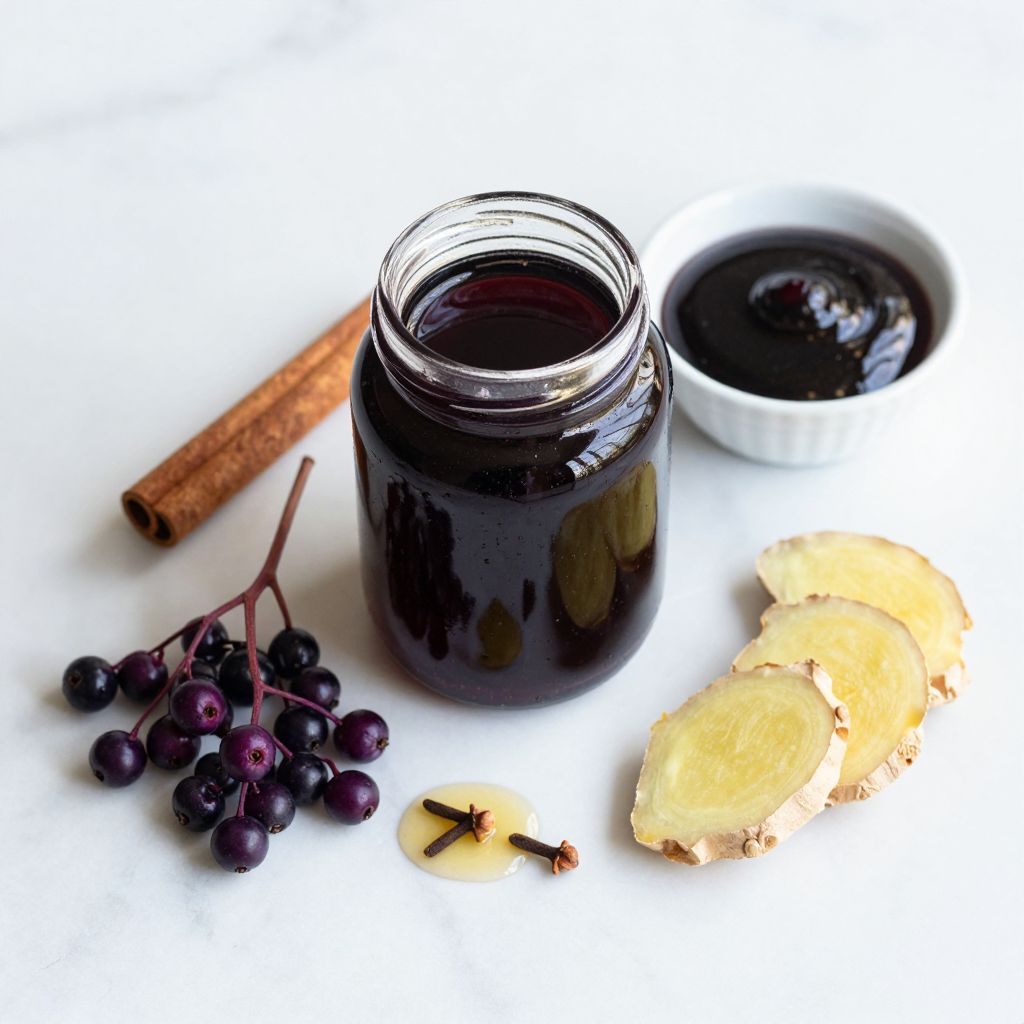
- Dried elderberries: Look for berries that appear plump and deeply colored, not dusty or gray; buy from suppliers who list the harvest date and source organic when possible
- Raw honey: Choose unfiltered, raw honey from a local beekeeper if available; the honey should be thick and opaque, not thin and clear
- Cinnamon sticks: Select Ceylon cinnamon for a sweeter, more complex flavor; the sticks should smell potent when you open the package
- Fresh ginger: Pick roots that feel firm and heavy with smooth, taut skin; avoid any with wrinkles or soft spots
- Whole cloves: Buy whole cloves that release a strong aroma when you squeeze them; pre ground cloves lose their punch within weeks
Ingredients for Elderberry Syrup
For the Elderberry Base
- 1 cup dried elderberries
- 3 cups filtered water
- 2 cinnamon sticks, Ceylon preferred
- 1 tablespoon fresh ginger, sliced into coins
- 5 whole cloves
For Finishing
- 1 cup raw honey, measured after the liquid has cooled
Smart Substitutions and Swaps
- Dried elderberries: These provide the core medicinal compounds and flavor, so there is no true substitute; fresh elderberries can work using 2 cups fresh for every 1 cup dried, but you must cook them longer
- Raw honey: This acts as both sweetener and natural preservative; maple syrup works for a vegan version but reduces shelf life to 2 weeks refrigerated
- Cinnamon sticks: These add warmth and depth; use 1 teaspoon ground cinnamon if you lack sticks, but strain carefully to avoid grittiness
- Fresh ginger: This provides a spicy brightness; substitute 1 teaspoon dried ginger powder, though the flavor will be less vibrant
- Whole cloves: These contribute a subtle spiced note; omit entirely rather than substitute ground cloves, which can overpower the syrup
Tools and Equipment You Will Need
Gathering all your equipment before you start prevents scrambling mid recipe when hot liquid needs immediate straining. This recipe uses standard kitchen tools, but each one plays a specific role in the final quality.
- Medium saucepan, 3 to 4 quart capacity (allows room for simmering without boiling over)
- Fine mesh strainer (essential for removing all berry solids and sediment)
- Cheesecloth or nut milk bag (for secondary straining to achieve smooth texture)
- Large glass bowl (for catching strained liquid)
- Potato masher or wooden spoon (for pressing maximum liquid from cooked berries)
- Glass storage jars with tight lids, sterilized (prevents contamination and extends shelf life)
- Funnel (for clean transfer into storage jars)
- Measuring cups and spoons
- Kitchen thermometer (ensures honey is added at safe temperature)
How to Make Elderberry Syrup
Read through all steps before starting and sterilize your storage jars in advance. The elderberries, spices, and water should be measured and ready beside the stove before you turn on the heat.
Step 1: Combine the Base Ingredients
Add the dried elderberries, filtered water, cinnamon sticks, ginger slices, and whole cloves to your saucepan. Stir everything gently to distribute the spices throughout the berries.
Starting with cold water and bringing everything up to temperature together allows the flavors to meld gradually. A sudden hot start can make the spices taste harsh and one dimensional.
The berries should be fully submerged with about an inch of water above them. If they float initially, they will sink as they rehydrate.
Step 2: Bring to a Boil
Place the saucepan over medium high heat and bring the mixture to a full rolling boil. Watch the pot carefully because elderberry liquid can foam up and overflow quickly.
Reaching a boil activates the extraction process and starts breaking down the berry cell walls. This initial burst of heat is necessary before the long, slow simmer.
You will see the liquid turn from clear to a deep reddish purple within the first few minutes. Small bubbles will form, then build to a vigorous boil.
Step 3: Reduce Heat and Simmer
Once boiling, immediately reduce the heat to low and maintain a gentle simmer. The surface should show small, lazy bubbles, not a rapid boil.
A slow simmer extracts compounds from the berries without destroying heat sensitive nutrients. Boiling aggressively can also evaporate too much liquid before the extraction completes.
The liquid should barely move, with a bubble breaking the surface every few seconds. If you see constant rapid bubbling, your heat is too high.
Step 4: Simmer Until Reduced by Half
Let the mixture simmer uncovered for 45 minutes, stirring occasionally every 10 to 15 minutes. The goal is to reduce the liquid by approximately half its original volume.
This concentration intensifies the elderberry flavor and creates a syrup base thick enough to coat a spoon. Reducing too little leaves you with weak, watery syrup.
The berries will look soft and bloated, and the liquid will have darkened to a deep purple, almost black color. When you draw a spoon through it, the liquid should feel slightly thicker than water.
Step 5: Remove from Heat and Cool
Take the saucepan off the heat and let the mixture cool for 30 minutes. Do not skip this cooling period under any circumstances.
Adding honey to liquid above 110 degrees Fahrenheit destroys the beneficial enzymes in raw honey. Patience here preserves what makes raw honey valuable.
Test the temperature with your kitchen thermometer. The liquid should register below 110 degrees before you proceed.
Step 6: Mash the Berries
Use a potato masher or the back of a wooden spoon to crush the softened berries against the side of the pot. Press firmly to release all the juice trapped inside.
The cooked berries hold a surprising amount of concentrated liquid. Thorough mashing can increase your final yield by up to 25 percent.
The berries should break apart easily and release dark purple juice when pressed. Continue mashing until no whole berries remain.
Step 7: First Straining
Set your fine mesh strainer over a large glass bowl and pour the entire contents of the pot through it. Let gravity do most of the work for 5 minutes.
Straining removes the solids while preserving the concentrated liquid. Rushing this step by pressing too hard can force bitter compounds through the strainer.
The liquid should flow freely at first, then slow to a drip. The strainer will hold a thick mass of spent berries and spices.
Step 8: Press the Solids
After the initial draining, use your spoon to press the solids firmly against the strainer to extract every last drop. Work in a circular motion around the entire mass.
Those solids still contain valuable syrup, and this pressing extracts the most concentrated portion. Some cooks wrap the solids in cheesecloth and squeeze, which works even better.
Dark purple liquid should stream out with each press. Stop when the pressing yields only a few drops at a time.
Step 9: Second Straining for Clarity
Line a clean strainer with cheesecloth or use a nut milk bag, and pour the liquid through a second time. This removes any fine sediment that passed through the first straining.
Double straining creates a smooth, pourable syrup without gritty particles at the bottom of your jar. Single straining often leaves sediment that settles over storage time.
The liquid flowing through should look clear and glossy, not cloudy. Any cloudiness indicates particles that need additional filtering.
Step 10: Add the Honey
Measure 1 cup of raw honey and add it to the warm (not hot) elderberry liquid. Stir continuously with a whisk or spoon for 2 to 3 minutes.
The warmth of the liquid helps the honey dissolve completely while staying below the temperature that would damage its enzymes. Cold liquid makes the honey clump and refuse to incorporate.
The mixture should become uniformly thick and glossy with no visible honey streaks or layers. Taste a small amount; it should be sweet but still taste distinctly of elderberry.
Step 11: Test the Consistency
Dip a clean spoon into the syrup and let it drip back into the bowl. Observe how the syrup falls and coats the spoon.
The right consistency pours easily but coats the spoon in a thin, even layer. Too thin and it will not feel like syrup; too thick and it becomes difficult to measure doses.
The syrup should fall from the spoon in a steady, slow stream, not a quick drip. A perfect syrup leaves a visible coating on the spoon when you pull it out.
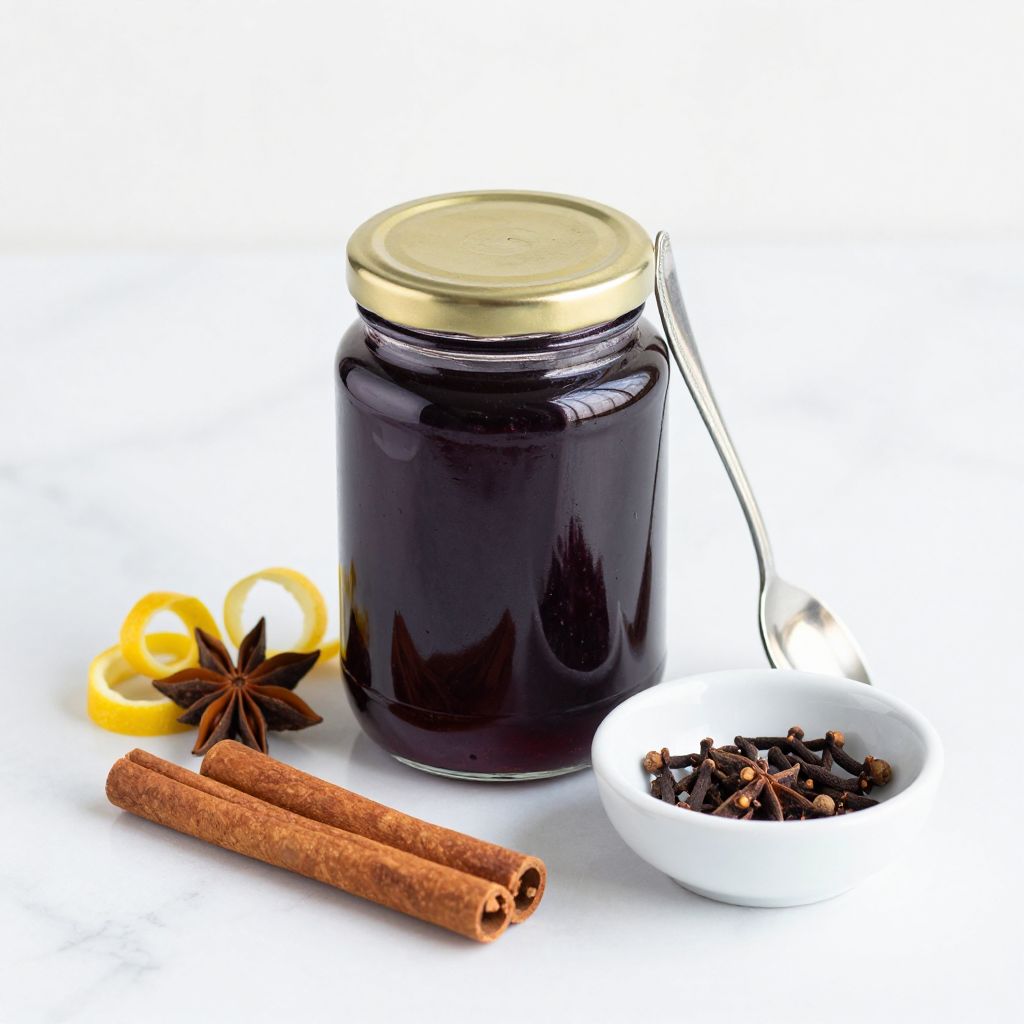
Step 12: Transfer and Store
Use a funnel to pour the finished syrup into your sterilized glass jars, leaving half an inch of headspace. Seal the jars tightly and label them with the date.
Proper storage extends the syrup’s life and maintains its quality over months of use. Glass jars prevent any interaction between the acidic syrup and the container.
The filled jars should show a deep, jewel toned purple color. Any jars that appear cloudy or separated should be refrigerated first and used within 2 weeks.
Pro Tip: Freeze a portion of your finished syrup in ice cube trays, then transfer the cubes to a freezer bag. You will have perfectly portioned doses that last up to a year and thaw in seconds under warm water.
The Science Behind the Technique
Elderberries contain compounds called anthocyanins, the same pigments that make blueberries blue and red cabbage red. These water soluble compounds extract readily into simmering liquid, which is why the water turns purple within minutes of heating.
The long, slow simmer breaks down the berry cell walls and releases these compounds along with natural sugars and pectin. The pectin contributes to the syrup’s body, while the natural sugars caramelize slightly to add depth to the flavor profile.
Chef Note: Adding honey at low temperature is not just about preserving enzymes; it also prevents the honey from crystallizing or separating in storage, which happens when heated honey cools too quickly.
Tips for Getting It Right Every Time
- Use a timer for the 45 minute simmer; getting distracted and oversimmering creates bitter, burnt notes that no amount of honey will mask
- Sterilize jars by running them through a dishwasher cycle or boiling them for 10 minutes right before filling
- Measure honey after cooling because adding it by eye often leads to overly sweet or overly tart batches
- Store in small jars so you open and close containers less frequently, reducing contamination risk
- Keep a batch log noting any adjustments you make so you can replicate your perfect version
- Taste before bottling and adjust sweetness while you can still stir in more honey if needed
Mistakes That Will Ruin Your Dish
- Adding honey to hot liquid: Destroys the beneficial enzymes and can cause the honey to crystallize or separate during storage
- Boiling instead of simmering: Evaporates liquid too quickly, concentrates bitter compounds, and can scorch the berries
- Skipping the second strain: Leaves sediment that settles at the bottom and creates an unpleasant gritty texture in the last few doses
- Using metal storage containers: Reacts with the acidic syrup over time and can impart metallic flavors or discoloration
- Storing at room temperature in warm climates: Shortens shelf life dramatically and can cause fermentation or mold growth
Make Ahead and Meal Prep Tips
Elderberry syrup is inherently a make ahead recipe, designed to be prepared in batches and used over weeks or months. This makes it ideal for busy households who want daily wellness support without daily effort.
- Elderberry concentrate: Simmer the berries and spices, strain, and refrigerate the unsweetened liquid for up to 5 days before adding honey and finishing
- Frozen syrup cubes: Freeze finished syrup in silicone ice cube trays, then store cubes in freezer bags for up to 12 months
- Spice blend packets: Pre measure the cinnamon, ginger, and cloves into small bags so you can start a new batch in seconds
- Gift jar prep: Make a triple batch in fall, portion into small jars, and store in the refrigerator for holiday gift giving
What to Serve With Elderberry Syrup
While most people take elderberry syrup by the spoonful, its rich, fruity flavor makes it surprisingly versatile as a culinary ingredient. Think of it as a deeply flavored berry syrup that happens to have wellness benefits.
- Pancakes and waffles: Drizzle over breakfast foods instead of maple syrup for a berry forward morning treat
- Plain yogurt: Swirl into unsweetened yogurt for a quick, healthy breakfast with natural sweetness
- Sparkling water: Add a tablespoon to a glass of sparkling water for a refreshing homemade soda
- Oatmeal: Stir into hot oatmeal during cold months for added flavor and a wellness boost
- Vanilla ice cream: Drizzle over vanilla ice cream for an easy dessert that looks impressive
Drink Pairings
Elderberry syrup shines when mixed into beverages, transforming simple drinks into something special. A tablespoon stirred into hot water with lemon creates a soothing tea that my family requests constantly during winter months.
- Wine pairing: A glass of light bodied Pinot Noir complements the berry notes if you are enjoying the syrup drizzled over cheese or dessert
- Beer pairing: Belgian style wheat beers with their fruity yeast character match the elderberry flavor surprisingly well
- Non alcoholic pairing: Hot water with a squeeze of lemon and a tablespoon of syrup makes the classic elderberry tea
- Hot drink pairing: Stir into chamomile tea before bed for a naturally sweetened, calming nightcap
Flavour Variations Worth Trying
- Citrus burst: Add the zest of one orange and one lemon during simmering; the syrup gains bright, sunny notes that balance the deep berry flavor
- Warming winter spice: Double the cloves and add a star anise pod; the result tastes like a cozy holiday drink
- Ginger forward: Triple the ginger quantity for a spicier, more pungent syrup that warms the throat on the way down
- Vanilla honey: Split a vanilla bean and add it during simmering; the syrup becomes rounder and more dessert like
- Berry blend: Add half a cup of dried rose hips during simmering; this boosts the tartness and adds vitamin C
How to Adapt This Recipe for Your Diet
- Gluten free: This recipe is naturally gluten free as written; just verify your dried elderberries are processed in a gluten free facility if you have celiac disease
- Dairy free: The recipe contains no dairy; it is naturally suitable for dairy free diets without modification
- Vegan: Replace the honey with maple syrup or agave nectar; expect a thinner consistency and shorter refrigerator life of about 2 weeks
- Low carb or keto: Use a sugar free sweetener like allulose or monk fruit sweetener; add gradually and taste, as sweetness levels vary by brand
- High protein: Stir your daily dose into a protein smoothie; the syrup adds flavor while the protein powder adds staying power
How to Store and Reheat
In the Refrigerator
Store the syrup in tightly sealed glass jars in the coldest part of your refrigerator, not in the door. Properly made syrup with raw honey keeps for 2 to 3 months refrigerated.
- Always use a clean, dry spoon when measuring doses to prevent introducing bacteria or moisture
- Check weekly for any signs of mold, fermentation bubbles, or off smells, and discard immediately if any appear
In the Freezer
Elderberry syrup freezes beautifully and maintains its quality for up to 12 months in a properly sealed container. Freezing is the best option for large batches or infrequent use.
- Leave an inch of headspace in jars to allow for expansion during freezing
- Freeze in silicone ice cube trays for single dose portions that thaw in under a minute
Reheating
Elderberry syrup does not require reheating and is typically served at room temperature or cold. If you prefer warm syrup, gentle heating preserves quality.
- Oven method: Not recommended for this product; the low liquid volume makes oven reheating impractical
- Stovetop method: Place frozen syrup in a small saucepan over very low heat, stirring constantly until just liquified; do not exceed 100 degrees Fahrenheit
- Microwave method: Use with extreme caution in 10 second bursts at 50% power; microwaving can create hot spots that damage the honey’s beneficial properties
Cost Breakdown
Making elderberry syrup at home costs roughly one quarter of what you would pay for comparable quality at a health food store. A 16 ounce bottle of premium elderberry syrup retails for 20 to 30 dollars; this batch costs under 8 dollars.
| Ingredient | Estimated Cost |
|---|---|
| Dried elderberries (1 cup) | $4.00 |
| Raw honey (1 cup) | $3.00 |
| Cinnamon sticks (2) | $0.40 |
| Fresh ginger (1 tbsp) | $0.25 |
| Whole cloves (5) | $0.10 |
| Total Per Serving (32 servings) | $0.24 |
Nutrition Information
| Nutrient | Amount |
|---|---|
| Calories | 35 |
| Total Fat | 0g |
| Saturated Fat | 0g |
| Trans Fat | 0g |
| Cholesterol | 0mg |
| Sodium | 1mg |
| Total Carbohydrates | 9g |
| Dietary Fiber | 0g |
| Total Sugars | 8g |
| Added Sugars | 6g |
| Protein | 0g |
| Vitamin D | 0mcg |
| Calcium | 2mg |
| Iron | 0.2mg |
| Potassium | 15mg |
Nutritional values are estimates based on standard ingredient compositions and may vary depending on specific brands, honey varieties, and portion sizes used.
Frequently Asked Questions
Can I use a different sweetener instead of honey?
Maple syrup and agave work well but reduce refrigerator shelf life to about 2 weeks. Sugar free options like monk fruit sweetener work for keto diets but may alter the texture slightly.
Can I make this syrup ahead of time for the whole winter?
Make a large batch in early fall, portion into several small jars, and freeze what you will not use within 2 months. Thaw jars as needed throughout the season.
How long does this syrup last in the refrigerator?
Properly made syrup with raw honey lasts 2 to 3 months refrigerated. Always use clean utensils when measuring and watch for any signs of mold or fermentation.
Why did my syrup turn out too thin?
You likely did not reduce the liquid enough before adding honey. Simmer the base until it reduces by half and coats a spoon lightly before straining.
Can I double or triple this recipe?
Scaling works perfectly with this recipe. Use a larger pot, extend the simmering time by 10 to 15 minutes for doubled batches, and ensure the liquid still reduces by half.
Should I use fresh elderberries instead of dried?
Fresh elderberries work but require double the quantity and longer cooking time. Dried berries are more concentrated and available year round, making them the preferred choice.
What is the recommended daily dose for adults and children?
Most adults take one tablespoon daily for maintenance or up to four times daily when feeling under the weather. Children over one year typically take one teaspoon daily; consult your pediatrician for specific guidance.
My Final Word
This elderberry syrup delivers everything I want from a homemade remedy: it tastes good, costs little, and actually gets used instead of sitting forgotten in the back of the fridge. The deep purple color alone makes it feel like you are taking something real, not just sugar water with a label.
I have made this recipe dozens of times now, and every batch reminds me why the extra hour of effort beats grabbing a bottle off the shelf. Give it one try, and I suspect you will feel the same way.
If you make this syrup, I would love to hear how it turned out for you. Drop a comment below or tag Recipe Papa on social media with your finished batch. Seeing your jars of deep purple syrup makes the time I spend testing and writing these recipes feel worthwhile.
Homemade Elderberry Syrup
Ingredients
Equipment
Method
- Add the dried elderberries, filtered water, cinnamon sticks, ginger slices, and whole cloves to your saucepan. Stir everything gently to distribute the spices throughout the berries.
- Place the saucepan over medium high heat and bring the mixture to a full rolling boil. Watch the pot carefully because elderberry liquid can foam up and overflow quickly.
- Once boiling, immediately reduce the heat to low and maintain a gentle simmer. The surface should show small, lazy bubbles, not a rapid boil.
- Let the mixture simmer uncovered for 45 minutes, stirring occasionally every 10 to 15 minutes. The goal is to reduce the liquid by approximately half its original volume.
- Remove the saucepan from heat and let the mixture cool for 30 minutes. Test the temperature with your kitchen thermometer; the liquid should register below 110 degrees Fahrenheit before proceeding.
- Use a potato masher or the back of a wooden spoon to crush the softened berries against the side of the pot. Press firmly to release all the juice trapped inside until no whole berries remain.
- Set your fine mesh strainer over a large glass bowl and pour the entire contents of the pot through it. Let gravity do most of the work for 5 minutes.
- After the initial draining, use your spoon to press the solids firmly against the strainer to extract every last drop. Work in a circular motion around the entire mass.
- Line a clean strainer with cheesecloth or use a nut milk bag, and pour the liquid through a second time to remove any fine sediment.
- Measure 1 cup of raw honey and add it to the warm (not hot) elderberry liquid. Stir continuously with a whisk or spoon for 2 to 3 minutes until uniformly thick and glossy.
- Test the consistency by dipping a clean spoon into the syrup. It should fall from the spoon in a steady, slow stream and leave a visible coating on the spoon.
- Use a funnel to pour the finished syrup into sterilized glass jars, leaving half an inch of headspace. Seal the jars tightly and label them with the date. Store in the refrigerator for up to 2-3 months.