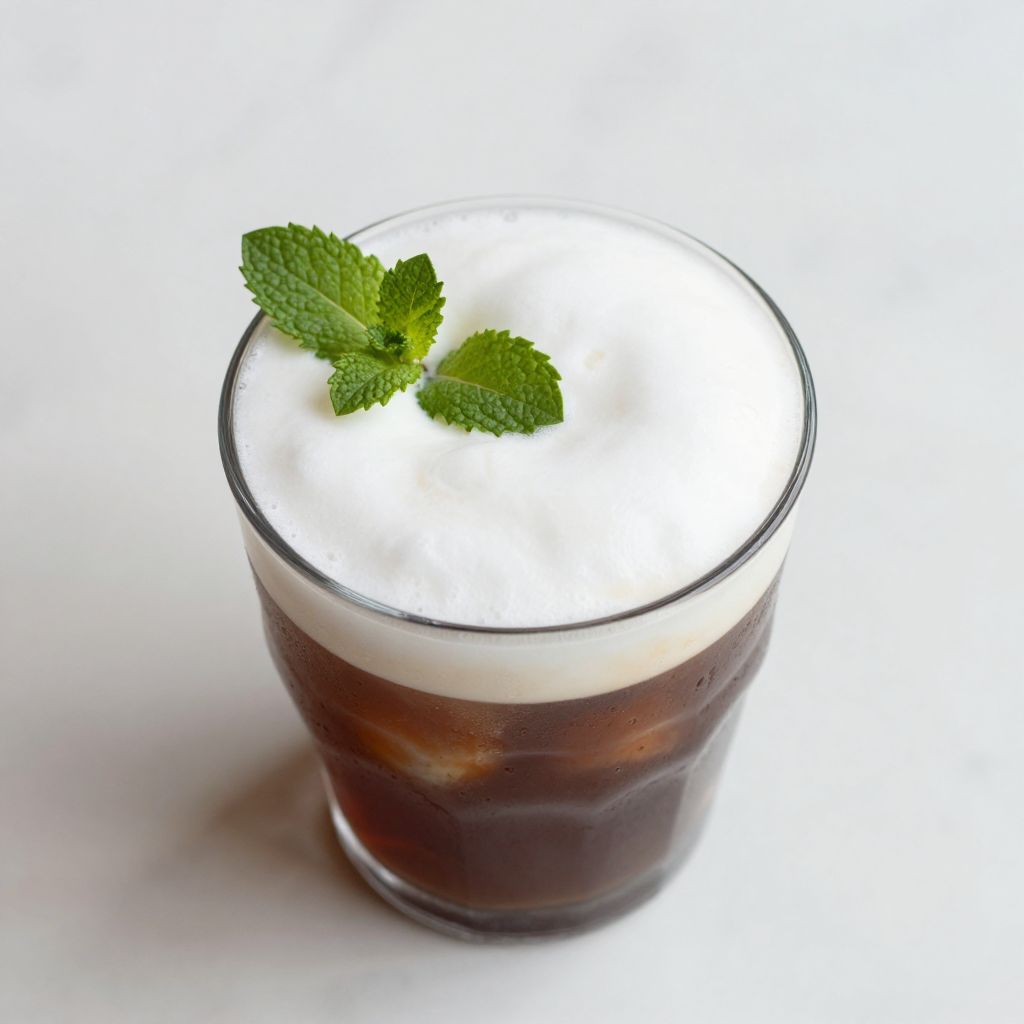
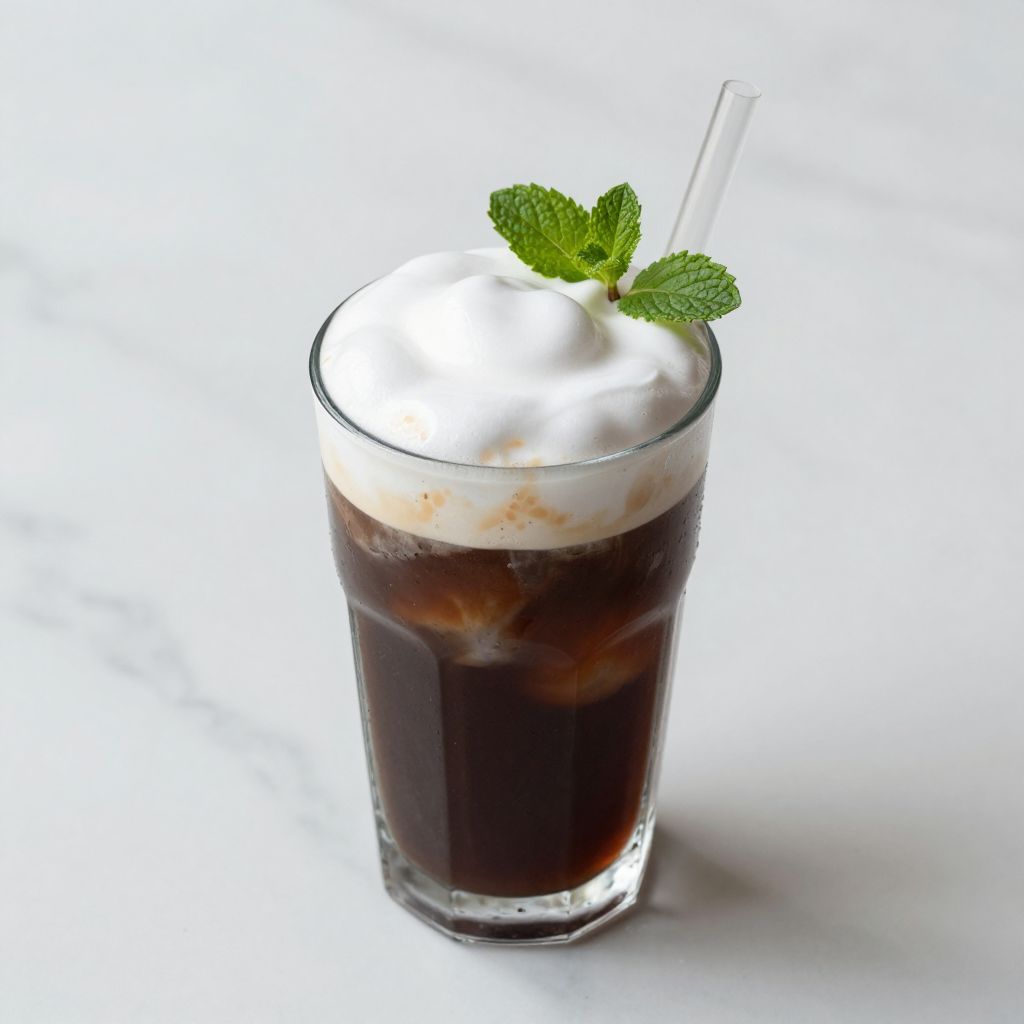
Cold foam transforms any iced coffee into something that feels like a treat, and making it at home takes about 90 seconds. This creamy, velvety topping sits on your drink like a cloud and slowly melts into the coffee below, creating layers of flavor with every sip. Once you nail the technique, you will never pay five dollars for it again.
What Makes This Recipe Worth Your Time
Store bought versions cost too much and come loaded with stabilizers you cannot pronounce. This homemade cold foam uses two ingredients, takes less than two minutes, and tastes better than anything from a drive through.
- Cost savings of over four dollars per drink compared to coffee shop prices
- Total control over sweetness level and flavor additions
- No special equipment required beyond tools you already own
- Customizable for any dietary restriction including dairy free and sugar free
- Impressive presentation that makes weekday mornings feel like a small luxury
A Little Background on This Dish
Cold foam entered the mainstream coffee scene around 2014 when specialty shops started looking for ways to add texture to cold drinks without ice dilution. Starbucks popularized it nationally in 2018, and it became the default upgrade for iced beverages almost overnight.
The technique borrows from the science of milk frothing but skips the heat entirely. Cold aeration creates smaller, tighter bubbles that hold their structure longer than traditional hot foam, which is why that cloud stays intact on your drink for several minutes before slowly cascading downward.
My Experience With This Recipe
I started making cold foam at home after calculating that my family’s coffee shop habit was costing us more than our streaming subscriptions combined. The first few attempts were disasters: thin, watery, and gone before I could even take a photo.
My biggest mistake was using milk straight from the fridge without checking the fat content. Skim milk produced foam that collapsed in seconds, and whole milk was too heavy to aerate properly. It took me about a dozen tries to land on the right milk and the right technique.
The morning I finally got it right, that foam held its shape for a full five minutes while I made breakfast. The texture was thick enough to write my initial on top with a toothpick, and my kids asked if we were having dessert for breakfast. That version is what I am sharing with you today.
Before You Start: Key Things to Know
This recipe suits absolute beginners and takes almost no active effort. The only challenge is frothing long enough to build structure without overdoing it and creating stiff peaks.
- Difficulty level: Beginner friendly with zero cooking required
- Active time vs passive time: 90 seconds active, no passive time
- Most important equipment: A milk frother, French press, or jar with a tight lid
- Step requiring most attention: Knowing when to stop frothing before the foam becomes too thick
Recipe at a Glance
- Recipe Name: Cold Foam
- Yield: 2 servings (enough to top 2 drinks)
- Prep Time: 1 minute
- Cook Time: 0 minutes
- Total Time: 2 minutes
- Difficulty: Beginner
- Course: Beverage topping
- Cuisine: American
- Calories per Serving: 25 calories
How to Source the Best Ingredients
The quality of your milk determines everything here. Cheap, ultra pasteurized milk from a discount bin will never foam as well as fresh dairy from a quality brand.
- Milk: Look for nonfat or 2% milk with a use by date at least a week out, which indicates freshness and better protein structure for frothing
- Sweetener: Use superfine sugar or simple syrup if sweetening, as granulated sugar will not dissolve in cold liquid
- Vanilla extract: Choose pure vanilla extract over imitation for cleaner flavor
- Heavy cream: If making sweet cream cold foam, select cream with at least 36% fat content
Ingredients for Cold Foam
- 1/2 cup nonfat milk or 2% milk, very cold
- 1 tablespoon superfine sugar or 1 tablespoon simple syrup (optional)
- 1/4 teaspoon vanilla extract (optional)
For Sweet Cream Cold Foam Variation
- 1/4 cup heavy cream, very cold
- 1/4 cup 2% milk, very cold
- 1 tablespoon vanilla syrup or 2 teaspoons superfine sugar plus 1/4 teaspoon vanilla extract
Smart Substitutions and Swaps
- Nonfat milk: Nonfat milk creates the most stable foam because its higher protein to fat ratio supports better aeration. Substitute with 2% milk for a slightly creamier result, but expect the foam to collapse faster.
- Superfine sugar: Superfine sugar dissolves instantly in cold liquid, which is critical for even sweetness. Substitute with simple syrup at a 1:1 ratio or use a sugar free sweetener like monk fruit for a low calorie version.
- Vanilla extract: Vanilla adds warmth and rounds out the dairy flavor. Substitute with almond extract for a nutty note or skip it entirely for a neutral foam.
- Heavy cream: Heavy cream adds richness and body to sweet cream foam. Substitute with coconut cream for a dairy free option, though the flavor will shift noticeably.
- Dairy milk: Dairy milk froths best because of its protein content. Substitute with oat milk (barista blend) for the closest nondairy result, as other plant milks lack the protein structure to hold foam.
Tools and Equipment You Will Need
Gathering your tools before you start means the difference between a smooth 90 seconds and a frustrating scramble. Cold foam waits for no one, so have everything within reach.
- Handheld milk frother (the most efficient tool for cold foam specifically)
- Tall, narrow cup or jar (the narrow shape keeps milk contained during frothing)
- Measuring cups and spoons
- Spoon for scooping foam
- French press as an alternative frothing method (works well for larger batches)
- Mason jar with tight lid as a backup method (requires more effort but works in a pinch)
How to Make Cold Foam
Read through all steps before starting so you understand the flow. Make sure your milk is as cold as possible straight from the refrigerator, as cold milk holds foam structure far better than room temperature milk.
Step 1: Chill Your Equipment
Place your frothing cup or jar in the freezer for 5 minutes while you gather ingredients. A cold vessel helps maintain the low temperature that keeps foam stable.
Cold equipment prevents the milk from warming during the frothing process. Even a few degrees of temperature increase can weaken the foam structure and cause faster collapse.
Your cup should feel noticeably cold to the touch when you remove it from the freezer. If frost forms on the outside, you have achieved the ideal starting temperature.
Step 2: Measure the Milk
Pour exactly 1/2 cup of cold milk into your chilled cup. Fill the cup no more than one third full, as the milk will expand significantly during frothing.
Using too much milk creates overflow and mess. The milk needs room to triple in volume as air incorporates, so restraint here prevents disaster.
The milk should sit low in the cup with at least 3 inches of headspace above it. This gives you the clearance needed for vigorous frothing motion.
Step 3: Add Sweetener If Using
Add your superfine sugar or simple syrup to the cold milk now, before frothing. Stir briefly with a spoon to begin dissolving the sweetener into the liquid.
Adding sweetener before frothing allows the aeration process to finish incorporating it evenly. Adding it after creates pockets of sweetness instead of uniform flavor throughout.
The sugar should mostly disappear into the milk after about 10 seconds of stirring. A few remaining granules will dissolve during the frothing process.
Step 4: Add Flavorings If Using
Add vanilla extract or any other liquid flavorings to the milk mixture now. Use a light hand, as flavors concentrate in foam and can easily overpower the drink below.
Flavorings added at this stage distribute evenly throughout the foam. Adding them after frothing creates streaks and uneven taste with each sip.
The milk should have a faint aroma of your flavoring but should not smell overpowering. If you can smell it strongly before frothing, reduce the amount next time.
Step 5: Position the Frother
Submerge your handheld milk frother into the milk at a slight angle, with the whisk head fully below the surface. Position it just off center in the cup to create a vortex effect.
The angled position creates circular motion that pulls air into the milk more efficiently. A straight vertical position traps less air and produces thinner foam.
The frother whisk should be about half an inch from the bottom of the cup. Too close to the bottom creates noise without effective aeration.
Step 6: Begin Frothing
Turn on the frother and hold it steady, letting the vortex do the work. Move the frother slowly up and down through the milk in small movements of about half an inch.
This motion pulls surface air down into the milk continuously. Keeping the frother stationary creates uneven foam with large bubbles on top and liquid on the bottom.
You should see the milk begin to increase in volume within the first 10 seconds. Small, uniform bubbles forming on the surface indicate proper technique.
Step 7: Continue Frothing Until Doubled
Continue frothing for 30 to 45 seconds total until the milk has approximately doubled in volume. The foam should look thick and creamy, not thin and bubbly.
Stopping too early produces weak foam that sinks into your drink immediately. The protein structure needs time to unfold and trap air bubbles effectively.
The foam should hold soft peaks when you lift the frother out. It should flow slowly, not run like liquid, and should not stand stiff like whipped cream.
Step 8: Check the Texture
Turn off the frother and lift it slowly from the foam. Tap the cup gently on the counter 2 to 3 times to pop any large surface bubbles.
Large bubbles weaken the foam structure and create an uneven texture on your drink. The tapping action bursts these without deflating the good microfoam beneath.
The surface should look smooth and glossy after tapping. If you see a layer of large bubbles remaining, give the cup one more firm tap.
Step 9: Rest Briefly
Let the foam rest for 15 to 20 seconds before spooning onto your drink. This brief rest allows the foam to stabilize and any remaining liquid to settle to the bottom.
Foam that rests briefly holds its shape longer on the drink. Rushing this step results in foam that begins separating the moment it hits the coffee.
You should see a clear distinction between thick foam on top and any thin liquid that has separated below. Spoon from the top layer only.
Step 10: Spoon Onto Your Drink
Use a spoon to gently scoop the foam from the top and place it onto your iced coffee or cold drink. Start from the edges and work toward the center for the thickest foam.
Pouring instead of spooning causes the foam to break apart and mix into the drink. The spooning method preserves the layered effect that makes cold foam special.
The foam should float on top of your drink and hold its shape for at least 3 to 4 minutes. It will slowly cascade into the drink as you sip, creating changing flavors throughout.
Pro Tip: For the most stable foam that lasts the longest, add a tiny pinch of xanthan gum (less than 1/8 teaspoon) to your milk before frothing. This is the secret coffee shops use to make foam that holds for 10 minutes or more.
The Science Behind the Technique
Cold foam works because of milk proteins, specifically casein and whey, which unfold during agitation and trap air bubbles. These proteins create a network that holds the foam structure stable, and colder temperatures keep that network intact longer.
Nonfat milk froths better than whole milk because fat globules interfere with protein bonding. The fat coats the air bubbles and prevents proteins from forming the stable matrix needed for long lasting foam.
Chef Note: This is why barista blend oat milks work better than regular oat milk: manufacturers add protein and fat stabilizers specifically designed to mimic the frothing properties of dairy.
Tips for Getting It Right Every Time
- Use the coldest milk possible straight from the back of the refrigerator where temperatures are lowest, not the door shelf.
- Froth in a narrow container rather than a wide bowl to keep the milk concentrated and create an effective vortex.
- Clean your frother immediately after use because dried milk residue affects frothing performance on your next batch.
- Avoid overfrothing past the soft peak stage, as the foam becomes grainy and loses its smooth, creamy texture.
- Make foam fresh for each drink rather than storing it, since cold foam begins breaking down within 5 to 10 minutes.
- Tilt your coffee glass when adding foam to let it slide gently onto the surface instead of splashing and sinking.
Mistakes That Will Ruin Your Dish
- Using warm milk produces foam that collapses within seconds because the protein structure cannot maintain stability at higher temperatures.
- Overfilling the container causes milk to splash everywhere during frothing and prevents proper air incorporation.
- Frothing whole milk creates heavy foam that sinks into your drink instead of floating on top.
- Stirring your drink after adding foam breaks the foam structure immediately and defeats the entire purpose of the layered presentation.
- Using a weak or dying frother produces thin, unstable foam because the motor cannot spin fast enough to create proper aeration.
Make Ahead and Meal Prep Tips
Cold foam works best when made fresh, but you can streamline your morning routine with a few prep strategies. Having measured ingredients ready eliminates the steps that slow you down.
- Sweetened milk mixture can be premixed and stored in a sealed container for up to 3 days, ready to froth each morning.
- Flavored syrups can be made in larger batches and refrigerated for up to 2 weeks to have variety on hand.
- Pre portioned milk in small containers speeds up morning prep when you are half awake and need caffeine immediately.
- Chilled frothing cup can live permanently in your freezer so it is always ready when you need it.
What to Serve With Cold Foam
Cold foam belongs on any chilled beverage where you want a creamy top layer and a visually impressive presentation. It works for quick weekday mornings and leisurely weekend coffee sessions alike.
- Iced cold brew pairs perfectly because the strong coffee flavor cuts through the creamy foam for balanced sips.
- Iced matcha latte creates a stunning visual contrast with green tea below and white foam above.
- Iced chai gets a luxurious upgrade as the foam mellows the spice intensity.
- Chocolate cold brew becomes a mocha experience when topped with vanilla cold foam.
- Iced black tea transforms into something resembling Thai tea with sweet cream cold foam on top.
Drink Pairings
The best base drink for cold foam is a bold iced coffee or cold brew that can stand up to the creamy layer without tasting watered down. Strong coffee concentrates work better than weaker brews.
- Wine pairing: Not applicable for a coffee topping, but cold foam on an espresso martini adds sophistication to the cocktail
- Beer pairing: A coffee stout with cold foam creates a layered dessert drink experience
- Non alcoholic pairing: Iced oat milk latte with vanilla cold foam provides a completely plant based treat
- Hot drink pairing: Cold foam can top a lukewarm Americano for a temperature contrast experience
Flavour Variations Worth Trying
- Salted caramel cold foam: Add 1 tablespoon caramel sauce and a pinch of flaky sea salt before frothing. The sweet and salty combination makes every sip more complex.
- Pumpkin spice cold foam: Mix in 1 teaspoon pumpkin puree and 1/4 teaspoon pumpkin pie spice before frothing. The foam takes on an orange tint and tastes like autumn.
- Lavender cold foam: Steep dried culinary lavender in milk overnight, strain, then froth. The floral notes create a sophisticated, spa like drinking experience.
- Brown sugar cold foam: Substitute brown sugar simple syrup for white sugar. The molasses notes add depth and pair beautifully with bold espresso.
- Chocolate cold foam: Whisk in 1 teaspoon cocoa powder before frothing. This turns any iced coffee into a makeshift mocha.
How to Adapt This Recipe for Your Diet
- Gluten free: This recipe is naturally gluten free. Just verify that any flavored syrups you add do not contain gluten based thickeners.
- Dairy free: Use barista blend oat milk or canned coconut cream. The foam will be slightly less stable but still holds for several minutes.
- Vegan: Combine oat milk with a small amount of aquafaba (chickpea water) for improved foam stability. The aquafaba proteins mimic dairy proteins effectively.
- Low carb or keto: Skip the sugar entirely and use monk fruit sweetener or a few drops of liquid stevia. Heavy cream based foam is naturally low carb.
- High protein: Add 1 tablespoon of unflavored collagen powder to your milk before frothing. It dissolves completely and boosts protein without affecting texture.
How to Store and Reheat
In the Refrigerator
Pre mixed sweetened milk can be stored in an airtight container for up to 3 days. The mixture may separate slightly, so shake before frothing.
- Store the unfrothed milk mixture only, not the finished foam
- Keep toward the back of the refrigerator where temperatures stay coldest
In the Freezer
Cold foam does not freeze well in its frothed state, as ice crystals destroy the protein structure. However, you can freeze portioned milk in ice cube trays for quick access.
- Freeze unfrothed milk mixture in 1/2 cup portions in silicone molds
- Thaw completely in the refrigerator before frothing for best results
Reheating
Cold foam is not meant to be reheated, as heat destroys the foam structure immediately. Always make it fresh and cold.
- Oven reheating: Not applicable for cold foam
- Stovetop reheating: Not applicable for cold foam
- Microwave reheating: Never microwave cold foam as it will collapse instantly and lose all texture
Cost Breakdown
Making cold foam at home costs pennies compared to the $1.25 or more that coffee shops charge as an add on. Over a month of daily drinks, the savings add up to a meaningful amount.
| Ingredient | Estimated Cost |
|---|---|
| Nonfat milk (1/4 cup per serving) | $0.08 |
| Superfine sugar | $0.02 |
| Vanilla extract | $0.05 |
| Total Per Serving | $0.15 |
Nutrition Information
| Nutrient | Amount |
|---|---|
| Calories | 25 |
| Total Fat | 0g |
| Saturated Fat | 0g |
| Trans Fat | 0g |
| Cholesterol | 2mg |
| Sodium | 30mg |
| Total Carbohydrates | 5g |
| Dietary Fiber | 0g |
| Total Sugars | 5g |
| Added Sugars | 3g |
| Protein | 2g |
| Vitamin D | 1mcg |
| Calcium | 75mg |
| Iron | 0mg |
| Potassium | 95mg |
Nutritional values are estimates based on nonfat milk with added sugar. Actual values will vary based on specific brands, milk type, and sweetener choices.
Frequently Asked Questions
Can I use almond milk instead of dairy milk?
Almond milk produces very thin, unstable foam because it lacks the protein content of dairy. Use barista blend oat milk for the best nondairy results.
Can I make cold foam ahead of time?
Cold foam should be made fresh because it begins breaking down within 10 minutes. Pre mix your sweetened milk instead and froth just before serving.
How long will cold foam last on my drink?
Properly made cold foam holds its shape for 3 to 5 minutes on a drink. After that, it slowly melts into the beverage below, which is part of the experience.
Why is my cold foam thin and watery?
Thin foam usually means you stopped frothing too early or your milk was too warm. Use colder milk and froth for at least 30 to 45 seconds until volume doubles.
Can I double this recipe?
You can double the ingredients, but froth in batches to maintain quality. Overfilling your frothing container creates weak foam and messy overflow.
Why does coffee shop cold foam last longer than mine?
Coffee shops often add stabilizers like xanthan gum to extend foam life. A tiny pinch in your milk before frothing creates the same effect at home.
Can I put cold foam on hot drinks?
Cold foam will melt quickly on hot drinks, but some people enjoy the temperature contrast. For hot drinks, traditional steamed milk foam works better.
My Final Word
This cold foam recipe changed my morning routine completely. That 90 seconds of frothing turns a regular iced coffee into something that feels like a small celebration, and the cost savings over a year are genuinely significant.
I tested every variable in this recipe so you do not have to guess: the milk type, the temperature, the frothing time, the sweetener timing. Follow the steps exactly once, then start playing with flavors and making it your own.
Give it a try this week and let me know how it turns out. Drop a comment below or tag us on social media with your cold foam creations. I always enjoy seeing what flavor combinations people come up with.
Cold Foam
Ingredients
Equipment
Method
- Place your frothing cup or jar in the freezer for 5 minutes while you gather ingredients. A cold vessel helps maintain the low temperature that keeps foam stable.
- Pour exactly 1/2 cup of cold milk into your chilled cup. Fill the cup no more than one third full, as the milk will expand significantly during frothing.
- Add your superfine sugar or simple syrup to the cold milk now, before frothing. Stir briefly with a spoon to begin dissolving the sweetener into the liquid.
- Add vanilla extract or any other liquid flavorings to the milk mixture now. Use a light hand, as flavors concentrate in foam and can easily overpower the drink below.
- Submerge your handheld milk frother into the milk at a slight angle, with the whisk head fully below the surface. Position it just off center in the cup to create a vortex effect.
- Turn on the frother and hold it steady, letting the vortex do the work. Move the frother slowly up and down through the milk in small movements of about half an inch.
- Continue frothing for 30 to 45 seconds total until the milk has approximately doubled in volume. The foam should look thick and creamy, not thin and bubbly.
- Turn off the frother and lift it slowly from the foam. Tap the cup gently on the counter 2 to 3 times to pop any large surface bubbles.
- Let the foam rest for 15 to 20 seconds before spooning onto your drink. This brief rest allows the foam to stabilize and any remaining liquid to settle to the bottom.
- Use a spoon to gently scoop the foam from the top and place it onto your iced coffee or cold drink. Start from the edges and work toward the center for the thickest foam.