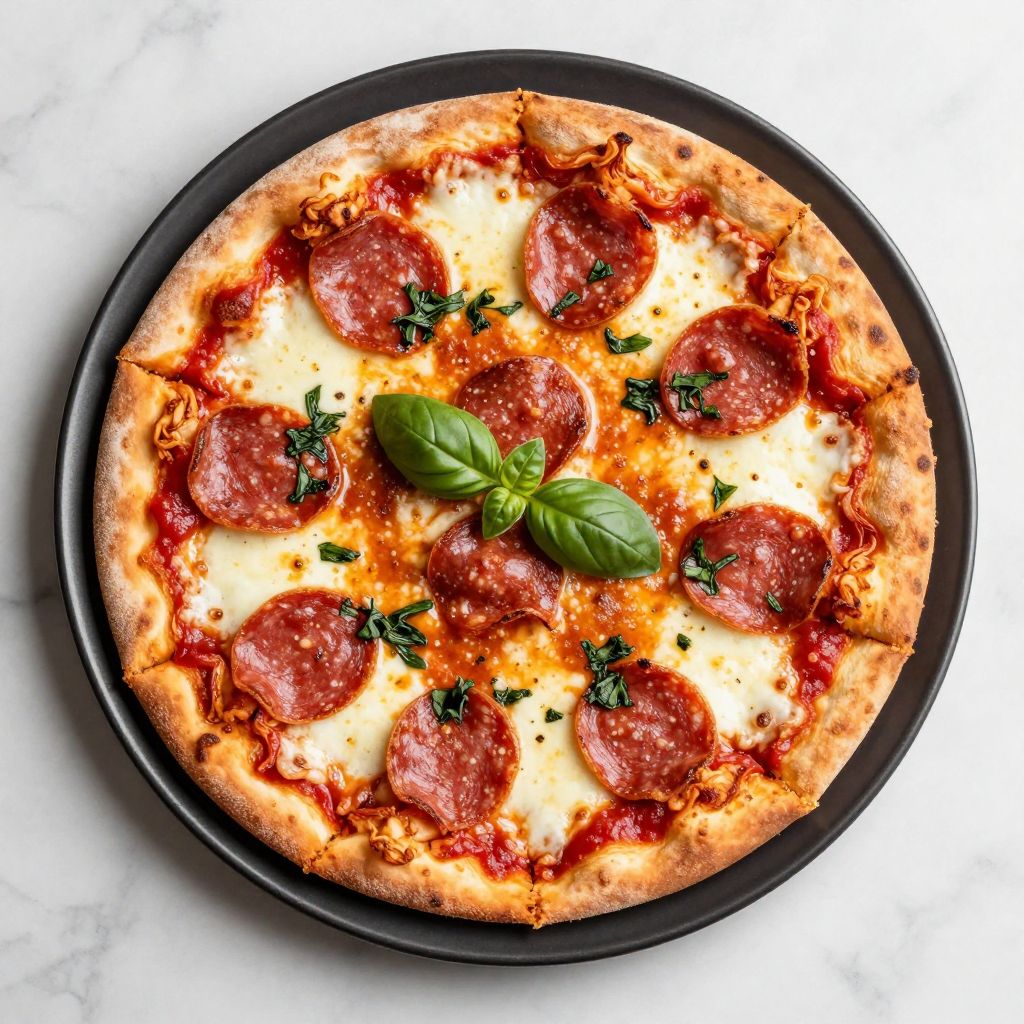
Picture this: golden, crispy edges with melted cheese bubbling on top, but the base is pure seasoned chicken instead of dough. Chicken crust pizza flips everything you know about pizza night on its head, delivering all the satisfaction without the carbs that usually come with it.
This recipe solves the eternal struggle between craving pizza and wanting to stick to a high-protein, low-carb meal plan. The crust gets surprisingly crispy, holding toppings like a champ while packing in serious flavor from the ground chicken itself.
What makes this work so well is the technique of pressing the chicken thin and baking it twice. You end up with a base that’s sturdy enough to pick up with your hands, not some soggy mess that falls apart.
Why You’ll Love This Recipe
This isn’t just another disappointing low-carb substitute that leaves you missing the real thing. The chicken crust actually tastes good on its own, with a texture that rivals thin-crust pizza when you nail the technique.
- Packs over 40 grams of protein per serving without trying
- Takes about 30 minutes from start to finish once you get the hang of it
- Holds toppings without falling apart or getting soggy
- Naturally gluten-free and keto-friendly without special ingredients
- Costs less than ordering delivery and tastes fresher than delivery
My Experience Making This Recipe
The first time I made this, I was skeptical that ground chicken could transform into anything resembling pizza crust. I pressed the seasoned meat onto parchment paper, slid it into a screaming-hot oven, and waited with low expectations.
What came out shocked me. The edges had crisped up beautifully, turning golden brown with slightly charred bits that added a savory depth. After adding sauce and cheese for the second bake, the whole thing held together when I sliced it, no structural collapse in sight.
My usually carb-loving partner grabbed a second slice without realizing it wasn’t traditional pizza until halfway through. That’s when I knew this recipe was a keeper, not just another diet food compromise.
Recipe Overview
- Recipe Name: Chicken Crust Pizza
- Servings: 4
- Prep Time: 10 minutes
- Cook Time: 20 minutes
- Total Time: 30 minutes
- Course: Main Course
- Cuisine: American, Italian Fusion
- Calories per Serving: 385
Equipment You Will Need
- Large baking sheet
- Parchment paper or silicone baking mat
- Mixing bowl
- Measuring cups and spoons
- Spatula or wooden spoon
- Pizza cutter or sharp knife
- Oven mitts
Ingredients for Chicken Crust Pizza
For the Chicken Crust
- Ground chicken: 1 pound (preferably not extra lean)
- Parmesan cheese: 1/2 cup, finely grated
- Italian seasoning: 2 teaspoons
- Garlic powder: 1 teaspoon
- Salt: 1/2 teaspoon
- Black pepper: 1/4 teaspoon
- Egg: 1 large
For the Toppings
- Pizza sauce: 1/2 cup
- Mozzarella cheese: 1 1/2 cups, shredded
- Pepperoni slices: 20-24 slices (optional)
- Fresh basil: handful, torn (optional)
Ingredient Notes and Substitutions
- Ground chicken: Provides the protein base and binds well when mixed with egg and cheese. You can swap in ground turkey, which works identically but may taste slightly drier.
- Parmesan cheese: Adds saltiness and helps bind the crust while creating crispy edges. Substitute with grated Pecorino Romano for a sharper, more assertive flavor.
- Italian seasoning: Gives the crust that familiar pizza flavor without needing multiple spice jars. Replace with a mix of dried oregano, basil, and thyme if you have those on hand.
- Egg: Acts as the binder that holds the ground chicken together during baking. Use a flax egg (1 tablespoon ground flaxseed mixed with 3 tablespoons water) for an egg-free version, though the texture will be slightly more crumbly.
- Mozzarella cheese: Melts beautifully and provides that classic pizza cheese pull. Try provolone or an Italian cheese blend if you want more complex flavor.
- Pizza sauce: Keeps things simple and familiar for traditional pizza taste. Swap in pesto, Alfredo sauce, or even buffalo sauce for completely different flavor profiles.
How to Make Chicken Crust Pizza
Step 1: Preheat and Prep Your Baking Surface
Set your oven to 450°F and let it fully preheat for at least 15 minutes. Line your baking sheet with parchment paper, making sure it lies flat without wrinkles that could create uneven cooking spots.
The high temperature is critical here because it mimics a pizza oven environment, creating that crispy exterior while keeping the inside moist. Skipping the preheat time will result in a softer, less pizza-like crust.
Step 2: Mix the Chicken Crust Base
Combine the ground chicken, Parmesan, Italian seasoning, garlic powder, salt, pepper, and egg in your mixing bowl. Use your hands or a wooden spoon to mix everything until just combined, being careful not to overwork the meat.
Overmixing makes the chicken tough and dense instead of tender. You want the ingredients distributed evenly but the meat itself still loosely packed.
Step 3: Form the Crust
Dump the chicken mixture onto your prepared baking sheet and use your hands to press it into a rectangle or circle about 1/4 inch thick. Aim for even thickness throughout, paying special attention to the edges so they don’t burn before the center cooks.
Thinner is better here because it crisps up more effectively and feels more like actual pizza crust. Going thicker than 1/4 inch leaves you with something closer to a chicken patty than a pizza base.
Step 4: Par-Bake the Crust
Slide the baking sheet into your preheated oven and bake for 12 minutes. The crust should look cooked through with golden-brown edges starting to form.
This first bake sets the structure so the crust can support toppings without getting soggy. The chicken needs to firm up before you add wet ingredients like sauce.
Step 5: Drain Excess Fat
Remove the baking sheet from the oven and carefully tilt it to let any rendered chicken fat drain into a corner. Blot it up with paper towels without disturbing the crust itself.
Skipping this step leaves your pizza sitting in grease, which prevents the bottom from crisping and makes the whole thing feel heavy. A quick drain makes all the difference in final texture.
Step 6: Add Sauce and Cheese
Spread the pizza sauce evenly over the par-baked crust, leaving about a half-inch border around the edges. Sprinkle the mozzarella cheese on top, then add your pepperoni or any other toppings you’re using.
The border without sauce helps the edges get extra crispy and creates that classic pizza crust look. Don’t overload with toppings or the moisture will make everything soggy.
Step 7: Final Bake
Return the topped pizza to the oven and bake for another 6-8 minutes. Watch for the cheese to melt completely and bubble, with some golden spots forming on top.
This second bake is shorter because you’re just melting cheese and heating toppings, not cooking raw meat. Overbaking at this stage dries out the chicken base.
Step 8: Rest and Slice
Let the pizza rest on the baking sheet for 3-4 minutes before slicing. This resting period lets everything set up so the slices hold together when you cut them.
Cutting immediately causes the cheese to slide off and the crust to tear. Patience here pays off with clean slices that actually look like pizza.
Pro Tip: Press the chicken crust as thin as you possibly can without creating holes. The thinner you go, the crispier the final result, and the more it mimics traditional thin-crust pizza texture.
Tips for the Best Chicken Crust Pizza
- Use ground chicken with some fat content rather than extra lean. The fat helps with browning and keeps the crust from drying out into a hockey puck.
- Let your oven fully preheat before baking. A properly hot oven creates the quick sear that produces crispy edges instead of steamed, soft ones.
- Press the crust thinner than you think you should. It puffs up slightly during baking, and thinner crusts get crispier and more pizza-like.
- Don’t skip draining the fat between bakes. That pooled grease prevents crisping and makes the bottom soggy no matter how long you bake it.
- Use a silicone baking mat instead of parchment if you have one. It conducts heat more evenly and helps the bottom crisp up better than parchment paper.
- Cool for those few minutes before cutting. The structure needs time to set, or you’ll end up with a messy pile instead of proper slices.
Common Mistakes to Avoid
- Making the crust too thick turns this into a giant chicken patty with toppings instead of pizza. Keep it at 1/4 inch or thinner for proper texture.
- Using extra lean ground chicken results in a dry, crumbly crust that falls apart. You need some fat for moisture and binding.
- Overloading with wet toppings like fresh tomatoes or excessive sauce makes the crust soggy. Go lighter on moisture-heavy ingredients than you would with regular pizza.
- Skipping the par-bake means your crust stays soft and can’t support toppings properly. The two-stage baking is not optional.
- Cutting too soon causes the whole thing to fall apart because the proteins haven’t had time to firm up after that final blast of heat.
Serving Suggestions
This pizza works great as a complete meal on its own since it’s loaded with protein. Pair it with lighter sides that add freshness without competing with the richness of cheese and meat.
- Simple arugula salad with lemon vinaigrette to cut through the richness
- Roasted vegetables like zucchini, bell peppers, or asparagus
- Caesar salad with extra anchovies if you’re feeling fancy
- Garlic-butter green beans for a quick veggie side
- Tomato and cucumber salad with red onion and Italian dressing
Variations to Try
- Buffalo Chicken Pizza: Replace pizza sauce with buffalo sauce and top with blue cheese crumbles and diced celery after baking. The spicy-tangy combo works surprisingly well with the chicken base.
- BBQ Chicken Version: Swap pizza sauce for your favorite BBQ sauce and add red onion and cilantro after baking. The sweetness of BBQ sauce complements the savory crust beautifully.
- White Pizza Style: Skip the red sauce and brush the crust with garlic-infused olive oil before adding mozzarella, ricotta dollops, and spinach. This feels more elegant and less heavy.
- Mediterranean Twist: Top with pesto instead of pizza sauce, then add sun-dried tomatoes, kalamata olives, and feta cheese. The briny, herby flavors make this feel lighter and fresher.
- Breakfast Pizza: After the first bake, top with scrambled eggs, crumbled bacon, and cheddar cheese. This turns leftover crust into a protein-packed breakfast.
Dietary Adaptations
- Gluten-Free: This recipe is naturally gluten-free as written, with no modifications needed. Just verify your pizza sauce doesn’t contain hidden gluten.
- Dairy-Free: Replace the Parmesan in the crust with nutritional yeast and use dairy-free mozzarella for topping. The crust won’t get quite as crispy without real Parmesan, but it still works.
- Keto/Low-Carb: Already keto-friendly with only about 3 grams of carbs per slice. Make sure your pizza sauce has no added sugar to keep carbs minimal.
- Paleo: Omit the cheese from both the crust and toppings, adding an extra egg to the crust mixture for binding. Top with compliant ingredients like vegetables and compliant sauce.
Storage and Reheating
Refrigerator
Store leftover slices in an airtight container in the fridge for up to 4 days. Place parchment paper between slices to prevent them from sticking together.
- Let the pizza cool completely before storing to prevent condensation
- Don’t stack slices directly on top of each other without separation
- The crust will soften slightly in the fridge but crisps back up when reheated properly
Freezer
Freeze individual slices wrapped in plastic wrap, then placed in a freezer bag for up to 3 months. This method prevents freezer burn and makes grabbing single portions easy.
- Flash-freeze slices on a baking sheet before wrapping to prevent cheese from sticking
- Label with the date so you remember when you made it
- Thaw in the fridge overnight before reheating for best texture
Reheating
The oven or toaster oven gives the best results, crisping up the crust instead of making it rubbery. Avoid the microwave if you care about texture at all.
- Reheat in a 375°F oven for 8-10 minutes until cheese bubbles again
- Use a wire rack on the baking sheet so air circulates underneath
- Skillet reheating works great too: cook covered for 3 minutes, then uncovered for 2 more
Nutrition Information
| Nutrient | Amount |
|---|---|
| Calories | 385 |
| Total Fat | 24g |
| Saturated Fat | 11g |
| Carbohydrates | 4g |
| Fiber | 1g |
| Sugar | 2g |
| Protein | 41g |
| Sodium | 780mg |
| Cholesterol | 165mg |
Nutritional values are approximate and vary based on specific ingredients used and portion sizes. These calculations assume basic toppings of sauce, mozzarella, and pepperoni.
Frequently Asked Questions
Can I use chicken breast instead of ground chicken?
You could grind chicken breast yourself, but it will be too lean and produce a dry, crumbly crust. Ground chicken thigh or a mix with some fat content works much better for moisture and binding.
Can I make the crust ahead of time?
Absolutely, par-bake the crust through step 5, let it cool, then refrigerate for up to 2 days. When you’re ready to eat, add toppings and do the final bake straight from the fridge, adding 2-3 extra minutes.
Why is my crust falling apart when I slice it?
You either made it too thick, didn’t let it rest after the final bake, or used extra lean chicken without enough fat to bind. Make sure you’re following the thickness guideline and including the egg.
Can I cook this in an air fryer?
Yes, but you’ll need to adjust the size to fit your air fryer basket. Cook at 400°F for 10 minutes, drain fat, add toppings, then cook another 5 minutes until cheese melts.
How do I prevent the crust from being too greasy?
Don’t skip draining the fat after the par-bake, and consider patting the surface with paper towels before adding sauce. Using regular ground chicken instead of fatty ground thigh also helps reduce excess grease.
Can I use this crust for other dishes besides pizza?
The seasoned chicken base works great as a flatbread for sandwiches or cut into strips as high-protein breadsticks. Season it differently and you could even use it as a base for appetizers with various toppings.
What’s the best way to get the crust really crispy?
Press it as thin as possible, use a preheated oven, and don’t skip draining the fat after the first bake. A silicone baking mat can also help the bottom brown more evenly.
Chicken Crust Pizza

A high-protein, low-carb pizza with a crispy ground chicken crust instead of traditional dough. This gluten-free and keto-friendly recipe delivers all the satisfaction of pizza night while packing over 40 grams of protein per serving.
- Large baking sheet
- Parchment paper or silicone baking mat
- Mixing bowl
- Measuring cups and spoons
- Spatula or wooden spoon
- Pizza cutter or sharp knife
- Oven mitts
For the Chicken Crust
- 1 pound ground chicken (preferably not extra lean)
- 1/2 cup Parmesan cheese (finely grated)
- 2 teaspoons Italian seasoning
- 1 teaspoon garlic powder
- 1/2 teaspoon salt
- 1/4 teaspoon black pepper
- 1 large egg
For the Toppings
- 1/2 cup pizza sauce
- 1 1/2 cups mozzarella cheese (shredded)
- 20-24 slices pepperoni (optional)
- handful fresh basil (torn, optional)
- Set your oven to 450°F and let it fully preheat for at least 15 minutes. Line your baking sheet with parchment paper, making sure it lies flat without wrinkles.
- Combine the ground chicken, Parmesan, Italian seasoning, garlic powder, salt, pepper, and egg in your mixing bowl. Use your hands or a wooden spoon to mix everything until just combined, being careful not to overwork the meat.
- Dump the chicken mixture onto your prepared baking sheet and use your hands to press it into a rectangle or circle about 1/4 inch thick. Aim for even thickness throughout, paying special attention to the edges.
- Slide the baking sheet into your preheated oven and bake for 12 minutes. The crust should look cooked through with golden-brown edges starting to form.
- Remove the baking sheet from the oven and carefully tilt it to let any rendered chicken fat drain into a corner. Blot it up with paper towels without disturbing the crust itself.
- Spread the pizza sauce evenly over the par-baked crust, leaving about a half-inch border around the edges. Sprinkle the mozzarella cheese on top, then add your pepperoni or any other toppings you’re using.
- Return the topped pizza to the oven and bake for another 6-8 minutes. Watch for the cheese to melt completely and bubble, with some golden spots forming on top.
- Let the pizza rest on the baking sheet for 3-4 minutes before slicing. This resting period lets everything set up so the slices hold together when you cut them.
Press the chicken crust as thin as possible without creating holes for the crispiest result. Use ground chicken with some fat content rather than extra lean to prevent drying. Don’t skip draining the fat between bakes to prevent sogginess. Store leftovers in an airtight container in the fridge for up to 4 days or freeze for up to 3 months.