Ahi tuna seared to perfection delivers a buttery, ruby-red center with a caramelized crust that rivals any high-end restaurant. This recipe transforms a single protein into a show-stopping meal in under fifteen minutes. Whether you’re impressing guests or treating yourself on a Tuesday night, this is the technique that will get you there.
What Makes This Recipe Worth Your Time
This method produces restaurant-quality seared ahi tuna at home without any specialized equipment or culinary training. The technique is straightforward, the results are consistent, and the flavor is unbeatable.
- Speed is the defining feature here: from cutting board to plate in under fifteen minutes of active cooking time.
- The crust-to-center contrast creates two distinct textures in every bite, something you simply cannot achieve with fully cooked tuna.
- Minimal ingredients let the fish shine; you need just five pantry staples to make this work beautifully.
- This recipe scales effortlessly for one person or a dinner party of eight without changing the technique.
- Leftover seared tuna makes exceptional next-day salads or poke-style bowls with zero quality loss when stored properly.
A Little Background on This Dish
Ahi is the Hawaiian name for both yellowfin and bigeye tuna, fish that have been central to Pacific Island cuisine for centuries. The searing technique we use today emerged from Japanese tataki preparation, where the goal is to cook only the outermost layer while preserving the raw interior.
This style of preparation landed on American menus in the 1980s when fusion cuisine took hold in coastal cities. The dish quickly became a steakhouse and sushi bar staple because it showcases the fish’s natural qualities better than any other cooking method.
My Experience With This Recipe
I started making seared ahi at home about twelve years ago after paying thirty dollars for a portion at a restaurant that took exactly ninety seconds to cook. That price tag felt like a challenge, and I wanted to see if I could match the result in my own kitchen.
My first attempts were disasters. I kept the tuna in the pan too long, turning that gorgeous red center into gray, dry protein that tasted like canned cat food.
The night I finally nailed it, I remember slicing into that first piece and seeing the perfect gradient from seared edge to cool, silky center. My wife actually stopped mid-conversation when she tasted it, which in our house counts as a standing ovation.
Before You Start: Key Things to Know
This recipe suits confident beginners and experienced cooks alike, but it demands your full attention during the brief cooking window. The biggest challenge is trusting the timing and resisting the urge to overcook.
- Difficulty level: Moderate; the technique is simple but timing is unforgiving.
- Active time vs passive time: Ten minutes active, five minutes resting; no passive cooking time.
- Most important equipment: A heavy-bottomed skillet (cast iron is ideal) that holds heat without hot spots.
- Step requiring most attention: The searing itself; you have roughly sixty to ninety seconds per side before overcooking begins.
Recipe at a Glance
- Recipe Name: Seared Ahi Tuna
- Yield: 4 servings
- Prep Time: 10 minutes
- Cook Time: 4 minutes
- Total Time: 14 minutes
- Resting Time: 2 minutes
- Difficulty: Moderate
- Course: Main Course or Appetizer
- Cuisine: Pacific Rim, Japanese-Inspired
- Calories per Serving: 285
How to Source the Best Ingredients
The quality of your tuna determines at least eighty percent of the final result. Since most of the fish stays raw, there is nowhere for inferior product to hide.
- Ahi tuna steaks: Look for deep red or magenta color with no brown spots; the flesh should appear moist and translucent, never dull or opaque; ask for sushi-grade or sashimi-grade, which indicates the fish was frozen at temperatures that kill parasites.
- Sesame seeds: Buy white and black sesame from a store with high turnover; stale seeds taste bitter and rancid; the Asian foods aisle typically offers better quality than the spice aisle.
- Sesame oil: Choose toasted sesame oil (dark amber color) for finishing, not the pale refined version used for cooking; it should smell intensely nutty.
- Soy sauce: Use naturally brewed soy sauce, not hydrolyzed versions; check the ingredient list for just soybeans, wheat, salt, and water.
- Neutral cooking oil: Avocado oil or refined grapeseed oil work best because they handle high heat without smoking or adding flavor.
Ingredients for Seared Ahi Tuna
For the Tuna
- 1.5 pounds sushi-grade ahi tuna steaks, cut 1.5 inches thick
- 3 tablespoons white sesame seeds
- 2 tablespoons black sesame seeds
- 1 teaspoon kosher salt
- 0.5 teaspoon freshly ground black pepper
- 2 tablespoons avocado oil or other high-smoke-point oil
For the Dipping Sauce
- 0.25 cup soy sauce
- 1 tablespoon rice vinegar
- 1 teaspoon toasted sesame oil
- 1 teaspoon fresh ginger, finely grated
- 0.5 teaspoon honey
- 1 green onion, thinly sliced
Smart Substitutions and Swaps
- Ahi tuna: This fish provides the signature buttery texture and clean flavor; substitute with sushi-grade salmon for a richer taste, but reduce searing time by fifteen seconds per side.
- Sesame seeds: These create the signature crust and nutty flavor; crushed coriander seeds mixed with poppy seeds offer a different but equally appealing texture.
- Soy sauce: This provides the primary salt component and umami depth; coconut aminos work for soy-free diets but taste slightly sweeter, so reduce or omit the honey.
- Rice vinegar: This adds brightness to the dipping sauce; fresh lime juice provides similar acidity with a more tropical character.
- Sesame oil: This contributes the finishing aroma and richness; walnut oil or a drizzle of good olive oil changes the flavor profile but maintains the fat component.
- Ginger: This adds heat and freshness to the sauce; a pinch of wasabi powder delivers similar warmth with more nasal intensity.
Tools and Equipment You Will Need
Having everything within arm’s reach before you start is critical because the cooking happens fast. Once that pan is hot, you will not have time to hunt for a spatula.
- 12-inch cast iron skillet or heavy stainless steel pan (retains heat for proper searing without temperature drops)
- Wide metal spatula or fish spatula (thin edge slides under the crust without tearing)
- Shallow dish or plate for the sesame seed mixture
- Sharp chef’s knife (dull blades crush the delicate fish fibers)
- Cutting board
- Small mixing bowl for the sauce
- Paper towels for drying the fish
- Instant-read thermometer (optional but useful for beginners)
- Kitchen timer
How to Make Seared Ahi Tuna
Read through every step before you begin and gather all ingredients and tools. The tuna must be completely dry and close to room temperature; remove it from the refrigerator fifteen minutes before cooking.
Step 1: Prepare the Dipping Sauce
Combine the soy sauce, rice vinegar, sesame oil, grated ginger, and honey in a small bowl. Whisk until the honey dissolves completely, then stir in the sliced green onion.
Making the sauce first gives the flavors time to meld while you prepare the tuna. The ginger needs a few minutes to release its aromatic oils into the liquid.
The sauce should taste balanced between salty, sweet, and acidic. Adjust now if needed, because you cannot fix it once the fish is ready.
Step 2: Mix the Sesame Seed Crust
Pour the white and black sesame seeds onto a shallow plate and mix them together with your fingers. Spread the mixture into an even layer about half an inch deep.
Using both colors creates visual contrast and slightly different flavor notes. White sesame seeds taste nuttier while black sesame seeds have a more earthy, bitter edge.
The layer must be deep enough to coat all sides of the tuna without running out mid-process.
Step 3: Dry and Season the Tuna
Pat each tuna steak thoroughly dry with paper towels, pressing firmly to remove all surface moisture. Season all sides evenly with the kosher salt and black pepper.
Surface moisture is the enemy of a good sear because water creates steam instead of allowing direct contact between protein and hot metal. Dry fish browns; wet fish steams and turns gray.
The salt should look like a light dusting, not a heavy coating. You will taste if you over-season.
Step 4: Coat the Tuna in Sesame Seeds
Press each tuna steak firmly into the sesame seed mixture, coating the top completely. Flip and repeat on the bottom, then press seeds onto all four sides.
The seeds need to adhere tightly so they do not fall off in the pan and burn. Pressing firmly embeds them into the surface of the fish.
A well-coated steak should have no visible red showing through the seed layer. Gaps mean bare spots that will cook differently.
Step 5: Preheat the Skillet
Set your cast iron skillet over high heat and let it preheat for three full minutes. The pan must reach smoking point before the fish goes in.
A properly preheated pan creates instant crust formation on contact. If the pan is too cool, the tuna will stick, the seeds will not toast, and the cooking time extends into the danger zone of overcooking.
Hold your hand six inches above the pan surface; you should feel intense, uncomfortable heat. A drop of water should vaporize instantly.
Step 6: Add the Oil
Add the avocado oil to the hot pan and swirl to coat the entire bottom surface. Wait ten seconds for the oil to heat and shimmer.
The oil acts as a heat transfer medium and prevents sticking. Adding it to an already hot pan ensures it reaches the correct temperature almost instantly.
The oil should shimmer and ripple but not smoke heavily. Light wisps of smoke are acceptable; billowing smoke means the pan is too hot.
Step 7: Sear the First Side
Lay the tuna steaks gently into the pan, placing them away from you to avoid oil splatter. Do not move them once they hit the surface. Sear for exactly sixty to ninety seconds.
The Maillard reaction requires uninterrupted contact between the protein surface and the hot metal. Moving the fish breaks that contact and prevents proper crust development.
You will hear aggressive sizzling that quiets slightly after thirty seconds. The edges of the visible side will begin to turn from red to tan, climbing about one-eighth inch up the side.
Step 8: Sear the Second Side
Slide the spatula under each steak and flip it in one confident motion. Sear the second side for another sixty to ninety seconds, maintaining high heat.
The second side develops its crust while the heat penetrates slightly deeper into the fish. Consistent timing on both sides ensures even cooking.
When you flip, the first side should show deep golden brown sesame seeds with no black burned spots. The color tells you the heat level was correct.
Step 9: Sear the Edges (Optional)
Using tongs, briefly press each narrow edge against the pan surface for fifteen to twenty seconds. This step is optional but creates a fully crusted exterior.
Edge searing completes the visual presentation and adds more toasted sesame flavor. For appetizer portions, this polish makes a significant difference.
The edges will brown quickly because they are thin. Watch for the same golden color you achieved on the flat sides.
Step 10: Rest the Tuna
Transfer the seared tuna to a clean cutting board and let it rest for exactly two minutes. Do not skip this step.
Resting allows the residual heat to distribute evenly and the muscle fibers to relax. Cutting immediately releases juices and makes the texture less pleasant.
The tuna will continue cooking slightly during the rest, so a slightly underdone appearance when leaving the pan is exactly what you want.
Step 11: Slice the Tuna
Using your sharpest knife, slice each tuna steak against the grain into half-inch medallions. Wipe the blade clean between cuts for the cleanest presentation.
Cutting against the grain shortens the muscle fibers and makes each bite more tender. A sharp knife glides through without compressing the delicate center.
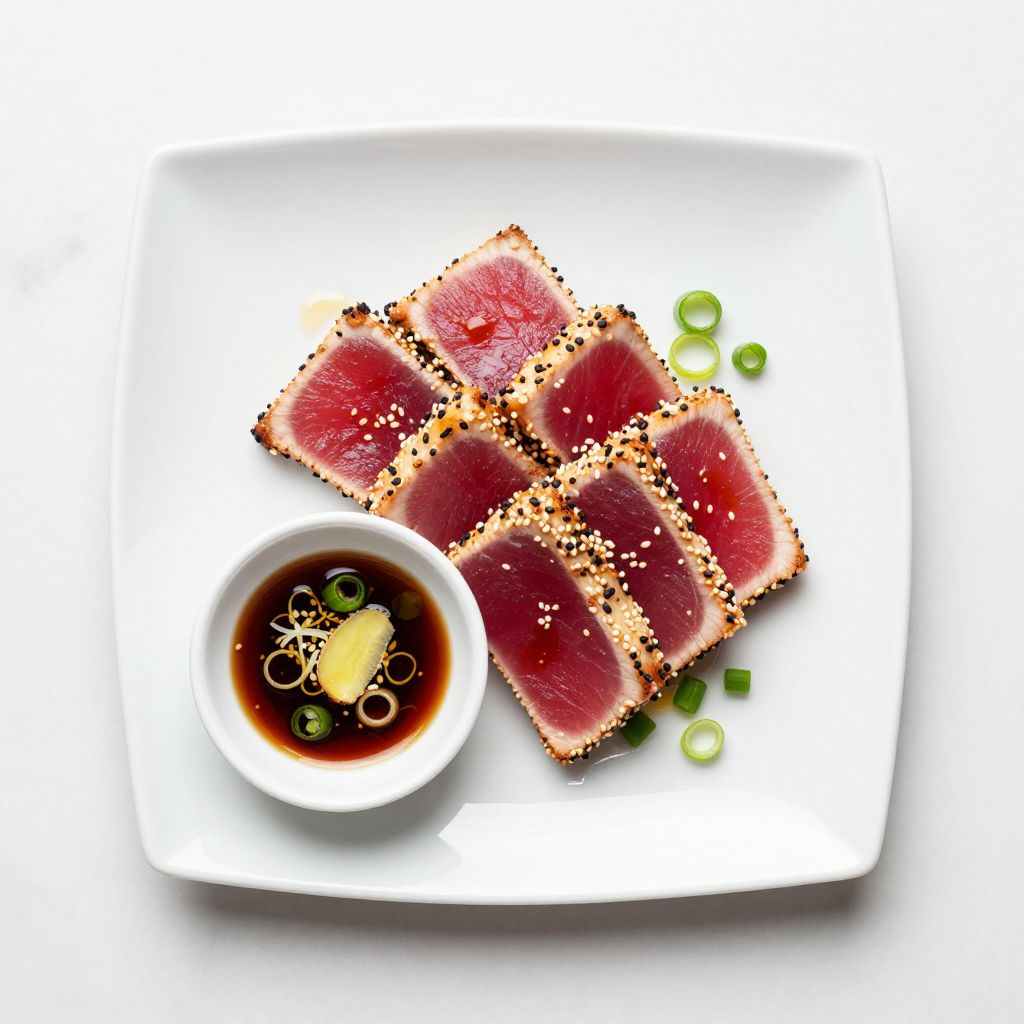
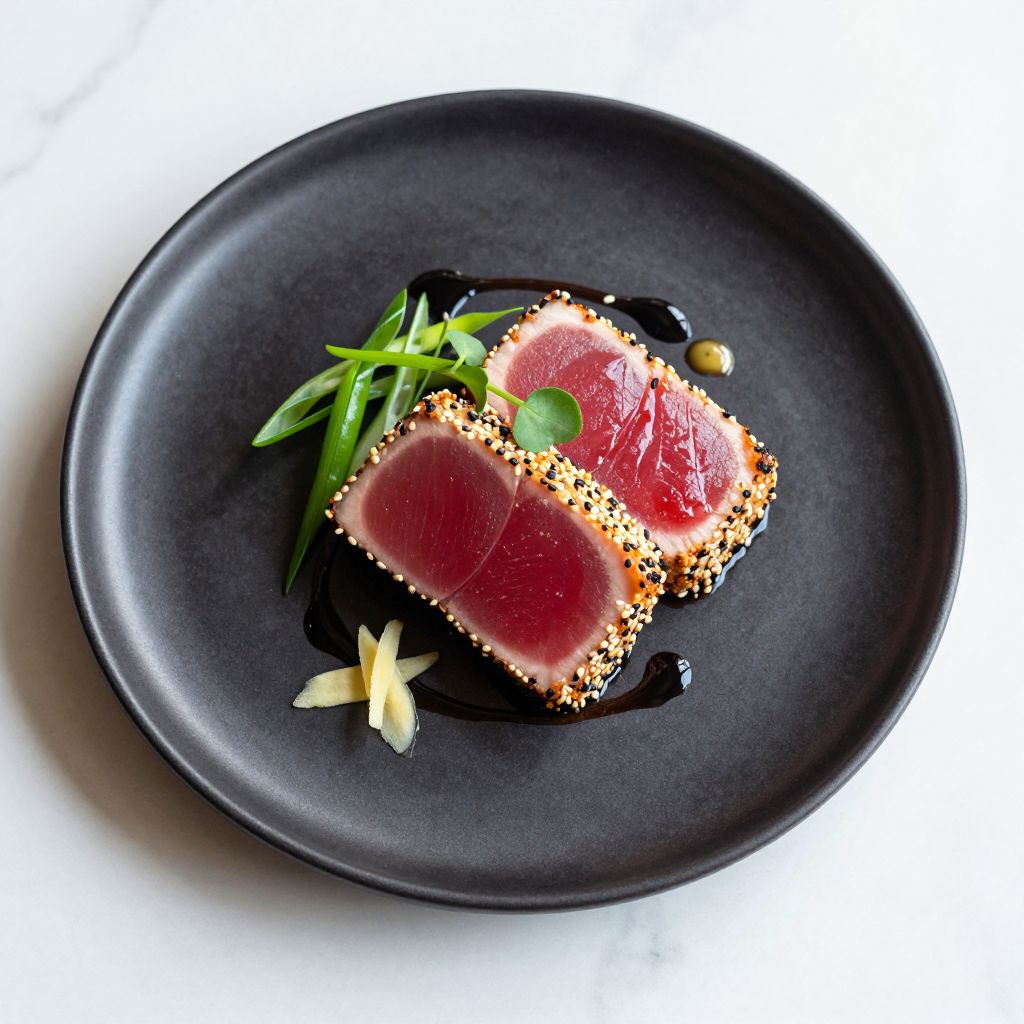
The cross-section should reveal a thin tan ring around a ruby red center. If the center looks more pink than red, you cooked it slightly too long but it will still taste good.
Step 12: Plate and Serve
Fan the slices across plates in a single layer, showing the red centers prominently. Drizzle lightly with a small amount of the dipping sauce and serve the remainder on the side.
Plating in a fan allows guests to see the quality of your sear and appreciate the color contrast. Keeping most sauce on the side lets people control their own seasoning level.
Serve immediately while the exterior remains warm and the interior stays cool. Seared ahi does not benefit from sitting.
Pro Tip: The total contact time between fish and pan should never exceed three minutes regardless of steak thickness. If you want a warmer center, use thinner steaks rather than cooking longer. Time is the variable that destroys this dish.
The Science Behind the Technique
The magic of seared ahi tuna relies on the massive temperature differential between the screaming hot pan and the cold fish interior. This gradient creates two completely different textures in the same piece of protein within seconds.
When the tuna surface hits the 500°F pan, proteins immediately denature and the Maillard reaction begins, producing hundreds of new flavor compounds. Meanwhile, the center stays below 80°F because heat transfers slowly through dense muscle tissue, leaving the interior essentially raw.
Chef Note: The crust acts as insulation that actually protects the interior from overcooking, which is why a thicker sesame seed coating helps maintain that temperature contrast longer.
Tips for Getting It Right Every Time
- Remove the tuna from refrigeration exactly fifteen minutes before cooking; too cold and it will not sear properly, too warm and food safety becomes a concern.
- Count out loud during searing rather than relying on visual cues alone; sixty seconds feels longer than you think when you are nervous about overcooking.
- Use an instant-read thermometer if you want certainty: the center should read 90°F to 100°F for proper rare doneness after resting.
- Slice just before serving rather than in advance; exposure to air begins oxidizing the red interior immediately.
- Keep the exhaust fan running on high because proper searing temperatures produce significant smoke; open windows if needed.
- Never crowd the pan with more than two steaks at once; overcrowding drops the temperature and causes steaming instead of searing.
Mistakes That Will Ruin Your Dish
- Using wet fish creates steam that prevents browning and produces a gray, unappetizing exterior with a rubbery texture.
- Cooking in a cold pan means the fish sticks, the seeds do not toast, and by the time color develops the interior is overcooked.
- Moving the fish during searing breaks the crust formation and results in patchy, uneven browning with pale spots.
- Searing longer than ninety seconds per side pushes heat too deep into the flesh, turning the ruby center into dry, gray protein.
- Skipping the rest period causes juice loss when slicing and makes the temperature difference between crust and center feel jarring rather than pleasant.
Make Ahead and Meal Prep Tips
Seared ahi tuna is best served immediately, but strategic prep work can cut your active cooking time dramatically for entertaining. The components keep well separately when stored correctly.
- Dipping sauce can be made up to three days ahead and stored refrigerated in an airtight container; bring to room temperature before serving for best flavor.
- Sesame seed mixture can be combined up to one week ahead and stored in a sealed jar at room temperature away from heat and light.
- Tuna steaks can be purchased, portioned, and frozen for up to two months; thaw overnight in the refrigerator before cooking.
- Leftover seared tuna stores refrigerated for up to two days and works beautifully sliced thin over salads or in grain bowls served cold.
What to Serve With Seared Ahi Tuna
This dish works as an elegant appetizer or a satisfying main course depending on portion size and accompaniments. The clean, rich flavor pairs best with bright, acidic sides that cut through the fish’s richness.
- Pickled ginger and wasabi: The traditional sushi accompaniments cleanse the palate between bites and add heat without overpowering the fish.
- Seaweed salad: The briny, slightly sweet flavor and crunchy texture complement the silky tuna and add visual color to the plate.
- Steamed jasmine rice: A neutral, aromatic starch absorbs the dipping sauce and transforms the appetizer into a complete meal.
- Quick-pickled cucumber: The cold, crisp acidity provides textural contrast and refreshes the palate.
- Edamame: Salted soybeans offer protein and a satisfying pop that rounds out the Asian flavor profile.
Drink Pairings
A chilled, crisp white wine with good acidity cuts through the richness of the tuna while complementing the sesame and soy flavors. Dry Riesling from Alsace or a minerally Grüner Veltliner from Austria are my top choices.
- Wine pairing: Dry Riesling or Grüner Veltliner; the high acidity and stone fruit notes balance the fish’s fattiness.
- Beer pairing: Japanese rice lager like Asahi or Sapporo; the clean, light body refreshes without competing for attention.
- Non-alcoholic pairing: Sparkling water with a squeeze of lime; the bubbles cleanse the palate and the citrus echoes the sauce.
- Hot drink pairing: Genmaicha (roasted rice green tea); the toasty flavor mirrors the sesame crust beautifully.
Flavour Variations Worth Trying
- Blackened Cajun Style: Replace the sesame crust with a blend of paprika, cayenne, thyme, and garlic powder. The result is smoky and spicy with a completely different flavor profile that works well with remoulade sauce.
- Furikake Crusted: Use Japanese rice seasoning (furikake) instead of plain sesame seeds. The nori and bonito flakes add umami depth and create a more complex, savory crust.
- Citrus Ponzu Version: Swap the soy dipping sauce for ponzu and add yuzu zest to the sesame coating. The citrus brightness makes this version feel lighter and more refreshing for summer.
- Spicy Sriracha Glazed: Brush the seared tuna with a mixture of sriracha, honey, and lime juice immediately after cooking. The glaze adds sweetness, heat, and a glossy presentation.
- Everything Bagel Crusted: Replace sesame seeds with everything bagel seasoning for a playful twist. The onion and garlic add pungency while maintaining the crunchy texture element.
How to Adapt This Recipe for Your Diet
- Gluten-free: Use tamari or coconut aminos instead of regular soy sauce; no other changes needed. The flavor stays nearly identical with tamari.
- Dairy-free: This recipe is naturally dairy-free as written. No modifications required.
- Low-carb or Keto: Omit the honey from the dipping sauce or substitute with a drop of liquid stevia. The recipe is already very low in carbohydrates.
- High-protein: Increase the portion size to 8 ounces per person and serve over a bed of quinoa. This modification provides over 50 grams of protein per serving.
- Vegetarian: This technique works surprisingly well with firm watermelon steaks cut to the same dimensions. The texture differs but the searing method and seasonings translate directly.
How to Store and Reheat
In the Refrigerator
Store leftover seared tuna tightly wrapped in plastic or in an airtight container for up to two days maximum. Quality degrades noticeably after the first day.
- Keep the sliced tuna in a single layer to prevent the pieces from sticking together.
- Store the dipping sauce separately to prevent the acid from affecting the fish texture.
In the Freezer
Seared ahi tuna does not freeze well after cooking because the delicate texture becomes rubbery upon thawing. I do not recommend freezing cooked portions.
- Freeze raw, uncooked tuna steaks instead and sear fresh when needed.
- Wrap raw steaks individually in plastic, then foil, removing as much air as possible.
Reheating
Honestly, do not reheat seared ahi tuna. Serve leftovers cold over salads or in poke bowls for best results.
- Oven reheating: Not recommended; the interior will overcook completely before the exterior warms.
- Stovetop reheating: Not recommended; any additional heat destroys the rare center.
- Microwave reheating: Absolutely do not attempt; you will have expensive rubber within thirty seconds.
Cost Breakdown
Making seared ahi tuna at home costs roughly one-third of restaurant prices for the same quality. The fish itself represents nearly all of the expense.
| Ingredient | Estimated Cost |
|---|---|
| Sushi-grade ahi tuna (6 oz) | $8.00 |
| Sesame seeds | $0.40 |
| Soy sauce | $0.15 |
| Sesame oil | $0.20 |
| Ginger | $0.10 |
| Rice vinegar | $0.05 |
| Avocado oil | $0.25 |
| Total Per Serving | $9.15 |
Nutrition Information
| Nutrient | Amount |
|---|---|
| Calories | 285 |
| Total Fat | 12g |
| Saturated Fat | 2g |
| Trans Fat | 0g |
| Cholesterol | 65mg |
| Sodium | 620mg |
| Total Carbohydrates | 6g |
| Dietary Fiber | 2g |
| Total Sugars | 2g |
| Added Sugars | 1g |
| Protein | 38g |
| Vitamin D | 82 IU |
| Calcium | 85mg |
| Iron | 2mg |
| Potassium | 485mg |
Nutritional values are estimates based on typical ingredients and may vary depending on specific brands, portion sizes, and any modifications made to the recipe.
Frequently Asked Questions
Can I use regular tuna steaks instead of sushi-grade?
I strongly advise against it because regular tuna has not been frozen to temperatures that kill parasites. For a dish served mostly raw, sushi-grade is a food safety requirement, not just a quality preference.
Can I sear the tuna ahead of time and slice it later?
You can sear up to two hours ahead and refrigerate the whole steaks unsliced. Slice just before serving to prevent oxidation and moisture loss.
How long will leftover seared tuna keep in the refrigerator?
Properly stored in an airtight container, leftover seared tuna keeps for two days maximum. Quality is best on day one, acceptable on day two, and risky beyond that.
Why did my sesame seeds burn while the tuna was still raw inside?
Your pan was too hot, likely over 525°F. Lower the heat slightly next time, or add the tuna just before the oil reaches its smoke point.
Can I double this recipe for a dinner party?
Yes, but sear in batches of no more than two steaks at a time. Let the pan recover its heat for sixty seconds between batches to maintain consistent results.
Is the center supposed to be completely cold?
The center should be cool to slightly room temperature, not refrigerator cold. If it feels cold, your resting time was too short or your starting temperature was too low.
Can I serve this on a bed of greens as a salad?
Absolutely, and I recommend it for a lighter presentation. Slice the tuna thin and fan it over mixed greens with the dipping sauce used as a dressing.
My Final Word
Seared ahi tuna delivers maximum impact for minimal effort, which is exactly my kind of recipe. That contrast between the warm, nutty crust and the cool, silky center never gets old, even after making this dish dozens of times.
I hope you will give this method a try and discover how easy restaurant-quality results can be at home. After testing this recipe more times than I can count, I can promise the technique is reliable if you trust the timing.
Let me know how yours turns out in the comments below or tag us on social media with your photos. Seeing your versions always makes my day, and I genuinely want to hear what you think.
Seared Ahi Tuna
Ingredients
Equipment
Method
- Prepare the Dipping Sauce: Combine the soy sauce, rice vinegar, sesame oil, grated ginger, and honey in a small bowl. Whisk until the honey dissolves completely, then stir in the sliced green onion. Set aside.
- Mix the Sesame Seed Crust: Pour the white and black sesame seeds onto a shallow plate and mix them together with your fingers. Spread the mixture into an even layer about half an inch deep.
- Dry and Season the Tuna: Pat each tuna steak thoroughly dry with paper towels, pressing firmly to remove all surface moisture. Season all sides evenly with the kosher salt and black pepper.
- Coat the Tuna in Sesame Seeds: Press each tuna steak firmly into the sesame seed mixture, coating the top completely. Flip and repeat on the bottom, then press seeds onto all four sides until no visible red is showing.
- Preheat the Skillet: Set your cast iron skillet over high heat and let it preheat for three full minutes until smoking hot.
- Add the Oil: Add the avocado oil to the hot pan and swirl to coat the entire bottom surface. Wait ten seconds for the oil to heat and shimmer.
- Sear the First Side: Lay the tuna steaks gently into the pan, placing them away from you. Do not move them once they hit the surface. Sear for exactly 60 to 90 seconds.
- Sear the Second Side: Slide the spatula under each steak and flip in one confident motion. Sear the second side for another 60 to 90 seconds, maintaining high heat.
- Sear the Edges (Optional): Using tongs, briefly press each narrow edge against the pan surface for 15 to 20 seconds for a fully crusted exterior.
- Rest the Tuna: Transfer the seared tuna to a clean cutting board and let it rest for exactly 2 minutes.
- Slice the Tuna: Using your sharpest knife, slice each tuna steak against the grain into half-inch medallions. Wipe the blade clean between cuts.
- Plate and Serve: Fan the slices across plates in a single layer, showing the red centers prominently. Drizzle lightly with dipping sauce and serve the remainder on the side. Serve immediately.