Picture this: smoke curling off the grill, a crowd of hungry friends gathered around, and you’re the one handing out ribs so tender they fall off the bone with barely a touch.
That’s what party ribs deliver every single time.
These ribs are a crowd-pleaser for a reason: they’re sticky, smoky, and require almost zero fussing once they hit the heat.
The magic lies in a simple three-ingredient dry rub that builds flavor deep into the meat, then a glaze that caramelizes into a glossy, finger-licking finish.
Whether you’re feeding a backyard full of people or just want leftovers that taste even better the next day, this recipe scales beautifully and delivers restaurant-quality results without the stress.
Why You’ll Love This Recipe
Party ribs win because they taste incredible, look impressive, and actually let you enjoy your guests instead of sweating over a stove.
- Minimal hands-on time once the ribs are prepped and on the grill.
- The dry rub infuses meat with bold, complex flavor that doesn’t fade.
- Naturally feeds a crowd and scales up or down with ease.
- Leftovers (if you have them) taste even better the next day, cold or reheated.
- Works equally well on a charcoal grill, gas grill, or in the oven.
My Experience Making This Recipe
The first time I made these ribs, I was nervous about timing a full rack perfectly for a dinner party of eight.
I worried the rub would burn, the glaze would slip off, or I’d somehow mess up something so simple.
None of that happened, which felt like a personal victory.
The ribs emerged glossy and dark, with a slight char on the edges and meat that literally dissolved when I bit into it.
My guests actually stopped talking to focus on eating, which is the highest compliment a home cook can receive.
Now I make these at least once a month, sometimes doubling the batch because people always ask for the recipe.
Recipe Overview
- Recipe Name: Party Ribs
- Servings: 4 to 6 people
- Prep Time: 15 minutes
- Cook Time: 3 hours
- Total Time: 3 hours 15 minutes
- Course: Main Course
- Cuisine: American Barbecue
- Calories per Serving: 485
Equipment You Will Need
- Large cutting board
- Sharp knife for trimming and slicing
- Small mixing bowl for the dry rub
- Charcoal or gas grill, or large baking sheet if using the oven
- Tongs for handling ribs
- Meat thermometer (optional but helpful)
- Aluminum foil or butcher paper for wrapping
- Basting brush for applying glaze
- Paper towels or clean kitchen towels
Ingredients for Party Ribs
- 2 full racks of baby back ribs (about 5 to 6 pounds total)
- 3 tablespoons brown sugar
- 2 tablespoons paprika
- 1 tablespoon garlic powder
- 1 tablespoon onion powder
- 1 tablespoon black pepper
- 1 tablespoon kosher salt
- 1 teaspoon cayenne pepper
- 1 cup barbecue sauce (store-bought or homemade)
- 2 tablespoons apple cider vinegar
- 1 tablespoon Worcestershire sauce
- 2 tablespoons melted butter
Ingredient Notes and Substitutions
- Baby back ribs: These cook faster and are more tender than spare ribs, making them ideal for gatherings. Spare ribs work fine but need an extra 30 to 45 minutes of cooking time.
- Brown sugar: It caramelizes beautifully and adds sweetness that balances the spice rub. White sugar works in a pinch, though you’ll lose the subtle molasses notes.
- Paprika: This brings color and a mild, slightly sweet flavor without heat. Smoked paprika deepens the barbecue flavor if you have it on hand.
- Cayenne pepper: It adds gentle heat and complexity to the rub. Cut it to half a teaspoon if your crowd prefers mild ribs.
- Barbecue sauce: Any style you enjoy works here; choose between sweet, vinegary, mustard-based, or smoky depending on your preference.
How to Make Party Ribs
Step 1: Remove the Membrane
Place one rib rack meat-side down on your cutting board.
Using a sharp knife or your fingers, peel away the thin, silvery membrane on the underside of the ribs; this membrane blocks seasoning and smoke from penetrating the meat, so removing it makes a real difference in flavor.
Step 2: Trim Excess Meat
Flip the ribs over and trim any dangling meat or excess fat from the edges.
This step isn’t strictly necessary, yet it helps the rub adhere evenly and gives your finished ribs a neater appearance.
Step 3: Mix the Dry Rub
In a small bowl, combine the brown sugar, paprika, garlic powder, onion powder, black pepper, salt, and cayenne pepper.
Stir well to break up any brown sugar clumps, ensuring all ingredients blend uniformly so every bite tastes balanced.
Step 4: Apply the Rub
Pat both sides of the ribs dry with paper towels, then generously coat every surface with the dry rub, using your fingers to press it firmly into the meat.
The rub should feel like a thick, textured crust; this creates a flavorful bark as the ribs cook and the rub caramelizes against the heat.
Step 5: Prepare Your Grill
Heat your grill to 225 to 250 degrees Fahrenheit using an indirect cooking setup: if using charcoal, push coals to one side and place ribs on the opposite side; if using gas, heat only one or two burners and place ribs on the unheated side.
Low, indirect heat keeps ribs from burning while allowing smoke and heat to penetrate slowly and evenly.
Step 6: Cook the Ribs (First Two Hours)
Place the rubbed ribs bone-side down on the cool side of the grill, close the lid, and cook for 2 hours without opening the grill frequently.
Resist the urge to peek; every time you open the lid, you release heat and extend cooking time.
Step 7: Wrap and Braise
After 2 hours, carefully wrap each rib rack tightly in aluminum foil or butcher paper, then return them to the grill for another 45 minutes to 1 hour.
This wrapped phase steams the ribs and makes them incredibly tender while the foil holds in the juices.
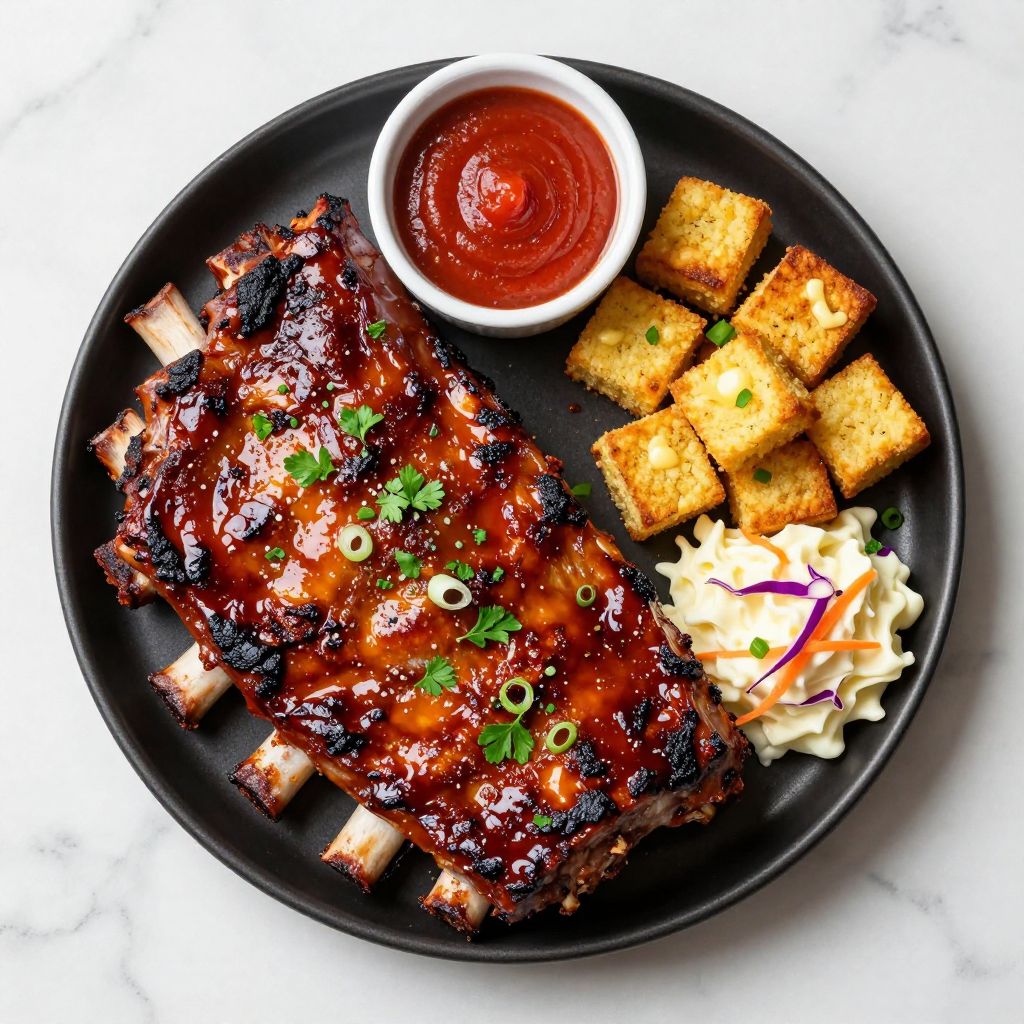
Step 8: Glaze and Finish
Mix the barbecue sauce, apple cider vinegar, Worcestershire sauce, and melted butter in a small bowl, then unwrap the ribs and brush this glaze generously over both sides.
Return the unwrapped ribs to the grill for the final 15 to 20 minutes, turning and brushing with glaze every 5 minutes until the sauce caramelizes into a glossy, sticky layer.
Step 9: Rest and Serve
Transfer the ribs to a cutting board and let them rest for 5 minutes before slicing between the bones.
A short rest allows the juices to redistribute, keeping each bite tender and moist.
Pro Tip: Don’t skip the wrapping phase in step 7; it’s the difference between good ribs and ribs that make people ask for the recipe.
Tips for the Best Party Ribs
- Invest 2 minutes in removing the membrane; it sounds fussy but truly impacts how well the rub seasons the meat. Your ribs will taste noticeably better.
- Use a meat thermometer if you have one: ribs are done when the internal temperature reaches 190 to 203 degrees Fahrenheit. This removes all guesswork.
- Don’t brush glaze on until the final 20 minutes, as sugar burns easily over prolonged heat. Wait until the ribs are nearly cooked, then add that sweet, sticky finish.
- Keep a spray bottle of water nearby in case flare-ups occur. A quick mist tames flames without cooling the entire grill.
- If cooking in the oven, set the temperature to 250 degrees and follow the same timing, placing ribs on a foil-lined baking sheet with a tent of foil on top for the first two hours.
- Make extra glaze; guests will want to dip their ribs in more once they taste it.
Common Mistakes to Avoid
- Cooking ribs too hot: High heat creates a burnt exterior while the inside stays tough. Low and slow yields tender, juicy meat every time.
- Skipping the dry rub by jumping straight to sauce: The rub creates depth and complexity that sauce alone cannot achieve. Use both for maximum flavor.
- Opening the grill lid repeatedly: Every peek drops the temperature and extends cooking time by several minutes. Trust your timing and resist temptation.
- Forgetting the rest period: Cutting directly into piping-hot ribs squeezes out the juices, leaving them dry. Five minutes of rest makes a real difference.
- Using damp ribs: Moisture prevents the rub from sticking and the skin from developing a proper bark. Always pat ribs completely dry before seasoning.
Serving Suggestions
Party ribs shine alongside classic barbecue sides that balance the rich, smoky flavors.
- Creamy coleslaw with a tangy vinegar dressing cuts through the richness of the ribs beautifully.
- Cornbread or buttered rolls soak up any extra glaze and keep the meal satisfying.
- Baked beans with a hint of smokiness complement the ribs without competing for attention.
- Grilled corn with herb butter adds freshness and a slight char that echoes the ribs.
- Simple garden salad with lemon vinaigrette provides a cool, crisp counterpoint to warm, sticky meat.
Variations to Try
- Spicy Ribs: Double the cayenne pepper to 2 teaspoons and add half a teaspoon of ghost pepper powder for serious heat. The rub will dominate, so balance it with a sweeter barbecue sauce.
- Asian-Inspired Ribs: Replace the barbecue sauce glaze with a mixture of soy sauce, honey, ginger, and sesame oil brushed on in the final stages. Finish with sesame seeds for texture.
- Coffee-Rubbed Ribs: Add 2 tablespoons of finely ground espresso or instant coffee powder to the dry rub for earthy depth. The coffee amplifies the meat’s savory notes without tasting like coffee.
- Maple Bourbon Ribs: Mix the glaze with 3 tablespoons of maple syrup and 2 tablespoons of bourbon whiskey for a sweet, boozy finish. The alcohol burns off, leaving rich, complex flavor.
- Mustard-Based Ribs: Replace barbecue sauce with a mixture of yellow mustard, brown sugar, and apple vinegar for a Carolina-style approach. This creates a tangier, less sweet final product.
Dietary Adaptations
- Gluten-Free: Use gluten-free barbecue sauce and verify that Worcestershire sauce is certified gluten-free; most store-bought versions contain gluten. The dry rub itself is naturally gluten-free.
- Dairy-Free: Substitute melted butter with olive oil or coconut oil in the glaze; the ribs will be slightly less rich but still delicious and fully flavorful.
- Low-Carb/Keto: Skip the brown sugar entirely and use a sugar-free barbecue sauce, or make your own with tomato paste, vinegar, and spices. The ribs stay tender and the rub delivers all the flavor you need.
- Vegan/Vegetarian: This recipe is inherently meat-based, yet you can apply the same rub and glaze to thick slices of cauliflower steak or king oyster mushrooms for a plant-based alternative with similar texture.
Storage and Reheating
Refrigerator
Store cooked ribs in an airtight container on the coldest shelf of your fridge for up to 4 days.
- Keep the glaze on the ribs to prevent them from drying out.
- You can also store ribs wrapped tightly in foil if you prefer.
Freezer
Wrap cooled ribs tightly in plastic wrap and then foil, or place them in a freezer-safe container with parchment between layers.
- Frozen ribs last up to 3 months with no loss of quality.
- Thaw overnight in the refrigerator before reheating.
Reheating
Reheat ribs wrapped in foil at 250 degrees Fahrenheit for 15 to 20 minutes until warmed through.
- For a quick warm-up, unwrap ribs and heat them on a grill over medium heat for 5 to 10 minutes.
- Never microwave ribs; the heat dries them out and ruins the texture.
Nutrition Information
| Nutrient | Amount |
|---|---|
| Calories | 485 |
| Total Fat | 28g |
| Saturated Fat | 12g |
| Carbohydrates | 19g |
| Fiber | 1g |
| Sugar | 14g |
| Protein | 42g |
| Sodium | 890mg |
| Cholesterol | 145mg |
These values are estimated for a serving of ribs with glaze based on a 4-serving yield per full rack.
Frequently Asked Questions
Can I make the dry rub ahead of time?
Absolutely, and I recommend it. Mix the rub 1 to 2 days ahead and store it in an airtight container at room temperature, then apply it to the ribs an hour or two before cooking for deeper flavor penetration.
What if I don’t have a grill?
You can cook these ribs in a 250-degree oven using the same timing. Place them on a foil-lined baking sheet, tent with foil for the first 2 hours, then unwrap and brush with glaze for the final 20 minutes, switching to the broiler at the end to caramelize the sauce if you prefer.
How do I know when the ribs are done?
The meat should pull back from the bones by about a quarter inch, and a toothpick should slide through the meat with minimal resistance. If you have a meat thermometer, aim for 190 to 203 degrees Fahrenheit.
Can I prep the ribs the day before?
Yes, trim and rub the ribs the night before, then cover them tightly with plastic wrap and refrigerate. Let them come to room temperature for 30 minutes before grilling for more even cooking.
What’s the best barbecue sauce for these ribs?
Any sauce you enjoy works, yet I prefer a balanced sauce with tomato, vinegar, and spice rather than one that’s overly sweet. Taste a spoonful before using it; if it’s too sweet or too thick, thin it with a splash of apple cider vinegar.
Can I cut the ribs into individual bones before serving?
Yes, cutting between the bones makes them easier to eat at a party and looks more elegant on a platter. Just slice them before resting if you prefer, or after the 5-minute rest as the recipe suggests.
Final Thoughts
Party ribs deliver the kind of flavor and satisfaction that make people remember your meal long after the plate is empty.
The combination of a spiced dry rub, low-and-slow cooking, and a sticky caramelized glaze creates something restaurant-quality that you can pull off at home without stress.
These ribs feed a crowd, taste incredible hot or cold, and freeze beautifully for future gatherings.
Next time you’re planning a party or just want to impress your family, give this recipe a try and watch people’s faces light up when they take that first bite.
Party Ribs
Ingredients
Equipment
Method
- Place one rib rack meat-side down on your cutting board. Using a sharp knife or your fingers, peel away the thin, silvery membrane on the underside of the ribs.
- Flip the ribs over and trim any dangling meat or excess fat from the edges.
- In a small bowl, combine the brown sugar, paprika, garlic powder, onion powder, black pepper, salt, and cayenne pepper. Stir well to break up any brown sugar clumps.
- Pat both sides of the ribs dry with paper towels, then generously coat every surface with the dry rub, using your fingers to press it firmly into the meat.
- Heat your grill to 225 to 250 degrees Fahrenheit using an indirect cooking setup: if using charcoal, push coals to one side and place ribs on the opposite side; if using gas, heat only one or two burners and place ribs on the unheated side.
- Place the rubbed ribs bone-side down on the cool side of the grill, close the lid, and cook for 2 hours without opening the grill frequently.
- After 2 hours, carefully wrap each rib rack tightly in aluminum foil or butcher paper, then return them to the grill for another 45 minutes to 1 hour.
- Mix the barbecue sauce, apple cider vinegar, Worcestershire sauce, and melted butter in a small bowl, then unwrap the ribs and brush this glaze generously over both sides.
- Return the unwrapped ribs to the grill for the final 15 to 20 minutes, turning and brushing with glaze every 5 minutes until the sauce caramelizes into a glossy, sticky layer.
- Transfer the ribs to a cutting board and let them rest for 5 minutes before slicing between the bones.