There’s a moment when caramelized onions transform into something magical: deep, sweet, and impossibly glossy, catching the light like amber.
Onion jam is one of those recipes that feels fancy but requires almost no skill, just patience and a good heavy-bottomed pot.
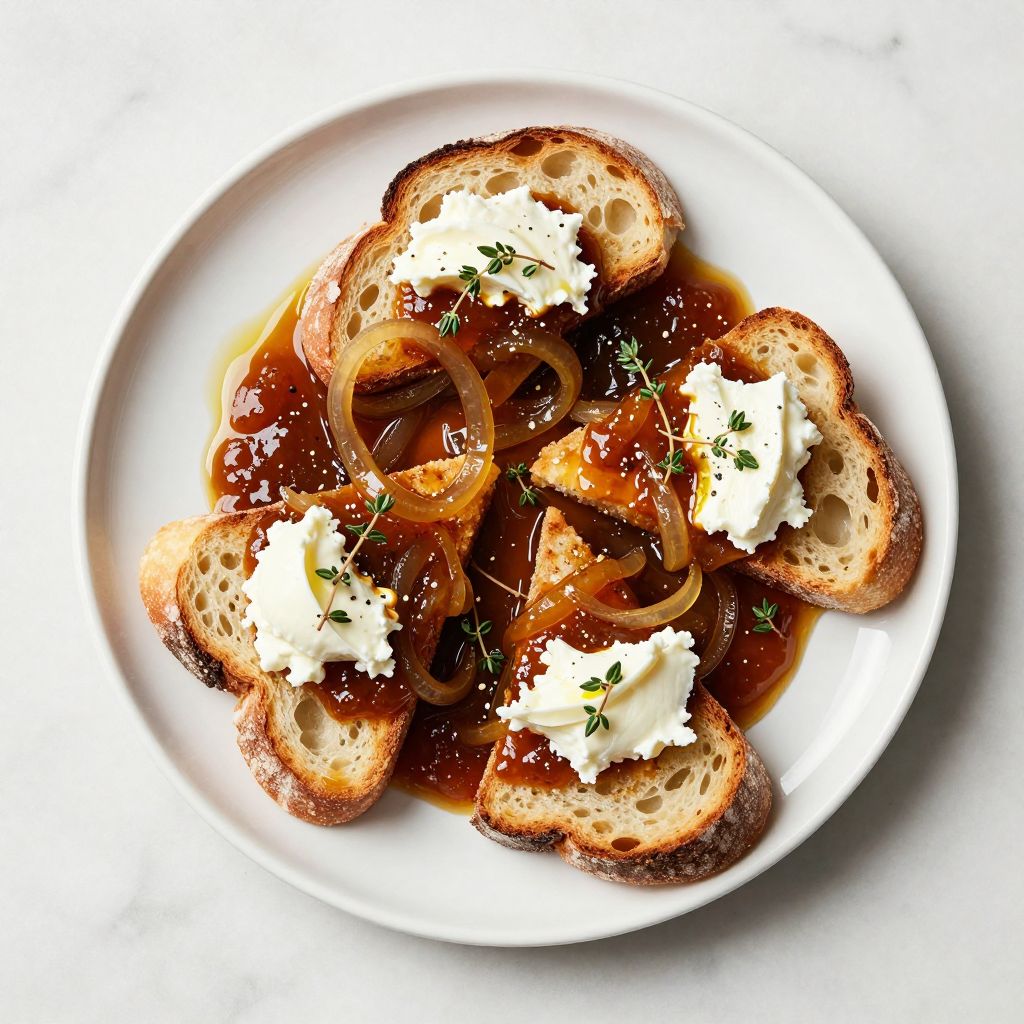
This recipe turns humble onions into a flavor powerhouse that works on crusty bread with cheese, alongside roasted meats, stirred into soups, or even spooned onto vanilla ice cream if you’re feeling adventurous.
What makes onion jam special is its concentrated sweetness and deep caramel color, achieved through low and slow cooking that coaxes out natural sugars and builds complexity.
Unlike regular caramelized onions, jam has a jammy consistency that sticks around, ready to elevate whatever plate it lands on.
Why You’ll Love This Recipe
This recipe is a pantry staple that transforms a single ingredient into something restaurant-quality, perfect for entertaining or meal prepping.
- Requires just five simple ingredients and one pot
- Takes less than an hour of active cooking for maximum flavor
- Keeps for weeks in the fridge, ready whenever inspiration strikes
- Naturally vegan, gluten-free, and pairs with almost any protein
- Impresses guests without making you look like you tried hard
My Experience Making This Recipe
The first time I made onion jam, I expected it to be boring, just a pot of cooking onions taking up stove space.
Then something clicked around the thirty-minute mark when the smell shifted from raw onion to something almost caramel-like, and I watched the color deepen into mahogany.
My kitchen smelled incredible, and when I finally tasted it on a piece of toasted bread with sharp cheddar, I understood why restaurants charge five dollars for a tiny spoonful.
Now I make a double batch monthly and use it as my secret weapon for busy weeknight dinners when I want to feel like I actually cooked something impressive.
Recipe Overview
- Recipe Name: Caramelized Onion Jam
- Servings: 8 servings (makes about 1.5 cups)
- Prep Time: 10 minutes
- Cook Time: 45 minutes
- Total Time: 55 minutes
- Course: Condiment or Appetizer
- Cuisine: French
- Calories per Serving: 45
Equipment You Will Need
- Large heavy-bottomed pot or Dutch oven (at least 3-quart capacity)
- Sharp chef’s knife
- Cutting board
- Wooden spoon or silicone spatula
- Measuring spoons and cups
- Small glass jars for storage
Ingredients for Onion Jam
- 2 pounds yellow onions (about 6 medium onions), peeled and sliced thin
- 3 tablespoons unsalted butter
- 1 teaspoon salt
- 1/4 teaspoon black pepper
- 2 tablespoons balsamic vinegar
- Optional: 1 tablespoon honey or brown sugar for extra depth
- Optional: 1/2 teaspoon fresh thyme leaves
Ingredient Notes and Substitutions
- Yellow onions: They’re the sweet variety and break down into silky softness when cooked slowly. Substitute with sweet onions like Vidalia if you want even more sweetness, though your cooking time may shorten slightly.
- Unsalted butter: Butter carries the onions’ natural sweetness and creates that rich mouthfeel. Olive oil works as a vegan swap but loses some of the richness and depth.
- Balsamic vinegar: This acidic element cuts through the sweetness and adds complexity. Red wine vinegar or sherry vinegar work fine, though the flavor profile shifts slightly and becomes less fruity.
- Salt: It heightens flavors and balances sweetness as the onions cook down. Kosher salt and sea salt perform the same function, just adjust amounts slightly if using fine sea salt.
- Honey: Optional but adds subtle floral notes and helps preserve the jam. Skip it entirely if you prefer a savory profile, or substitute with maple syrup for earthier tones.
How to Make Onion Jam
Step 1: Prepare Your Onions
Slice your onions thinly, about 1/4 inch thick, and keep them mostly consistent in size so they cook evenly.
This is where a sharp knife saves your sanity and your knuckles, so take your time and enjoy the meditative rhythm of slicing.
Step 2: Melt the Butter Over Medium Heat
Place your pot on the stove and add the butter, letting it melt completely and coat the bottom evenly.
You want the pot hot enough that the onions begin to soften immediately when they hit the butter, which jumpstarts the cooking process.
Step 3: Add the Onions and Salt
Dump all your sliced onions into the pot along with the salt, stirring well to coat everything with butter.
The salt draws moisture from the onions right away, which seems counterintuitive but actually helps them release their liquid and cook more efficiently.
Step 4: Cook at Medium Heat for the First 15 Minutes
Stir occasionally, letting the onions soften and release their moisture as the pot becomes steamy.
This initial phase breaks down the cell walls and starts converting the harsh sulfur compounds into sweet, mellow notes.
Step 5: Reduce Heat to Medium-Low and Cook for 20 Minutes
Lower the heat and continue stirring every few minutes, allowing the onions to brown gradually without burning.
You should see the mixture transition from translucent to golden, with liquid evaporating slowly and the onions collapsing into themselves.
Step 6: Continue Cooking Until Deep Brown
Keep stirring every 5 minutes or so, scraping any browned bits from the bottom of the pot and mixing them back in for extra flavor.
The entire mass should turn a deep mahogany color, smell intensely sweet, and take on a jam-like consistency that coats the spoon.
Step 7: Add Balsamic Vinegar and Optional Ingredients
Pour in your balsamic vinegar along with honey and thyme if using them, stirring well to combine.
The vinegar will sizzle slightly and add a bright acidic note that balances the deep sweetness perfectly.
Step 8: Cook for Final 2 Minutes and Taste
Let everything bubble together for a couple more minutes to meld the flavors, then taste and adjust salt or vinegar as needed.
The jam should taste sweet but not cloying, with a sophisticated depth underneath that makes people ask what the secret ingredient is.
Pro Tip: Don’t rush the caramelization process by turning up the heat, or your jam will taste harsh and burnt instead of sweet and complex.
Tips for the Best Onion Jam
- Slice onions fairly uniformly so they cook at the same rate and you end up with a consistent texture throughout your jam.
- Resist the urge to turn up the heat for speed; low and slow wins the game and rewards you with deeper flavor.
- Stir frequently during the last twenty minutes to prevent sticking and ensure even browning across the bottom of the pot.
- If your jam seems dry before reaching deep color, add a splash of water or stock to keep things moving without rushing the process.
- Make this on a day when you’re home anyway, since it doesn’t need babysitting but benefits from occasional attention.
- Save that gorgeous browned fond stuck to the pot bottom; it’s pure concentrated onion flavor and belongs in your final jam.
Common Mistakes to Avoid
- High heat causes the onions to brown too fast and taste burnt or sulfurous instead of sweet and caramel-like.
- Skipping the salt early on slows down the release of moisture and extends cooking time unnecessarily.
- Leaving the pot unattended for long stretches invites burnt edges that ruin the entire batch with acrid flavors.
- Adding vinegar too early can prevent proper caramelization, so wait until the onions reach deep color first.
- Using white onions or red onions instead of yellow varieties gives you a different flavor profile that’s sharper and less naturally sweet.
Serving Suggestions
Onion jam is ridiculously versatile and works equally well as an appetizer topping or a quiet supporting player in a larger dish.
- Spread on crusty bread or crostini with goat cheese or sharp cheddar for an effortless appetizer
- Top burgers or beef sandwiches for sophisticated sweetness that cuts through rich meat
- Stir into soups or gravy for depth and body without any dairy needed
- Serve alongside a cheese board as a condiment that makes every selection taste better
- Dollop onto roasted vegetables or grain bowls for color and complex flavor
Variations to Try
- Caramelized Red Onion Jam: Swap red onions for yellow onions and add a splash of red wine instead of balsamic, creating an earthier version with deeper purple tones and slightly different sweetness.
- Spiced Onion Jam: Stir in a pinch of cayenne, cumin, or smoked paprika during the final minutes for warming spice that transforms this into something more exotic.
- Sweet and Savory with Soy: Replace balsamic with a mix of soy sauce, rice vinegar, and ginger for an Asian-inspired version that pairs beautifully with pork or duck.
- Herb-Infused Jam: Add fresh rosemary, sage, or basil during cooking for aromatic complexity that makes this shine alongside roasted chicken or pork.
- Whiskey or Wine Jam: Deglaze your pot with a splash of whiskey or red wine after the onions brown, letting it cook down for a more sophisticated adult version.
Dietary Adaptations
- Vegan: Swap butter for olive oil or vegan butter to keep everything plant-based with no flavor compromise.
- Dairy-free: Use olive oil or ghee instead of regular butter for a completely dairy-free condiment.
- Low-carb/Keto: This recipe is naturally low in carbs, containing only about 8 grams per serving mostly from the onions themselves.
- Gluten-free: The basic recipe contains no gluten, though always verify your balsamic vinegar label for any hidden ingredients.
Storage and Reheating
Refrigerator
Transfer cooled jam to an airtight glass container and refrigerate for up to three weeks.
- Make sure the jam cools completely before sealing to prevent condensation and mold growth
- Stir well before each use as natural separation sometimes occurs during storage
Freezer
Freeze in ice cube trays for convenient portions, then pop cubes into freezer bags for storage up to three months.
- This method lets you grab exactly what you need without thawing a whole container
- Thaw at room temperature for thirty minutes or warm gently over low heat when ready to use
Reheating
Warm gently over low heat or in the microwave, stirring occasionally to ensure even warming.
- High heat can break down the texture and intensify any burnt flavors, so patience pays off
- A splash of water helps loosen the jam if it has thickened significantly during storage
Nutrition Information
| Nutrient | Amount |
|---|---|
| Calories | 45 |
| Total Fat | 4.5 grams |
| Saturated Fat | 2.8 grams |
| Carbohydrates | 3.5 grams |
| Fiber | 0.6 grams |
| Sugar | 2.2 grams |
| Protein | 0.4 grams |
| Sodium | 280 mg |
| Cholesterol | 12 mg |
These values are approximate and based on standard ingredient sizes and the recipe as written without optional additions.
Frequently Asked Questions
Can I make onion jam in a slow cooker?
Yes, cook on low for 8 to 10 hours, stirring occasionally, then finish with the balsamic vinegar and any optional ingredients. The slow cooker method requires patience but frees up your stovetop.
How do I know when the onions are done caramelizing?
They should be deep mahogany or chocolate brown, smell intensely sweet and almost caramel-like, and coat a spoon thickly when lifted from the pot. If they still taste sharp or sulfurous, they need more time.
Can I make this ahead for a dinner party?
Absolutely, this recipe is perfect for make-ahead cooking and actually tastes better after sitting for a day or two as flavors meld. Prepare it up to a week ahead and refrigerate until serving time.
What if my onion jam is too thin or too thick?
Thin jam needs more cooking time over low heat; thick jam can be loosened with a splash of water or vinegar. Both issues resolve quickly with gentle adjustment.
Can I use a food processor to slice the onions?
Yes, the slicing blade makes quick work of large batches, though hand slicing gives slightly better control over thickness. Either method works fine.
Is onion jam the same as caramelized onions?
They’re cousins but not identical; jam has a jammy consistency from longer cooking and added acidity, while plain caramelized onions are looser and less structured. Both are delicious, just different applications.
Final Thoughts
Making onion jam once teaches you that patience in the kitchen pays off in ways that fancy ingredients simply cannot match. A single pot, a few humble ingredients, and time create something that tastes expensive and impressive but costs almost nothing.
The next time you need something to elevate an ordinary meal or impress someone at a dinner party, reach for this recipe and let slow cooking do the heavy lifting.
Caramelized Onion Jam
Ingredients
Equipment
Method
- Slice your onions thinly, about 1/4 inch thick, keeping them mostly consistent in size so they cook evenly.
- Place your pot on the stove over medium heat and add the butter, letting it melt completely and coat the bottom evenly.
- Add all sliced onions into the pot along with the salt, stirring well to coat everything with butter.
- Cook at medium heat for 15 minutes, stirring occasionally, letting the onions soften and release their moisture as the pot becomes steamy.
- Reduce heat to medium-low and cook for 20 minutes, stirring every few minutes, allowing the onions to brown gradually without burning until they transition from translucent to golden.
- Continue cooking, stirring every 5 minutes or so, scraping any browned bits from the bottom of the pot and mixing them back in until the entire mass turns a deep mahogany color and takes on a jam-like consistency.
- Add balsamic vinegar, black pepper, and optional honey and thyme if using, stirring well to combine.
- Cook for a final 2 minutes to meld the flavors, then taste and adjust salt or vinegar as needed.
- Let cool completely before transferring to airtight glass containers for storage.