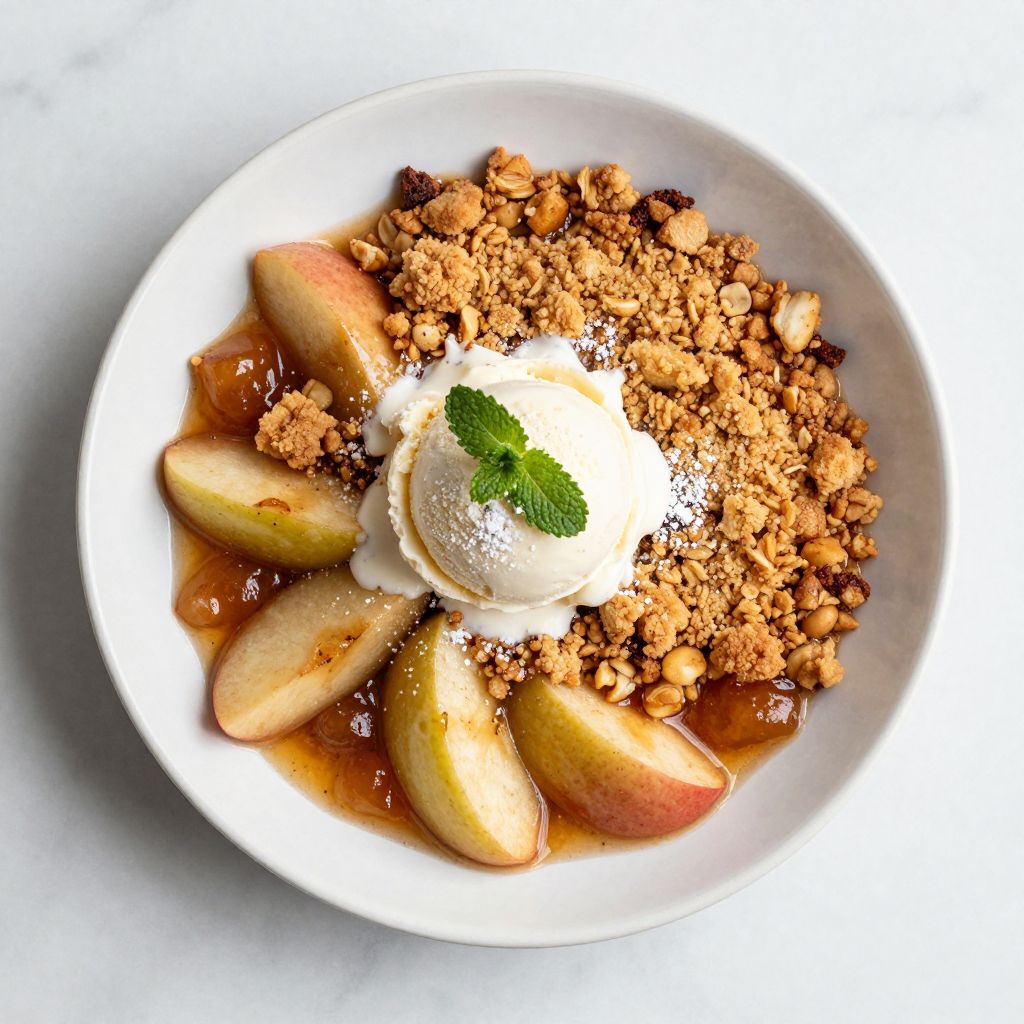
There’s nothing quite like the smell of cinnamon-spiced apples bubbling underneath a golden, buttery crumb topping fresh from the oven. Apple crisp without oats is the dessert that bridges the gap between comfort and elegance, requiring no special ingredients yet delivering restaurant-quality results every single time.
This recipe skips the oats entirely and relies on flour, brown sugar, and butter to create a topping that’s crispy on the outside and tender within. You get all the warmth of a classic apple crisp in under an hour, making it perfect for weeknight desserts, holiday gatherings, or whenever you need something that feels homemade and genuine. The best part is how forgiving it is: whether you use Granny Smiths, Honeycrisps, or a mix of whatever’s in your fruit bowl, this dessert adapts beautifully.
Why You’ll Love This Recipe
This apple crisp delivers everything you want from a dessert without the fuss or complexity. The topping is buttery, crunchy, and ready in minutes, while the apples cook down into a spiced, jammy filling that’s pure comfort.
- No oats required, so the texture is purely crispy and crumbly.
- Ready in under 50 minutes from start to finish.
- Works with any variety of apples you have on hand.
- One bowl for the topping, minimal cleanup.
- Naturally impressive but tastes effortless.
My Experience Making This Recipe
I first made this version when a friend mentioned she didn’t have oats at home but still wanted apple crisp for dinner guests. I threw together flour, butter, and brown sugar in a bowl, scattered it over sliced apples with cinnamon, and popped it in the oven.
Twenty minutes in, the butter began melting down into the apples, and the topping turned this gorgeous golden brown. The result was a crisp that had more texture and bite than the oat versions I’d made before, with a topping that stayed crispy even after sitting for hours.
My guests went back for seconds without hesitation, and honestly, I’ve barely made it any other way since. The simplicity means you can focus on getting the apple-to-topping ratio just right instead of wrestling with too many moving parts.
Recipe Overview
- Recipe Name: Apple Crisp Without Oats
- Servings: 8
- Prep Time: 15 minutes
- Cook Time: 35 minutes
- Total Time: 50 minutes
- Course: Dessert
- Cuisine: American
- Calories per Serving: 285
Equipment You Will Need
- 9×13 inch baking dish
- Large mixing bowl
- Small mixing bowl
- Cutting board
- Sharp knife
- Measuring cups and spoons
- Fork or pastry cutter
- Oven
- Cooling rack (optional)
Ingredients for Apple Crisp Without Oats
For the Apple Filling
- 6 medium apples (about 2.5 pounds), peeled, cored, and sliced into half-inch wedges
- 1/4 cup granulated sugar
- 2 tablespoons brown sugar
- 1 tablespoon all-purpose flour
- 1/2 teaspoon ground cinnamon
- 1/4 teaspoon ground nutmeg
- 1/8 teaspoon salt
- 1 tablespoon fresh lemon juice
- 1/2 teaspoon vanilla extract
For the Crispy Topping
- 1 cup all-purpose flour
- 3/4 cup packed brown sugar
- 1/2 cup cold unsalted butter, cubed
- 1/4 teaspoon salt
- 1/4 teaspoon ground cinnamon (optional but recommended)
Ingredient Notes and Substitutions
- Apples: A mix of tart and sweet varieties gives the best flavor. Granny Smith apples provide tartness and structure, while Honeycrisp or Gala add sweetness and juiciness. If using all sweet apples, reduce the sugar in the filling by one tablespoon.
- Brown sugar in the topping: Brown sugar adds moisture and chewiness to the topping, creating that perfect tender-crispy balance. You can substitute with muscovado sugar for deeper molasses notes, though the texture will be slightly more dense.
- Cold butter: Cold butter creates small, distinct pieces that produce a crumbly texture when baked. Room temperature butter will meld too quickly and produce a denser topping. If your butter softens, refrigerate the topping for ten minutes before baking.
- Cinnamon: This spice is optional in the topping but adds warmth and ties the flavors together. You can skip it entirely or double it if you love cinnamon.
- Lemon juice: This brightens the apples and cuts through sweetness. Apple cider vinegar works as a one-to-one substitute if you prefer.
How to Make Apple Crisp Without Oats
Step 1: Prepare Your Apples
Peel, core, and slice six medium apples into half-inch wedges. You want them thick enough to hold their shape during baking but thin enough to cook through in about thirty-five minutes.
Work quickly and toss the sliced apples with a splash of lemon juice as you go to prevent browning. This step takes about eight minutes if you work steadily, and it’s worth doing by hand rather than using a food processor, which can create pieces that are too small and cook down into mush.
Step 2: Mix the Apple Filling
In a small bowl, whisk together one-quarter cup granulated sugar, two tablespoons brown sugar, one tablespoon all-purpose flour, one-half teaspoon ground cinnamon, one-quarter teaspoon ground nutmeg, and one-eighth teaspoon salt. The flour acts as a thickener and keeps the filling from becoming watery, while the spices are your flavor foundation.
Add the lemon juice and vanilla extract to the sugar mixture and stir until combined. This creates a light sauce that will coat the apples during baking.
Step 3: Assemble the Apple Layer
Spread the sliced apples evenly in a nine-by-thirteen-inch baking dish. Pour the sugar mixture over the apples and gently toss with your hands or a large spoon until every piece is lightly coated.
Even distribution matters here because it ensures the filling thickens evenly and flavors develop consistently. Take thirty seconds to make sure nothing is clumped in one corner.
Step 4: Make the Crumb Topping
In a large mixing bowl, combine one cup all-purpose flour, three-quarters cup packed brown sugar, one-quarter teaspoon salt, and one-quarter teaspoon ground cinnamon. Stir these dry ingredients together until the brown sugar lumps break apart and everything is evenly distributed.
The brown sugar can clump, so take a moment to press out any chunks between your fingers. This prevents pockets of overly sweet topping in your finished crisp.
Step 5: Cut in the Cold Butter
Add one-half cup of cold, cubed unsalted butter to the flour mixture. Using a fork or your fingertips, work the butter into the flour until the mixture resembles coarse breadcrumbs with some pea-sized pieces of butter still visible.
This uneven texture is what creates the crispy topping when baked. The larger pieces of butter create steam pockets, while the smaller pieces help bind everything together.
Step 6: Distribute the Topping
Spread the crumb mixture evenly over the prepared apples. Don’t press it down or compact it, since you want it to stay loose and create a light, crispy texture when it bakes.
Use your fingers to break up any large clumps and scatter the topping into an even layer. A few exposed apple slices peeking through are fine and actually desirable.
Step 7: Bake the Crisp
Preheat your oven to four hundred twenty-five degrees Fahrenheit. Once preheated, place the baking dish in the center rack and bake for thirty-five to forty minutes, until the topping is golden brown and the apple filling bubbles slightly at the edges.
The timing depends on your oven and how hot it runs. Start checking at thirty-five minutes; the topping should be a deep golden color, not pale or dark brown. If the edges of your filling are bubbling but the top is still pale, you can tent it loosely with foil and bake for five more minutes.
Step 8: Cool Before Serving
Remove the baking dish from the oven and let it cool for at least ten to fifteen minutes before serving. This allows the filling to set slightly and makes serving much easier, as the crisp will hold together better on the plate.
The topping will crisp up even more as it cools, so don’t worry if it seems slightly soft when first removed from the oven. It will firm up beautifully during those few minutes of resting.
Pro Tip: Keep your butter in the freezer for at least thirty minutes before using it in the topping, and work quickly so it doesn’t warm up in your hands. Cold butter is the secret to a crispy, crumbly topping that won’t turn into a dense cake.
Tips for the Best Apple Crisp Without Oats
- Mix your apple varieties. Two-thirds tart apples and one-third sweet apples create the ideal balance of flavor and texture. Tart apples hold their shape during baking, while sweet apples contribute natural sweetness.
- Don’t skip the lemon juice. Even a small amount brightens the filling and prevents it from tasting cloying or one-dimensional. Your guests won’t taste lemon, but they’ll notice how much better everything tastes.
- Toast your topping separately for extra crispness. If you want an even crunchier topping, spread it on a baking sheet and toast it at four hundred degrees for eight to ten minutes before scattering it over the apples. This step is optional but creates exceptional texture.
- Measure brown sugar properly. Brown sugar should be packed firmly into your measuring cup and leveled off. Loosely measured brown sugar can throw off your ratios and make the topping too dry.
- Bake at a higher temperature for better browning. Four hundred twenty-five degrees creates a darker, crispier topping than three hundred fifty degrees. If your oven tends to run hot, start at four hundred and adjust as needed.
- Serve warm with vanilla ice cream. The contrast between warm spiced apples and cold, creamy ice cream is hard to beat and transforms a simple dessert into something special.
Common Mistakes to Avoid
- Using room-temperature butter in the topping. Warm butter mixes into the flour instead of creating distinct pieces, resulting in a dense, cake-like topping that lacks crispness. Always start with cold or frozen butter.
- Slicing apples too thin. Apples thinner than one-quarter inch will turn into applesauce during baking and leave you with a mushy, underdefined filling. Aim for half-inch wedges that maintain their structure.
- Overmixing the filling spices. You only need to stir until the spices are evenly distributed. Overmixing can overdevelop gluten in the flour and make the filling grainy.
- Compacting the topping before baking. Pressing down the crumb mixture creates a dense, bread-like layer instead of a crispy one. Scatter it loosely and let the oven do the work.
- Baking in a glass dish without checking doneness. Glass conducts heat differently than ceramic or metal and can cause the bottom to brown too quickly. If using glass, lower the oven temperature by twenty-five degrees.
Serving Suggestions
Apple crisp is wonderfully versatile and pairs beautifully with cold, creamy, and warm accompaniments. Serve it as the centerpiece of a simple dessert spread, or dress it up for a special occasion with thoughtful additions.
- Vanilla ice cream or whipped cream. The classic pairing that never fails. The cold cream melts into the warm apples and topping, creating a luxurious texture contrast.
- Greek yogurt. A tangier, lighter alternative that complements the spiced apples without overwhelming them.
- Caramel sauce drizzled on top. Adds richness and a slightly bitter sweetness that deepens the overall flavor.
- Custard sauce or creme anglaise. Transforms the crisp into an elegant plated dessert suitable for dinner parties.
- Serve it warm for breakfast. Top a bowl with granola or additional crisp topping and eat it as a special morning treat over yogurt or porridge.
Variations to Try
- Add nuts to the topping. Fold one-half cup of chopped pecans or walnuts into the crumb mixture for added crunch and nuttiness. Pecans pair especially well with cinnamon and brown sugar.
- Make it brown butter crisp. Brown the butter for three to four minutes in a saucepan, then cool it slightly before adding to the topping. Brown butter adds a nutty, complex flavor that elevates the entire dessert.
- Use spiced rum in the filling. Replace the vanilla extract with one tablespoon of spiced rum for a grown-up twist. The rum deepens the spice notes and adds warmth.
- Add fresh ginger. Reduce the cinnamon to one-quarter teaspoon and add one teaspoon of freshly grated ginger to the filling. Fresh ginger brings a bright, peppery note that makes the apples taste livelier.
- Make it with pears instead. Substitute three pounds of sliced pears for the apples, reduce the cinnamon to one-quarter teaspoon, and add one-half teaspoon of cardamom. Pears have a milder flavor that pairs beautifully with cardamom and vanilla.
Dietary Adaptations
- Gluten-free: Replace the all-purpose flour in both the filling and topping with a one-to-one gluten-free flour blend. The texture will be slightly different, but the results are still excellent. Use less of the gluten-free flour in the filling since it thickens more aggressively.
- Dairy-free: Substitute the butter with vegan butter or coconut oil in the topping. The texture will be less crispy with coconut oil but still delicious. Vegan butter works best for maintaining that crispy, crumbly topping.
- Vegan: Use vegan butter in the topping and ensure your brown sugar contains no bone char (most modern brown sugars don’t). The apple filling is naturally vegan and needs no changes.
- Lower-sugar: Replace the granulated sugar in the filling with monk fruit sweetener or erythritol using a one-to-one substitution. Reduce the brown sugar in the topping by one-quarter cup and replace with allulose for better browning.
Storage and Reheating
Refrigerator
Store leftover apple crisp in an airtight container in the refrigerator for up to four days. The topping softens slightly over time as it absorbs moisture from the apples, which is still delicious but less crispy.
- Cool the crisp completely before covering to prevent condensation from making the topping soggy.
- Transfer to an airtight container or cover the baking dish tightly with plastic wrap.
Freezer
You can freeze baked apple crisp for up to two months in a freezer-safe container. Freeze it completely first, then wrap it well to prevent freezer burn.
- Freeze in the baking dish covered tightly with plastic wrap and foil, or transfer to a freezer container once solid.
- Frozen crisp thaws in about two hours at room temperature.
Reheating
Reheat the crisp in a three hundred fifty-degree oven for twelve to fifteen minutes, covered with foil to prevent the topping from browning further. If you want to crisp up the topping, remove the foil for the last five minutes of reheating.
- Alternatively, reheat individual servings in the microwave for sixty to ninety seconds until warm.
- The microwave method softens the topping, so the oven method is preferred if you want to maintain texture.
Nutrition Information
| Nutrient | Amount |
|---|---|
| Calories | 285 |
| Total Fat | 12 g |
| Saturated Fat | 7 g |
| Carbohydrates | 42 g |
| Fiber | 3 g |
| Sugar | 28 g |
| Protein | 2 g |
| Sodium | 180 mg |
| Cholesterol | 30 mg |
Apple Crisp Without Oats
There’s nothing quite like the smell of cinnamon-spiced apples bubbling underneath a golden, buttery crumb topping fresh from the oven. This apple crisp skips the oats entirely and relies on flour, brown sugar, and butter to create a topping that’s crispy on the outside and tender within. You get all the warmth of a classic apple crisp in under an hour, making it perfect for weeknight desserts, holiday gatherings, or whenever you need something that feels homemade and genuine.
- 9×13 inch baking dish
- Large mixing bowl
- Small mixing bowl
- Cutting board
- Sharp knife
- Measuring cups and spoons
- Fork or pastry cutter
- Oven
For the Apple Filling
- 6 medium apples (about 2.5 pounds, peeled, cored, and sliced into half-inch wedges)
- 1/4 cup granulated sugar
- 2 tablespoons brown sugar
- 1 tablespoon all-purpose flour
- 1/2 teaspoon ground cinnamon
- 1/4 teaspoon ground nutmeg
- 1/8 teaspoon salt
- 1 tablespoon fresh lemon juice
- 1/2 teaspoon vanilla extract
For the Crispy Topping
- 1 cup all-purpose flour
- 3/4 cup packed brown sugar
- 1/2 cup cold unsalted butter (cubed)
- 1/4 teaspoon salt
- 1/4 teaspoon ground cinnamon (optional but recommended)
- Preheat your oven to 425 degrees Fahrenheit.
- Peel, core, and slice 6 medium apples into half-inch wedges. Toss with a splash of lemon juice as you go to prevent browning.
- In a small bowl, whisk together 1/4 cup granulated sugar, 2 tablespoons brown sugar, 1 tablespoon all-purpose flour, 1/2 teaspoon ground cinnamon, 1/4 teaspoon ground nutmeg, and 1/8 teaspoon salt.
- Add the lemon juice and vanilla extract to the sugar mixture and stir until combined.
- Spread the sliced apples evenly in a 9×13 inch baking dish. Pour the sugar mixture over the apples and gently toss until every piece is lightly coated.
- In a large mixing bowl, combine 1 cup all-purpose flour, 3/4 cup packed brown sugar, 1/4 teaspoon salt, and 1/4 teaspoon ground cinnamon. Stir until evenly distributed.
- Add 1/2 cup of cold, cubed unsalted butter to the flour mixture. Using a fork or your fingertips, work the butter into the flour until the mixture resembles coarse breadcrumbs with some pea-sized pieces of butter still visible.
- Spread the crumb mixture evenly over the prepared apples. Don’t press it down or compact it.
- Place the baking dish in the center rack and bake for 35 to 40 minutes, until the topping is golden brown and the apple filling bubbles slightly at the edges.
- Remove the baking dish from the oven and let it cool for at least 10 to 15 minutes before serving.
Keep your butter in the freezer for at least thirty minutes before using it in the topping, and work quickly so it doesn’t warm up in your hands. Cold butter is the secret to a crispy, crumbly topping that won’t turn into a dense cake. A mix of tart and sweet apple varieties gives the best flavor. Store leftover apple crisp in an airtight container in the refrigerator for up to four days. Serve warm with vanilla ice cream for the best experience.