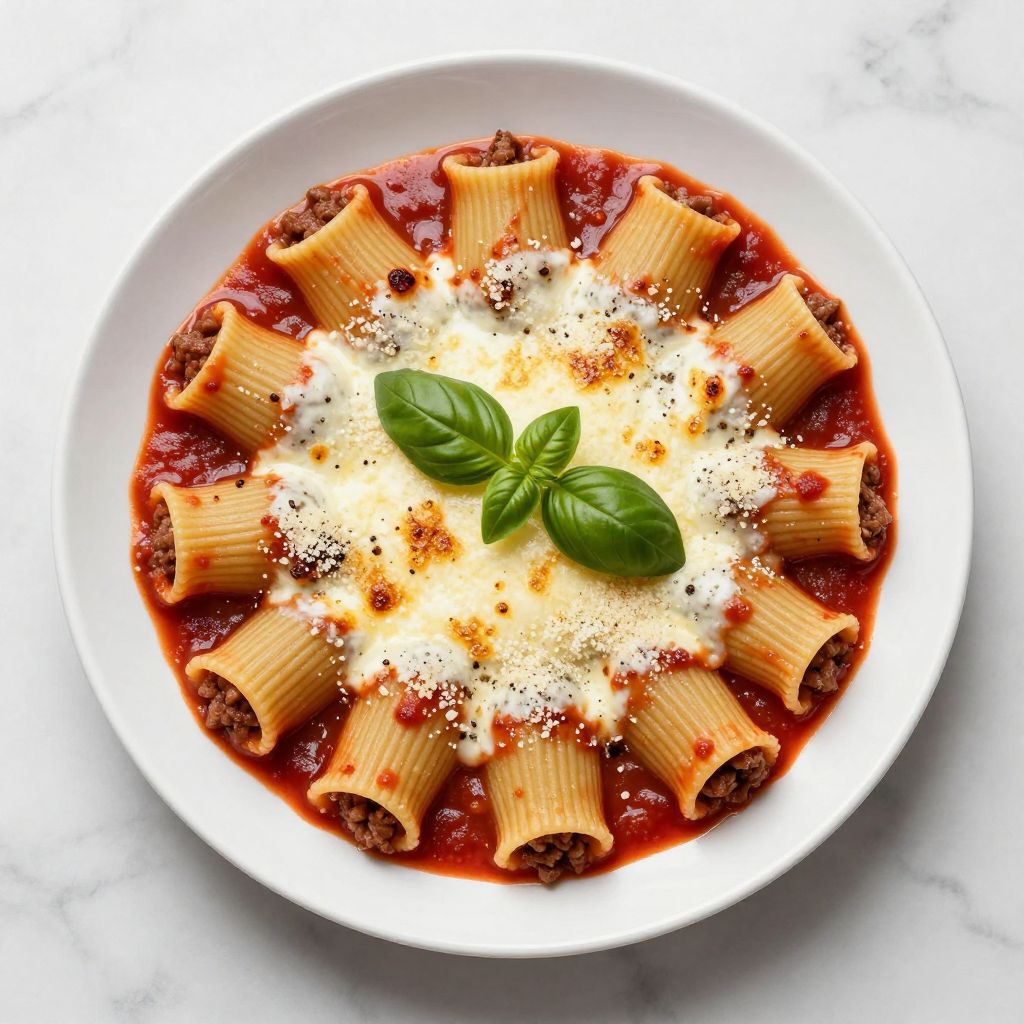
There’s something magical about pulling a bubbling pan of stuffed pasta tubes from the oven, their edges just starting to crisp while marinara sauce bubbles around them. Manicotti with meat transforms simple ingredients into a crowd-pleasing Italian feast that feels restaurant-worthy but comes together in your own kitchen with straightforward steps and honest effort.
This recipe delivers tender pasta shells packed with a savory blend of ground beef, three cheeses, and fresh herbs, all blanketed in rich tomato sauce. The filling stays moist and flavorful while the top gets golden and slightly crispy in all the right places.
Whether you’re feeding hungry teenagers or hosting Sunday dinner, this dish hits that sweet spot between comforting and impressive. Let’s get those manicotti tubes stuffed and ready for their spotlight.
Why You’ll Love This Recipe
This manicotti recipe combines hearty meat and creamy cheese in a way that satisfies even the pickiest eaters. The technique is forgiving, and the results look like you spent all day in the kitchen.
- Feeds a crowd without breaking your budget or your back
- Can be assembled a full day ahead and baked when you need it
- Reheats beautifully, making leftovers actually exciting
- Adaptable to whatever cheese or meat you have on hand
- Creates those crispy, saucy edges everyone fights over
My Experience Making This Recipe
The first time I made this, I worried about getting the filling inside those tubes without making a mess. Turns out, using a piping bag (or even a zip-top bag with the corner snipped off) makes the job almost fun, and any spills just add to the rustic charm.
My kitchen smelled like an Italian grandmother had taken over, with garlic, oregano, and bubbling cheese creating an aroma that had my family circling the oven. The hardest part was making everyone wait the ten minutes for it to cool enough to serve.
When I finally plated it, the pasta shells had absorbed just enough sauce to be tender but still held their shape beautifully. The meat filling stayed juicy, and that top layer of melted mozzarella had those golden-brown spots that make everything taste better.
Recipe Overview
- Recipe Name: Manicotti with Meat
- Servings: 6 to 8
- Prep Time: 30 minutes
- Cook Time: 45 minutes
- Total Time: 1 hour 15 minutes
- Course: Main Dish
- Cuisine: Italian-American
- Calories per Serving: 485
Equipment You Will Need
- Large pot for boiling pasta
- 9×13 inch baking dish
- Large skillet for browning meat
- Large mixing bowl
- Piping bag or large zip-top bag
- Wooden spoon
- Colander
- Aluminum foil
- Tongs or slotted spoon
Ingredients for Manicotti with Meat
For the Pasta
- 12 manicotti shells (about one 8-ounce box)
- 1 tablespoon salt for pasta water
For the Meat Filling
- 1 pound ground beef (80/20 blend works best)
- 1 cup ricotta cheese (whole milk)
- 1 cup shredded mozzarella cheese
- 1/2 cup grated Parmesan cheese
- 1 large egg
- 2 cloves garlic, minced
- 2 tablespoons fresh parsley, chopped
- 1 teaspoon dried oregano
- 1/2 teaspoon salt
- 1/4 teaspoon black pepper
For the Sauce and Topping
- 3 cups marinara sauce (store-bought or homemade)
- 1 1/2 cups shredded mozzarella cheese for topping
- 1/4 cup grated Parmesan cheese for topping
- Fresh basil leaves for garnish (optional)
Ingredient Notes and Substitutions
- Ground beef: Provides rich, savory flavor and protein to the filling. You can swap for ground turkey, Italian sausage, or a 50/50 beef-pork blend for different flavor profiles.
- Ricotta cheese: Creates a creamy, light texture that balances the meat. Cottage cheese blended until smooth works as a tangier substitute with slightly less richness.
- Manicotti shells: These large tubes are specifically shaped for stuffing. Jumbo pasta shells or cooked crepes can replace them if manicotti proves hard to find.
- Marinara sauce: Brings acidity and tomato flavor that cuts through the richness. Any tomato-based pasta sauce works, or make your own by simmering crushed tomatoes with garlic and herbs.
- Fresh parsley: Adds brightness and a subtle herbaceous note. Dried parsley works in a pinch (use 1 tablespoon), or substitute fresh basil for a different flavor direction.
How to Make Manicotti with Meat
Step 1: Cook the Manicotti Shells
Bring a large pot of water to a rolling boil and add the salt. Cook the manicotti shells for 6 to 7 minutes, about 2 minutes less than the package directions, so they remain firm enough to handle.
Drain the shells carefully and lay them flat on a lightly oiled baking sheet to prevent sticking. Slightly undercooked pasta will finish cooking in the oven and won’t turn mushy.
Step 2: Brown the Ground Beef
Heat a large skillet over medium-high heat and add the ground beef, breaking it apart with a wooden spoon. Cook for 6 to 8 minutes until no pink remains and the meat develops some browned bits.
Add the minced garlic during the last minute of cooking and stir constantly so it becomes fragrant without burning. Drain any excess fat, then transfer the meat to a large bowl and let it cool for 5 minutes.
Step 3: Prepare the Cheese Filling
Add the ricotta, 1 cup mozzarella, Parmesan, egg, parsley, oregano, salt, and pepper to the bowl with the cooled meat. Mix everything together with a spoon until thoroughly combined and the mixture looks uniform.
The egg acts as a binder that keeps the filling from falling apart when you cut into the finished dish. Taste the mixture and adjust the seasoning if needed, keeping in mind the sauce and topping cheese will add more flavor.
Step 4: Prepare the Baking Dish
Preheat your oven to 375°F. Spread 1 cup of marinara sauce evenly across the bottom of your 9×13 inch baking dish.
This layer of sauce prevents the pasta from sticking to the pan and keeps the bottom of each shell moist during baking. Don’t skip this step or you’ll end up scraping pasta off the dish later.
Step 5: Fill the Manicotti Shells
Transfer the meat and cheese mixture to a piping bag or a large zip-top bag with one corner cut off. Gently squeeze the filling into each manicotti shell, working from one end until it feels full but not bursting.
Arrange the stuffed shells in a single layer over the sauce in the baking dish, placing them seam-side up if there’s a split. You should fit all 12 shells snugly in the pan.
Step 6: Add Sauce and Cheese
Pour the remaining 2 cups of marinara sauce over the stuffed shells, making sure each one gets covered. Use the back of a spoon to spread the sauce into any gaps.
Sprinkle the 1 1/2 cups of mozzarella and 1/4 cup of Parmesan evenly over the top. This creates that irresistible golden, bubbly cheese layer everyone loves.
Step 7: Bake the Manicotti
Cover the baking dish tightly with aluminum foil and place it in the preheated oven. Bake for 30 minutes, then remove the foil and continue baking for another 15 minutes until the cheese turns golden brown and the sauce bubbles vigorously around the edges.
The foil traps steam during the first part of baking, which helps the pasta finish cooking and prevents the cheese from browning too quickly. Removing it at the end gives you that perfect crispy top.
Step 8: Rest and Serve
Remove the pan from the oven and let it rest for 10 minutes before serving. This cooling time allows the sauce to thicken slightly and the cheese to set, making the manicotti much easier to plate without everything sliding apart.
Garnish with fresh basil leaves if you have them, and serve hot with extra Parmesan on the side. The filling will be steaming hot, so warn your eager diners to take that first bite carefully.
Pro Tip: Slightly undercook your manicotti shells during boiling so they stay al dente after baking. Overcooked shells turn mushy and can tear when you try to stuff them, creating a frustrating mess that nobody wants to deal with.
Tips for the Best Manicotti with Meat
- Oil your baking sheet before laying out the cooked shells to prevent them from sticking together while you prepare the filling.
- Let the cooked meat cool for a few minutes before mixing with the cheese to prevent the ricotta from becoming grainy or separating.
- Use a spoon to gently open each manicotti shell before filling if the ends have sealed during cooking.
- Don’t overfill the shells or they’ll burst during baking and create a messy presentation. Three-quarters full is the sweet spot.
- Save any leftover filling to make small meatballs that you can nestle around the manicotti in the pan for extra protein.
- Rotate your baking dish halfway through the uncovered baking time if your oven has hot spots to ensure even browning on the cheese.
Common Mistakes to Avoid
- Boiling the pasta shells too long makes them fall apart when you try to fill them, turning your elegant dish into a sloppy casserole.
- Skipping the sauce layer on the bottom causes the pasta to stick and burn, making serving a nightmare and cleanup even worse.
- Adding hot meat directly to the cheese mixture can cause the egg to start cooking prematurely, creating an unpleasant texture.
- Baking without foil for the entire time dries out the top and leaves the pasta undercooked in the center, a textural disaster.
- Cutting into the manicotti immediately after baking results in a soupy mess on the plate instead of neat, composed portions.
Serving Suggestions
This hearty pasta dish pairs beautifully with lighter sides that provide textural contrast and cut through the richness. Think crisp, fresh, and simple accompaniments that don’t compete for attention.
- A simple arugula salad with lemon vinaigrette and shaved Parmesan
- Garlic bread or crusty Italian bread for soaking up extra sauce
- Roasted broccoli or green beans with olive oil and garlic
- Caesar salad with crunchy romaine and homemade croutons
- Sauteed spinach with a squeeze of lemon juice
Variations to Try
- Spinach and ricotta: Skip the meat and mix sauteed spinach with the cheese filling for a vegetarian version that’s lighter but still satisfying.
- Three-meat filling: Combine ground beef, Italian sausage, and ground pork for a deeply savory, complex flavor that meat lovers will devour.
- White sauce version: Replace the marinara with a creamy Alfredo or bechamel sauce for a richer, more decadent take on the classic.
- Spicy kick: Add red pepper flakes to the filling and use spicy Italian sausage instead of ground beef for heat that builds with each bite.
- Mushroom addition: Saute finely chopped mushrooms with the meat for an earthy depth and extra moisture in the filling.
Dietary Adaptations
- Gluten-free: Use gluten-free manicotti shells or large rice pasta tubes, which cook similarly but may need an extra minute or two of baking time. The texture will be slightly different but still delicious.
- Dairy-free: Replace the cheeses with dairy-free ricotta, mozzarella, and Parmesan alternatives, though the filling will be less creamy and the top won’t brown quite as beautifully.
- Vegetarian: Omit the ground beef and add sauteed mushrooms, chopped spinach, or diced zucchini to the cheese mixture for bulk and flavor without sacrificing heartiness.
- Low-carb/keto: Skip the pasta entirely and use thin slices of grilled eggplant or zucchini as wraps for the meat and cheese filling, reducing the carbs dramatically but changing the dish significantly.
Storage and Reheating
Refrigerator
Store leftover manicotti in an airtight container or cover the baking dish tightly with plastic wrap or foil. It will keep for 3 to 4 days in the refrigerator.
- Let the dish cool completely before covering to prevent condensation
- Store individual portions separately for easier reheating
- The flavors often improve after a day as everything melds together
Freezer
Manicotti freezes exceptionally well either before or after baking. Properly stored, it will maintain quality for up to 3 months.
- To freeze unbaked: Assemble completely, wrap tightly in plastic wrap and then foil, and freeze flat
- To freeze baked: Cool completely, portion into serving sizes, and store in freezer-safe containers
- Label with the date and baking instructions for future reference
- Thaw overnight in the refrigerator before baking or reheating
Reheating
Reheat manicotti gently to prevent the pasta from drying out or the cheese from becoming rubbery. A moderate oven works better than a microwave for maintaining texture.
- Oven method: Cover with foil and bake at 350°F for 20 to 25 minutes until heated through
- Microwave method: Heat individual portions on medium power for 2 to 3 minutes, checking and stirring halfway through
- Add a splash of water or extra sauce before reheating if the pasta looks dry
Nutrition Information
| Nutrient | Amount |
|---|---|
| Calories | 485 |
| Total Fat | 24g |
| Saturated Fat | 12g |
| Carbohydrates | 36g |
| Fiber | 3g |
| Sugar | 6g |
| Protein | 28g |
| Sodium | 780mg |
| Cholesterol | 85mg |
Nutritional values are approximate and based on one serving when the recipe serves 8 people. Your actual values may vary depending on specific brands and any modifications you make to the recipe.
Frequently Asked Questions
Can I use no-boil manicotti shells instead?
Yes, no-boil shells work well and save time, but you’ll need to add an extra half cup of sauce to provide enough moisture for them to cook properly in the oven. They may need an additional 5 to 10 minutes of covered baking time.
Can I make this dish ahead of time?
Absolutely, you can assemble the entire dish up to 24 hours in advance, cover it tightly, and refrigerate until you’re ready to bake. Add 10 to 15 minutes to the covered baking time if you’re starting from cold.
Why did my manicotti shells tear when I tried to fill them?
The pasta was likely overcooked, making it too soft and fragile to handle. Next time, undercook the shells by 2 minutes and handle them gently with clean hands or tongs.
Can I use jarred Alfredo sauce instead of marinara?
Yes, Alfredo sauce creates a rich, creamy version that’s delicious, though it will be significantly heavier and higher in calories. Use the same amount and follow the same baking instructions.
How do I know when the manicotti is fully cooked?
The cheese on top should
Manicotti with Meat
Ingredients
Equipment
Method
- Bring a large pot of water to a rolling boil and add the salt. Cook the manicotti shells for 6 to 7 minutes, about 2 minutes less than the package directions, so they remain firm enough to handle.
- Drain the shells carefully and lay them flat on a lightly oiled baking sheet to prevent sticking.
- Heat a large skillet over medium-high heat and add the ground beef, breaking it apart with a wooden spoon. Cook for 6 to 8 minutes until no pink remains and the meat develops some browned bits.
- Add the minced garlic during the last minute of cooking and stir constantly so it becomes fragrant without burning. Drain any excess fat, then transfer the meat to a large bowl and let it cool for 5 minutes.
- Add the ricotta, 1 cup mozzarella, Parmesan, egg, parsley, oregano, salt, and pepper to the bowl with the cooled meat. Mix everything together with a spoon until thoroughly combined and the mixture looks uniform.
- Preheat your oven to 375°F. Spread 1 cup of marinara sauce evenly across the bottom of your 9x13 inch baking dish.
- Transfer the meat and cheese mixture to a piping bag or a large zip-top bag with one corner cut off. Gently squeeze the filling into each manicotti shell, working from one end until it feels full but not bursting.
- Arrange the stuffed shells in a single layer over the sauce in the baking dish, placing them seam-side up if there's a split.
- Pour the remaining 2 cups of marinara sauce over the stuffed shells, making sure each one gets covered. Use the back of a spoon to spread the sauce into any gaps.
- Sprinkle the 1 1/2 cups of mozzarella and 1/4 cup of Parmesan evenly over the top.
- Cover the baking dish tightly with aluminum foil and place it in the preheated oven. Bake for 30 minutes, then remove the foil and continue baking for another 15 minutes until the cheese turns golden brown and the sauce bubbles vigorously around the edges.
- Remove the pan from the oven and let it rest for 10 minutes before serving. Garnish with fresh basil leaves if desired, and serve hot with extra Parmesan on the side.


