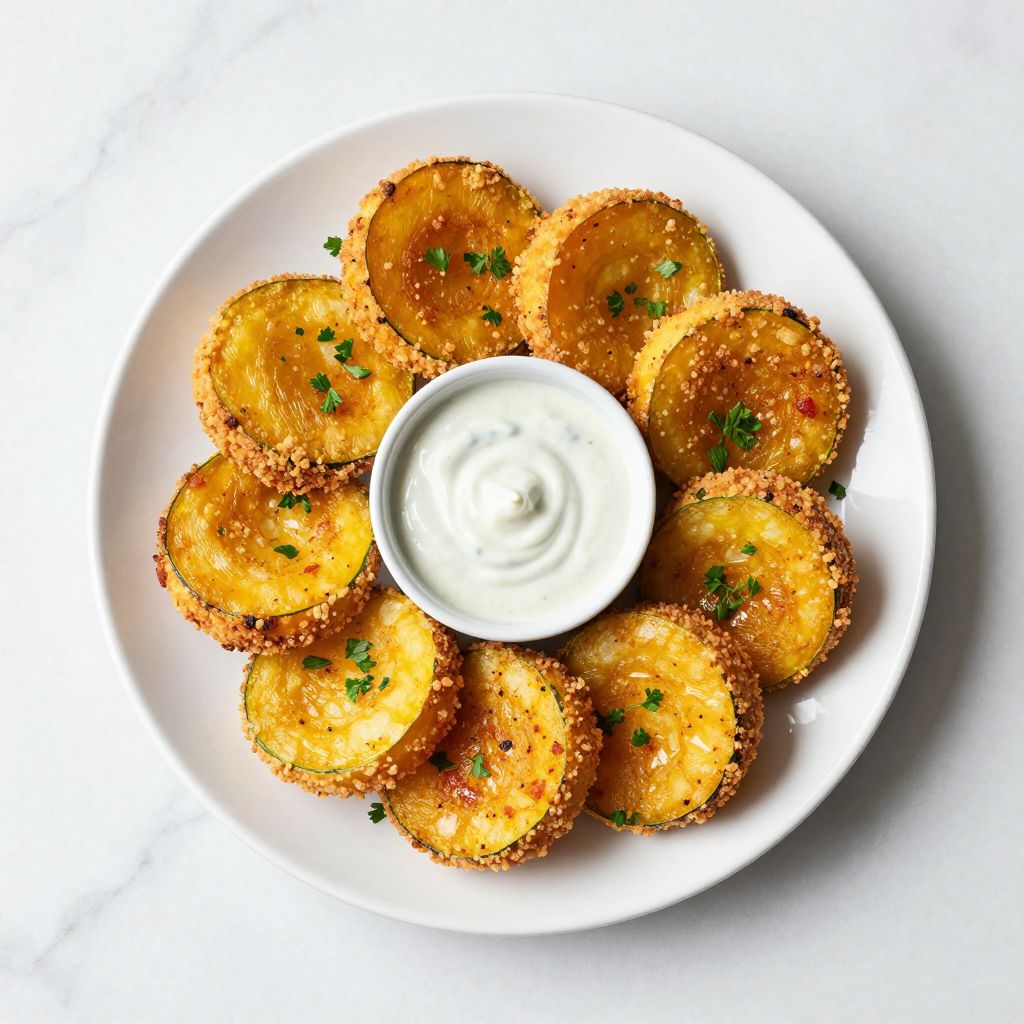
There’s something about the crisp edges of golden fried squash that takes me straight back to summer evenings on my grandmother’s porch. This recipe transforms humble yellow squash into crispy, tender rounds that disappear faster than you can make them.
The cornmeal coating creates an irresistible crunch while the squash stays creamy inside. Whether you’re looking for a quick side dish or a way to use up that garden bounty, this Southern classic delivers every time.
Why You’ll Love This Recipe
This fried squash hits all the right notes with minimal effort and maximum flavor. The technique is simple enough for weeknight cooking but impressive enough for company.
- Ready in under 30 minutes from start to finish
- Uses basic pantry ingredients you likely already have
- Creates an addictively crispy exterior with a tender center
- Perfect way to use abundant summer squash
- Works beautifully as a side dish or snack
My Experience Making This Recipe
The first time I made this, I underestimated how quickly these would vanish. I stood at the stove frying batch after batch while my family hovered nearby, snatching pieces straight from the cooling rack.
The key moment came when I learned to resist overcrowding the pan. Giving each slice space to breathe meant the difference between soggy and spectacularly crisp.
Now I double the recipe automatically. The sizzle when the coated squash hits the hot oil and that nutty, golden aroma filling the kitchen make the extra effort worth it every single time.
Recipe Overview
- Recipe Name: Fried Squash
- Servings: 4
- Prep Time: 10 minutes
- Cook Time: 15 minutes
- Total Time: 25 minutes
- Course: Side Dish
- Cuisine: Southern American
- Calories per Serving: 245
Equipment You Will Need
- Sharp knife and cutting board
- Three shallow bowls or pie plates for dredging station
- Large heavy-bottomed skillet or cast iron pan
- Paper towels for draining
- Wire cooling rack
- Tongs or slotted spoon for flipping
- Kitchen thermometer (optional but helpful)
Ingredients for Fried Squash Recipe
- 2 pounds yellow squash (about 4 medium), sliced into 1/4-inch rounds
- 1 cup all-purpose flour
- 1 cup cornmeal (yellow or white)
- 2 large eggs
- 1/4 cup whole milk
- 1 teaspoon salt, divided
- 1/2 teaspoon black pepper
- 1/2 teaspoon garlic powder
- 1/4 teaspoon cayenne pepper (optional)
- Vegetable oil for frying (about 1 cup)
Ingredient Notes and Substitutions
- Yellow squash: The mild flavor and tender texture make it perfect for frying. You can substitute zucchini, but it contains more water and may need extra draining time.
- Cornmeal: This creates the signature crunchy coating and authentic Southern texture. Panko breadcrumbs work in a pinch but won’t have the same cornmeal crunch.
- All-purpose flour: Forms the base layer that helps everything stick together. Gluten-free flour blends work well if you need a substitute.
- Whole milk: Adds richness to the egg wash for better coating adhesion. Buttermilk makes an excellent substitute and adds a subtle tang.
- Vegetable oil: Provides a neutral flavor and high smoke point needed for frying. Canola, peanut, or avocado oil all work equally well.
How to Make Fried Squash Recipe
Step 1: Prepare the Squash
Wash the squash thoroughly and pat completely dry with paper towels. Slice into uniform 1/4-inch rounds, discarding the ends.
Uniform thickness ensures even cooking so you don’t end up with some pieces burned while others stay raw. Excess moisture will make the coating slide off, so drying is critical.
Step 2: Set Up Your Dredging Station
Place the flour in the first shallow bowl and season with 1/2 teaspoon salt and the black pepper. In the second bowl, whisk together the eggs and milk until well combined.
In the third bowl, mix the cornmeal with the remaining 1/2 teaspoon salt, garlic powder, and cayenne if using. This assembly line setup makes coating quick and keeps your hands from getting impossibly messy.
Step 3: Heat the Oil
Pour oil into your skillet to a depth of about 1/4 inch. Heat over medium-high heat until it reaches 350°F, or until a pinch of cornmeal sizzles immediately when dropped in.
The right temperature prevents greasy, soggy squash and ensures that golden crust forms quickly. Too hot and the outside burns before the inside cooks; too cool and you get oil-logged slices.
Step 4: Coat the Squash
Working with a few slices at a time, dredge each piece in flour and shake off excess. Dip into the egg mixture, letting excess drip back into the bowl.
Press both sides into the cornmeal mixture, ensuring complete coverage. The three-step process creates layers that lock together during frying for a coating that actually stays put.
Step 5: Fry the First Batch
Carefully place coated squash slices in the hot oil, leaving space between each piece. Fry for 2 to 3 minutes without moving them until the bottom turns deep golden brown.
Overcrowding drops the oil temperature and creates steam, which ruins the crispy texture you’re working toward. Patience here pays off in crunch.
Step 6: Flip and Finish
Use tongs to gently flip each slice and cook the second side for another 2 to 3 minutes until equally golden. The squash should feel tender when pierced with a fork.
Watch for that perfect golden color that signals crispy perfection. Undercooked squash tastes raw and bitter, while overcooked pieces turn mushy inside.
Step 7: Drain and Keep Warm
Transfer fried squash to a wire rack set over paper towels to drain excess oil. This two-layer system pulls oil away from the bottom so pieces stay crispy instead of sitting in grease.
If working in batches, you can keep finished pieces warm in a 200°F oven on the rack. Avoid stacking them or covering with foil, which traps steam and softens the coating.
Step 8: Repeat and Season
Continue frying remaining squash in batches, allowing the oil to return to temperature between each batch. Sprinkle with a pinch of extra salt immediately after removing from oil while still hot.
The residual heat helps salt stick and penetrate the coating. Serve immediately for maximum crispiness, though these rarely last long enough to worry about.
Pro Tip: Salt your fried squash the moment it comes out of the oil. The hot surface helps the salt adhere and the flavor penetrate the coating for perfectly seasoned bites every time.
Tips for the Best Fried Squash Recipe
- Choose firm, medium-sized squash without soft spots or blemishes. Smaller squash tend to be sweeter and have fewer seeds.
- Let coated squash rest for 5 minutes before frying to help the coating set and adhere better. This prevents the breading from sliding off in the oil.
- Maintain consistent oil temperature by adjusting heat between batches. Use a thermometer to stay in the 350°F sweet spot.
- Don’t skip the flour layer in your dredging process. It creates a dry surface that helps the egg mixture stick, which in turn holds the cornmeal.
- Slice squash as uniformly as possible using a mandoline for perfect consistency. Even thickness means everything finishes cooking at the same time.
- Refresh your dredging station halfway through if the mixture gets clumpy from moisture. Fresh, dry coating ingredients produce better results.
Common Mistakes to Avoid
- Slicing squash too thick makes the center stay raw while the coating burns. Stick to 1/4-inch thickness for the best texture balance.
- Skipping the drying step leaves surface moisture that prevents coating adhesion. Wet squash means the breading falls off in chunks.
- Overcrowding the pan drops oil temperature and creates steam instead of crispiness. Fry in small batches even though it takes longer.
- Using old oil or reheating it too many times gives food an off flavor. Fresh oil tastes clean and produces better color.
- Placing fried squash on paper towels alone traps moisture underneath. Always use a wire rack to allow air circulation on all sides.
Serving Suggestions
This fried squash shines alongside classic comfort foods and casual summer meals. The crispy, savory flavor pairs beautifully with rich proteins and fresh vegetables.
- Serve with ranch dressing or comeback sauce for dipping
- Pair with fried chicken, pulled pork, or grilled burgers for a Southern feast
- Add to a vegetable plate with sliced tomatoes, butter beans, and cornbread
- Stack on a BLT sandwich for extra crunch and vegetable goodness
- Serve alongside grilled fish with coleslaw and hush puppies
Variations to Try
- Parmesan Herb Version: Add 1/2 cup grated Parmesan and 1 tablespoon Italian seasoning to the cornmeal mixture for a savory, cheesy twist. The cheese crisps up beautifully and adds umami depth.
- Spicy Cajun Style: Replace the seasonings with 2 tablespoons Cajun seasoning in the cornmeal. The heat builds with each bite and pairs perfectly with cooling ranch dip.
- Buttermilk Soaked: Soak sliced squash in buttermilk for 30 minutes before breading. This tenderizes the squash and adds tanginess that cuts through the richness.
- Panko Crusted: Use half cornmeal and half panko breadcrumbs for extra-crispy texture. The combination gives you cornmeal flavor with added crunch.
- Air Fryer Version: Coat as directed and air fry at 400°F for 10 to 12 minutes, flipping halfway through. You’ll use less oil while still achieving impressive crispiness.
Dietary Adaptations
- Gluten-Free: Replace all-purpose flour with a gluten-free flour blend and ensure your cornmeal is certified gluten-free. The texture stays nearly identical with this simple swap.
- Dairy-Free: Substitute the milk with unsweetened almond milk or water in the egg wash. The coating adheres just as well without any dairy.
- Vegan: Use a flax egg (1 tablespoon ground flaxseed mixed with 3 tablespoons water per egg) and plant-based milk. The coating won’t be quite as sturdy but still delivers good crunch.
- Low-Carb/Keto: Replace flour and cornmeal with a mixture of almond flour and crushed pork rinds. You’ll sacrifice some authenticity but keep the concept intact with fewer carbs.
Storage and Reheating
Refrigerator
Store cooled fried squash in an airtight container lined with paper towels for up to 3 days. The paper towels absorb any residual moisture that could soften the coating.
- Let squash cool completely before storing to prevent condensation
- Place paper towels between layers if stacking
- Expect some loss of crispiness even with proper storage
Freezer
Freezing fried squash is not recommended as the high water content in squash makes it mushy when thawed. The coating also tends to separate and become soggy after freezing.
- If you must freeze, flash freeze on a baking sheet first
- Transfer to freezer bags once solid
- Use within 1 month and expect significant texture changes
Reheating
The best reheating method restores crispiness rather than microwaving into mush. A hot oven or air fryer works wonders for reviving the coating.
- Oven method: Bake at 375°F on a wire rack for 8 to 10 minutes until crispy
- Air fryer method: Heat at 375°F for 4 to 5 minutes
- Avoid microwaving as it makes the coating rubbery and limp
Nutrition Information
| Nutrient | Amount |
|---|---|
| Calories | 245 |
| Total Fat | 12g |
| Saturated Fat | 2g |
| Carbohydrates | 28g |
| Fiber | 3g |
| Sugar | 4g |
| Protein | 7g |
| Sodium | 620mg |
| Cholesterol | 95mg |
Nutritional values are approximate and will vary based on specific ingredients used and oil absorption during frying. These calculations assume standard home frying techniques and moderate oil absorption.
Frequently Asked Questions
Can I use zucchini instead of yellow squash?
Yes, zucchini works perfectly with this same method. Just know that zucchini contains slightly more water, so be extra diligent about patting it dry before coating to prevent sogginess.
Can I make the coating mixture ahead of time?
You can mix your dry ingredients up to a week ahead and store them in airtight containers. However, slice and coat the squash right before frying for the best coating adhesion and texture.
Why does my coating fall off during frying?
This usually happens when the squash is too wet or the oil temperature is wrong. Make sure to thoroughly dry the squash and maintain oil temperature around 350°F for proper sealing of the coating.
How do I keep the first batches warm while frying the rest?
Place finished squash on a wire rack set on a baking sheet in a 200°F oven. The low heat keeps them warm without continuing to cook, and the rack prevents sogginess.
Can I bake these instead of frying?
You can bake coated squash at 425°F for 20 to 25 minutes, flipping halfway through and spraying with oil. The results will be lighter and less crispy but still tasty with fewer calories.
What’s the best oil for frying squash?
Vegetable, canola, or peanut oil work best for their high smoke points and neutral flavors. Avoid olive oil as its low smoke point can create bitter flavors and smoking at frying temperatures.
How thin should I slice the squash?
Aim for 1/4-inch thick slices for the perfect balance of crispy exterior and tender interior. Thinner slices can burn easily while thicker ones may stay raw in the center.
Final Thoughts
This fried squash recipe proves that simple ingredients and straightforward techniques can create something truly special. The contrast between that crunchy cornmeal crust and tender squash inside makes every bite satisfying.
Whether you’re feeding a crowd at a summer cookout or just looking for a way to enjoy fresh produce, this recipe delivers comfort and flavor without fuss. Give it a try and watch these golden rounds disappear from the plate.
Fried Squash
Ingredients
Equipment
Method
- Wash the squash thoroughly and pat completely dry with paper towels. Slice into uniform 1/4-inch rounds, discarding the ends.
- Place the flour in the first shallow bowl and season with 1/2 teaspoon salt and the black pepper. In the second bowl, whisk together the eggs and milk until well combined. In the third bowl, mix the cornmeal with the remaining 1/2 teaspoon salt, garlic powder, and cayenne if using.
- Pour oil into your skillet to a depth of about 1/4 inch. Heat over medium-high heat until it reaches 350°F, or until a pinch of cornmeal sizzles immediately when dropped in.
- Working with a few slices at a time, dredge each piece in flour and shake off excess. Dip into the egg mixture, letting excess drip back into the bowl. Press both sides into the cornmeal mixture, ensuring complete coverage.
- Carefully place coated squash slices in the hot oil, leaving space between each piece. Fry for 2 to 3 minutes without moving them until the bottom turns deep golden brown.
- Use tongs to gently flip each slice and cook the second side for another 2 to 3 minutes until equally golden. The squash should feel tender when pierced with a fork.
- Transfer fried squash to a wire rack set over paper towels to drain excess oil. If working in batches, keep finished pieces warm in a 200°F oven on the rack.
- Continue frying remaining squash in batches, allowing the oil to return to temperature between each batch. Sprinkle with a pinch of extra salt immediately after removing from oil while still hot. Serve immediately.


