Mango sago is the dessert that makes summer worth sweating through. Sweet ripe mangoes, chewy tapioca pearls, and cold coconut milk come together in a bowl that tastes like a tropical vacation you can make in your own kitchen.
This Hong Kong style dessert takes about 30 minutes and rewards you with something restaurant quality. Let me show you exactly how to nail it every single time.
What Makes This Recipe Worth Your Time
This mango sago delivers the perfect balance of creamy, fruity, and chewy in every spoonful. It hits differently than store bought versions because you control the mango quality and sweetness level.
- Three textures in one bowl: silky mango puree, chewy tapioca pearls, and fresh mango chunks
- No baking required and minimal cooking keeps your kitchen cool in hot weather
- Naturally gluten free so everyone at your table can enjoy it without worry
- Ready in 30 minutes including the time it takes to chill properly
- Kid approved sweetness that adults find sophisticated enough for dinner parties
A Little Background on This Dish
Mango sago originated in Hong Kong’s cha chaan teng restaurants during the 1980s. Cantonese cooks combined Southeast Asian tapioca traditions with the region’s obsession with fresh mango to create something entirely new.
The dish spread across Asia and became a staple in dessert shops from Singapore to Taiwan. Each region adds its own spin, but the Hong Kong original remains the gold standard that this recipe follows.
My Experience With This Recipe
I first tried mango sago at a dim sum restaurant years ago and became obsessed with recreating it at home. The version I ordered was perfect: cold, creamy, with tapioca pearls that bounced between my teeth just right.
My early attempts produced mushy tapioca that dissolved into paste and mango that tasted flat. I kept overcooking the pearls and using mangoes that looked good but had no flavor, and the results showed it.
The first time I got everything right, the kitchen smelled like a mango farm and my kids fought over who got to lick the blender. That bowl disappeared in under five minutes, and I knew I had finally cracked it.
Before You Start: Key Things to Know
This recipe suits beginner cooks who can follow timing closely. The biggest challenge is cooking the tapioca pearls to the right texture without turning them into glue.
- Difficulty level: Easy, perfect for first time dessert makers
- Active time vs passive time: 15 minutes active cooking, 15 minutes chilling
- Most important equipment: A blender or food processor for the smoothest puree
- Step requiring most attention: Cooking the tapioca pearls to chewy perfection
Recipe at a Glance
- Recipe Name: Mango Sago
- Yield: 4 servings
- Prep Time: 10 minutes
- Cook Time: 15 minutes
- Total Time: 25 minutes plus chilling
- Resting Time: 30 minutes in refrigerator
- Difficulty: Easy
- Course: Dessert
- Cuisine: Hong Kong, Cantonese
- Calories per Serving: 285
How to Source the Best Ingredients
The mango you choose makes or breaks this dessert completely. Ripe, fragrant fruit creates magic while unripe mangoes produce something forgettable and bland.
- Mangoes: Choose Ataulfo (honey) or Alphonso varieties for the sweetest, smoothest flesh. The mango should give slightly when pressed and smell intensely fruity at the stem end.
- Tapioca pearls: Buy small pearls (2mm) from an Asian grocery store rather than large boba pearls. Look for packages that show uniform, white, dry pearls with no clumping.
- Coconut milk: Select full fat canned coconut milk, not the carton kind meant for drinking. Shake the can; a good one feels heavy and sounds thick.
- Evaporated milk: Any brand works fine here. Check the expiration date and avoid dented cans.
Ingredients for Mango Sago
For the Tapioca
- 1/2 cup small tapioca pearls (sago)
- 6 cups water for boiling
- Ice water for shocking
For the Mango Base
- 3 large ripe mangoes (about 2 pounds total)
- 1 cup coconut milk, full fat, chilled
- 1/2 cup evaporated milk, chilled
- 3 tablespoons sugar, or to taste
- 1/4 teaspoon vanilla extract
For Serving
- Fresh mango cubes for topping
- Pomelo segments, optional
- Fresh mint leaves for garnish
Smart Substitutions and Swaps
- Mangoes: Fresh mango provides the best flavor and texture. Frozen mango chunks work in a pinch but produce a slightly less vibrant color and may need extra sugar.
- Coconut milk: This adds richness and tropical flavor. Substitute with heavy cream for a less coconut forward taste, though you lose some authenticity.
- Evaporated milk: This contributes creaminess without thinning the mixture. Use regular whole milk but reduce the amount by half to maintain consistency.
- Sugar: The sugar balances any tartness in the mango. Honey or agave work as substitutes but will slightly change the flavor profile and may make the mixture thinner.
- Tapioca pearls: These provide the signature chewy texture. Chia seeds offer a different texture entirely but work for those avoiding tapioca.
Tools and Equipment You Will Need
Having everything ready before you start prevents scrambling while your tapioca overcooks. The blender is non negotiable for achieving that silky smooth puree.
- Large pot with lid (for boiling tapioca with plenty of room to prevent sticking)
- Fine mesh strainer (for draining tapioca without losing pearls)
- Large bowl with ice water (for stopping the tapioca cooking instantly)
- Blender or food processor (for creating smooth mango puree)
- Sharp knife and cutting board
- Mixing bowl
- Rubber spatula
- Serving glasses or bowls
- Measuring cups and spoons
How to Make Mango Sago
Read through all the steps before you begin and prep your ice bath in advance. Your mangoes should be at room temperature for blending, and your coconut milk should be cold from the refrigerator.
Step 1: Prepare Your Ice Bath
Fill a large bowl halfway with ice cubes and add cold water until the bowl is three quarters full. Place this near your stove where you can reach it quickly after draining the tapioca.
The ice bath stops the cooking process instantly and prevents the tapioca from turning mushy. Tapioca pearls carry residual heat and will continue cooking if you skip this step.
Your ice bath is ready when you can see condensation forming on the outside of the bowl and the water feels painfully cold to the touch.
Step 2: Boil the Water
Bring 6 cups of water to a rolling boil in a large pot over high heat. The water should be bubbling vigorously across the entire surface before you add the tapioca.
Using plenty of water gives the tapioca pearls room to move freely and cook evenly. Crowded pearls stick together and cook unevenly, leaving some mushy and others still hard in the center.
You will know the water is ready when large bubbles break the surface continuously and steam rises steadily from the pot.
Step 3: Cook the Tapioca Pearls
Pour the tapioca pearls slowly into the boiling water while stirring constantly with a wooden spoon. Keep stirring for the first 2 minutes to prevent the pearls from sinking and sticking to the pot bottom.
The constant stirring during the initial phase separates each pearl before the starches on the surface start to set. Once they firm up slightly, they become much less likely to clump together.
The pearls will appear white and opaque at first, then gradually become translucent around the edges while maintaining a tiny white dot in the center after about 10 minutes.
Step 4: Test the Tapioca for Doneness
After 12 minutes of boiling, fish out a few pearls with a slotted spoon and run them under cold water. Bite into one to check the texture: you want chewy throughout with no hard, chalky center.
The starch in tapioca needs sufficient heat and time to fully hydrate and gelatinize. Undercooked pearls have an unpleasant gritty texture that ruins the dessert experience.
Perfectly cooked pearls feel bouncy between your teeth, similar to gummy candy, and look almost completely translucent with just a faint cloudiness in the very center.
Step 5: Shock the Tapioca
Drain the tapioca through a fine mesh strainer and immediately plunge the strainer into your prepared ice bath. Swirl the pearls around in the ice water for 30 seconds to stop the cooking.
The sudden temperature drop firms up the exterior of each pearl and locks in that chewy texture. Skipping this step results in tapioca that continues to soften and eventually becomes mushy paste.
The pearls are properly shocked when they feel cool to the touch and have firmed up noticeably, bouncing back when you press them gently.
Step 6: Drain and Set Aside
Lift the strainer from the ice bath and shake off excess water thoroughly. Transfer the drained tapioca to a clean bowl and set aside at room temperature while you prepare the mango mixture.
Removing excess water prevents your final dessert from becoming watery and diluted. The pearls can sit at room temperature for up to an hour without degrading in quality.
Step 7: Prepare the Mangoes
Peel the mangoes using a sharp knife or vegetable peeler. Cut the flesh away from the flat pit by slicing along each side, then trim any remaining fruit from the edges of the pit.
You want to maximize the amount of flesh you harvest from each mango since the fruit is the star ingredient. Reserve one third of the mango in cubes for topping and the rest goes into the blender.
Well prepared mango chunks should be uniform in size (about half inch cubes) and free of any fibrous bits from near the pit.
Step 8: Blend the Mango Puree
Add two thirds of the mango flesh to your blender along with the sugar and vanilla extract. Blend on high speed for 60 seconds until completely smooth with no visible chunks remaining.
The high speed blending incorporates air into the puree and creates a lighter, more luxurious texture. Lower speeds leave fibrous strands that disrupt the silky mouthfeel you want.
The puree is ready when it looks uniformly smooth and pours in a steady stream without any lumps visible.
Step 9: Add the Milks
Pour the cold coconut milk and evaporated milk into the blender with the mango puree. Blend on medium speed for 20 seconds just until everything combines into a uniform golden mixture.
Using chilled milks keeps the final mixture cold and prevents separation. The brief blending time mixes without incorporating too much air, which would make the texture foamy rather than creamy.
The mixture should look like a pale orange smoothie with no streaks of white visible and a pourable but slightly thick consistency.
Step 10: Taste and Adjust Sweetness
Pour a small amount of the mixture into a spoon and taste it at the temperature it will be served. Add more sugar one tablespoon at a time if the mixture tastes too tart, blending briefly after each addition.
Sweetness perception decreases as temperature drops, so the mixture should taste slightly sweeter than you want the final dessert. Cold dulls sweetness by about 20 percent.
The mixture is properly sweetened when it tastes balanced with no sharp tartness but also does not taste like candy.
Step 11: Combine and Chill
Pour the mango mixture into a large bowl and fold in half of the cooked tapioca pearls using a rubber spatula. Cover the bowl and refrigerate for at least 30 minutes until thoroughly chilled.
Chilling allows the flavors to meld and gives the tapioca time to absorb some of the mango mixture. The resting period transforms the dessert from good to great.
The dessert is ready to serve when it feels cold throughout and has thickened slightly to a consistency similar to thin pudding.
Step 12: Assemble and Serve
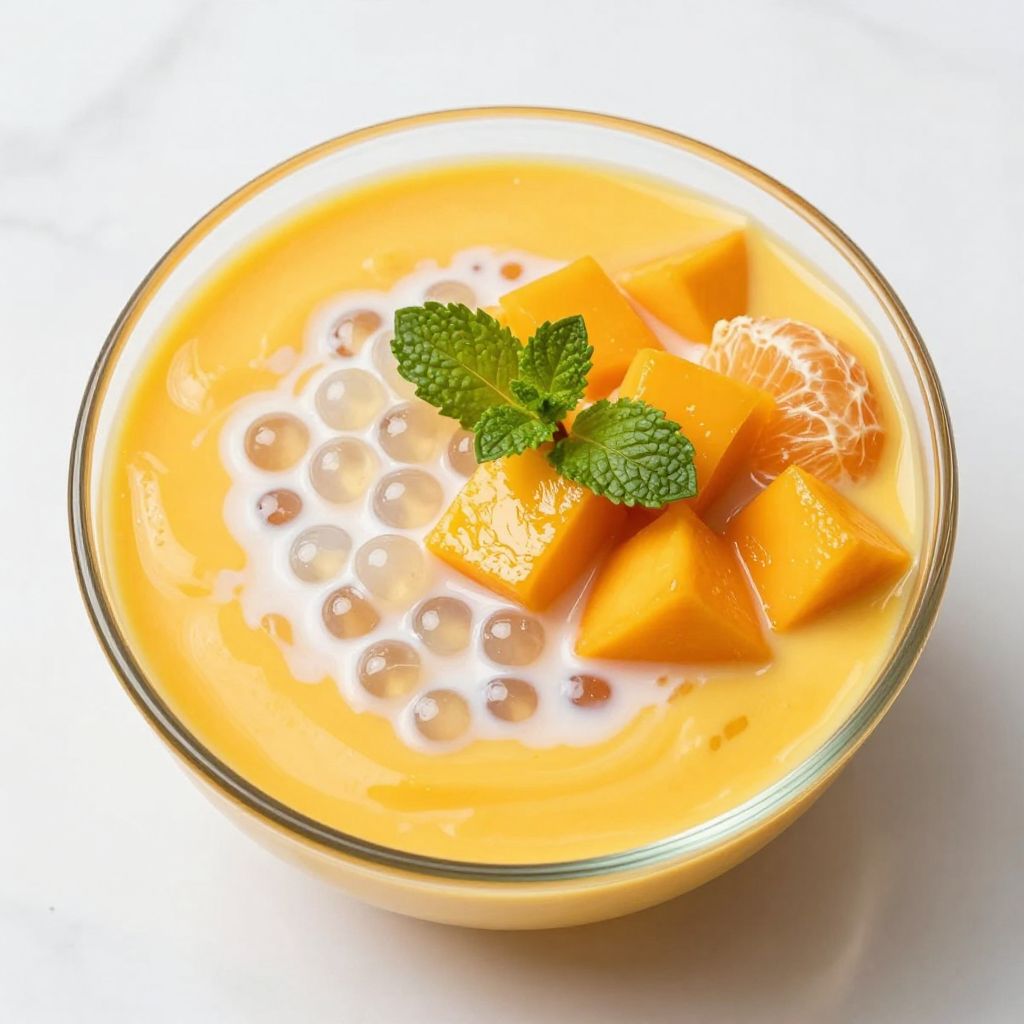
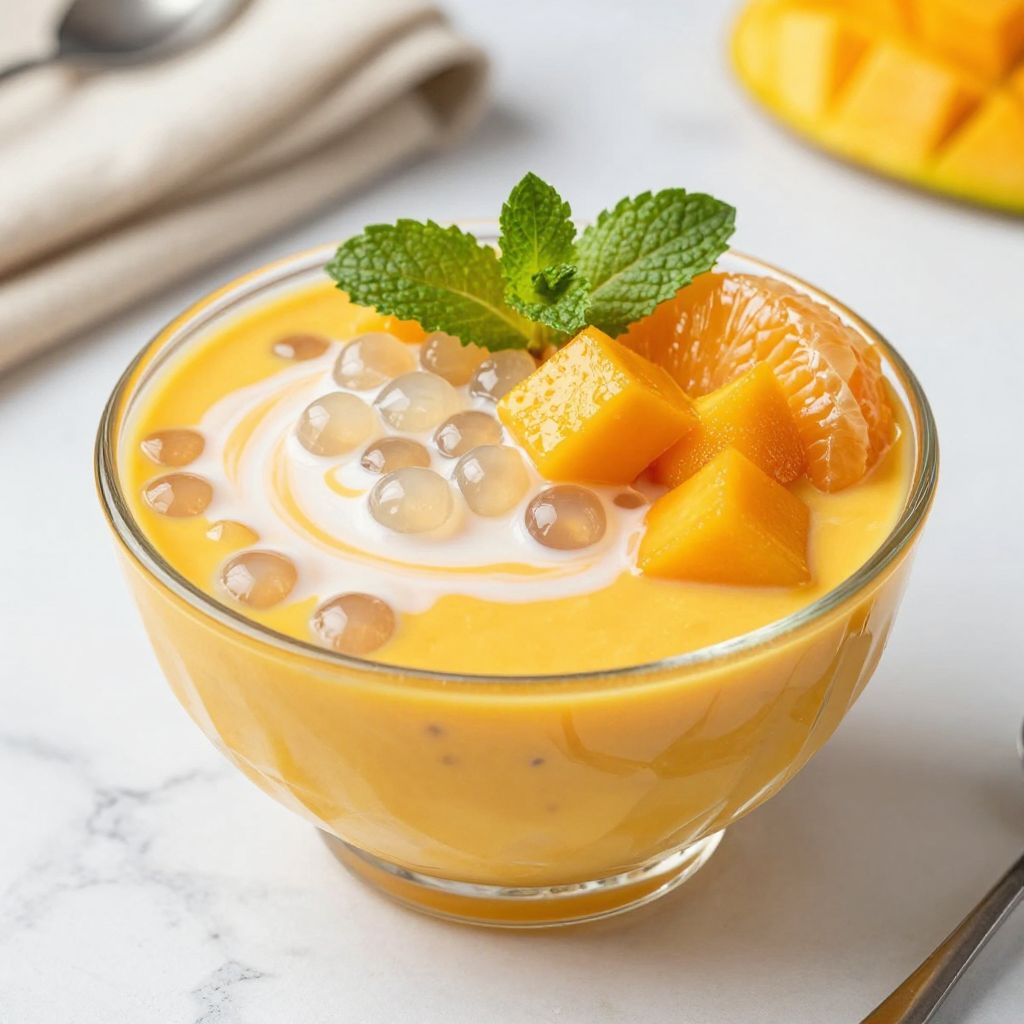
Divide the chilled mango sago among four serving glasses or bowls. Top each portion with the reserved mango cubes, remaining tapioca pearls, pomelo segments if using, and fresh mint.
Layering some tapioca on top creates visual appeal and textural contrast in each spoonful. The fresh mango cubes add bright pops of flavor against the creamy base.
A properly assembled serving shows distinct layers of creamy mango base, glossy tapioca pearls, and bright fresh fruit visible through the glass.
Pro Tip: Make the mango mixture slightly sweeter than you think you need because cold temperatures suppress sweetness perception by about 20 percent.
The Science Behind the Technique
Tapioca pearls are pure starch extracted from cassava root, and cooking them is all about controlled gelatinization. The starch granules absorb water and swell as they heat, eventually bursting and forming the chewy gel matrix that gives sago its signature bounce.
The ice bath works by rapidly cooling the gelatinized starch, which sets the structure before it can break down further. Without this shock, residual heat continues to degrade the starch network, turning chewy pearls into shapeless mush.
Chef Note: The window between perfectly chewy and overcooked tapioca is about 90 seconds, so test frequently and trust your teeth more than any timer.
Tips for Getting It Right Every Time
- Use ripe mangoes that smell fragrant at the stem end and give slightly when pressed. Unripe mangoes lack the sugar and aroma that make this dessert shine.
- Stir constantly during the first two minutes of cooking tapioca to prevent clumping. The pearls are most vulnerable to sticking before the surface starches set.
- Chill your milks in the refrigerator for at least two hours before making this dessert. Cold ingredients prevent the mixture from becoming warm and separating.
- Taste before chilling because you cannot easily adjust sweetness once the dessert is cold. Cold temperatures mask sweetness, so adjust accordingly.
- Serve within 24 hours for the best tapioca texture. The pearls gradually absorb liquid and lose their chewy bounce after the first day.
- Reserve fresh mango for topping rather than mixing it all into the puree. The textural contrast between smooth base and chunky topping makes each bite interesting.
Mistakes That Will Ruin Your Dish
- Using unripe mangoes produces a sour, fibrous dessert that no amount of sugar can save. The flesh should be soft and deeply fragrant.
- Skipping the ice bath lets residual heat turn your chewy pearls into a gluey paste within minutes.
- Overcooking the tapioca beyond translucency dissolves the pearls into a starchy slurry that coats your mouth unpleasantly.
- Using low fat coconut milk results in a thin, watery dessert that lacks the luxurious richness this dish needs.
- Serving immediately without chilling means lukewarm dessert with flavors that have not melded. This dish needs time in the cold.
Make Ahead and Meal Prep Tips
This dessert works beautifully for making ahead when you have guests coming. The mango base actually improves with a few hours in the refrigerator as flavors develop.
- Mango puree can be made up to 2 days ahead and stored in an airtight container in the refrigerator. Stir well before using as separation may occur.
- Tapioca pearls should be cooked the same day you serve for the best texture. If you must cook ahead, store in the mango mixture rather than plain water.
- Fresh mango cubes can be cut up to 4 hours before serving and stored covered in the refrigerator. Toss with a squeeze of lime to prevent browning.
- Complete assembled dessert keeps for up to 24 hours refrigerated, though tapioca texture is best within the first 8 hours.
What to Serve With Mango Sago
This dessert shines brightest after a spicy or savory Asian meal when something cool and sweet hits the spot. It works equally well as a light afternoon treat on a hot summer day.
- Dim sum: The cold sweetness perfectly balances salty, savory dumplings and creates a classic Hong Kong dessert experience.
- Thai curry: The creamy coconut in both dishes creates a flavor bridge while the cold temperature soothes any residual heat.
- Grilled meats: The fruity freshness cleanses the palate after rich, charred proteins.
- Light salads: Pair with a fresh Asian slaw for a complete warm weather meal that stays refreshing.
- Sticky rice dishes: The contrast between warm sticky rice mains and cold mango sago dessert satisfies completely.
Drink Pairings
A cold glass of jasmine tea complements mango sago beautifully, with the floral notes of the tea enhancing the tropical fruit without competing. The clean finish refreshes between sweet bites.
- Wine: A chilled Moscato d’Asti or late harvest Riesling echoes the mango sweetness while adding effervescence that lightens each bite.
- Beer: A Belgian witbier with orange peel notes plays well with the tropical flavors and provides refreshing carbonation.
- Non alcoholic: Cold brewed jasmine or green tea adds floral complexity without overwhelming the delicate mango flavor.
- Hot drink: A small cup of hot oolong tea creates a pleasant temperature contrast and aids digestion after a rich meal.
Flavour Variations Worth Trying
- Pomelo Mango Sago: Add fresh pomelo segments to the topping and reduce the sugar slightly. The citrus bursts add tartness that cuts through the richness.
- Coconut Cream Mango Sago: Replace the evaporated milk with thick coconut cream for an intensely tropical version. The coconut flavor becomes dominant and the texture becomes richer.
- Matcha Swirl Mango Sago: Drizzle sweetened matcha over the finished dessert before serving. The bitter green tea creates visual appeal and adds earthy complexity.
- Mango Sago with Sticky Rice: Serve alongside a scoop of coconut sticky rice for a fusion version. You get chewy rice and chewy tapioca in one bowl.
- Tropical Fruit Sago: Replace half the mango with ripe papaya or passion fruit. The flavor becomes more complex and less sweet, appealing to those who find straight mango too intense.
How to Adapt This Recipe for Your Diet
- Gluten free: This recipe is naturally gluten free as written. Verify your tapioca pearl packaging does not indicate cross contamination if you have celiac disease.
- Dairy free: Substitute the evaporated milk with additional coconut milk or use a thick oat milk. The dessert becomes fully vegan with this swap and slightly more coconut forward.
- Vegan: Replace evaporated milk with coconut cream and use maple syrup instead of white sugar. The texture remains nearly identical and the flavor gains slight caramel notes.
- Low carb: Reduce the tapioca by half and use a monk fruit sweetener instead of sugar. The texture becomes less substantial but the flavor remains satisfying.
- High protein: Stir two scoops of unflavored collagen powder into the blended mixture before chilling. The texture becomes slightly thicker and you add about 10 grams of protein per serving.
How to Store and Reheat
In the Refrigerator
Store the mango sago in an airtight glass container for up to 3 days. The tapioca will continue to absorb liquid and soften slightly each day.
- Stir gently before serving as the mixture tends to separate after sitting
- Add fresh mango cubes just before serving rather than storing them in the mixture
In the Freezer
Freezing is not recommended for the complete dessert because tapioca pearls become unpleasantly hard and grainy after thawing. The mango puree alone freezes beautifully.
- Freeze the mango puree without tapioca in ice cube trays for up to 3 months
- Thaw frozen puree overnight in the refrigerator and mix with freshly cooked tapioca
Reheating
This dessert is meant to be served cold and should not be reheated. Simply remove from the refrigerator and serve within 15 minutes for the best temperature.
- Oven reheating is not applicable for this cold dessert
- Stovetop warming would destroy the tapioca texture and is not recommended
- Microwave heating causes the coconut milk to separate and creates an unpleasant oily film on top
Cost Breakdown
Making mango sago at home costs a fraction of what dessert shops charge for a single serving. You get four generous portions for less than the price of one restaurant bowl.
| Ingredient | Estimated Cost |
|---|---|
| Mangoes (3 large) | $4.50 |
| Tapioca pearls | $0.60 |
| Coconut milk | $2.00 |
| Evaporated milk | $1.50 |
| Sugar | $0.15 |
| Vanilla extract | $0.25 |
| Total Per Serving | $2.25 |
Nutrition Information
| Nutrient | Amount |
|---|---|
| Calories | 285 |
| Total Fat | 14g |
| Saturated Fat | 12g |
| Trans Fat | 0g |
| Cholesterol | 8mg |
| Sodium | 45mg |
| Total Carbohydrates | 42g |
| Dietary Fiber | 2g |
| Total Sugars | 32g |
| Added Sugars | 9g |
| Protein | 3g |
| Vitamin D | 0mcg |
| Calcium | 65mg |
| Iron | 1mg |
| Potassium | 320mg |
Nutritional values are estimates based on standard ingredients and may vary depending on specific brands, mango ripeness, and portion sizes used.
Frequently Asked Questions
Can I use frozen mango instead of fresh?
Frozen mango works but produces a slightly less vibrant color and may need additional sugar. Thaw completely and drain excess liquid before blending.
Can I make the tapioca ahead of time?
Cook the tapioca the same day for the best texture. If you must prep ahead, store the pearls in the mango mixture rather than plain water to prevent them from drying out.
How long does mango sago last in the refrigerator?
The dessert keeps for up to 3 days refrigerated, but the tapioca texture is best within the first 24 hours. After that, the pearls absorb liquid and become softer.
Why did my tapioca turn mushy?
Mushy tapioca results from overcooking or skipping the ice bath. Test the pearls frequently after 10 minutes and shock them immediately after draining.
Can I double this recipe?
Yes, the recipe doubles easily. Cook the tapioca in a larger pot with proportionally more water, and blend the mango mixture in batches if your blender is small.
What is the white dot in the center of my tapioca?
A tiny white dot means the tapioca is perfectly cooked and still has the ideal chewy texture. If the dot is large, cook for another minute or two.
Can I serve this warm instead of cold?
Traditional mango sago is served cold, which is how the flavors and textures work best. Warm versions exist but have a different character and the tapioca softens more quickly.
My Final Word
This mango sago delivers everything I want from a summer dessert: it is cold, creamy, fruity, and has that chewy tapioca texture that keeps you coming back for one more spoonful. The fresh mango shining through the coconut milk makes it taste like something special.
I have made this recipe dozens of times now, tweaking the proportions until they work perfectly every single time. Give it a try and make it your own by adjusting the sweetness to your taste.
If you make this mango sago, I would love to hear how it turned out. Drop a comment below or tag us on social media with your creation.
Mango Sago
Ingredients
Equipment
Method
- Fill a large bowl halfway with ice cubes and add cold water until the bowl is three quarters full. Place this near your stove where you can reach it quickly after draining the tapioca.
- Bring 6 cups of water to a rolling boil in a large pot over high heat. The water should be bubbling vigorously across the entire surface before you add the tapioca.
- Pour the tapioca pearls slowly into the boiling water while stirring constantly with a wooden spoon. Keep stirring for the first 2 minutes to prevent the pearls from sinking and sticking to the pot bottom. Cook for about 10-12 minutes.
- After 12 minutes of boiling, fish out a few pearls with a slotted spoon and run them under cold water. Bite into one to check the texture: you want chewy throughout with no hard, chalky center. The pearls should look almost completely translucent with just a faint cloudiness in the very center.
- Drain the tapioca through a fine mesh strainer and immediately plunge the strainer into your prepared ice bath. Swirl the pearls around in the ice water for 30 seconds to stop the cooking.
- Lift the strainer from the ice bath and shake off excess water thoroughly. Transfer the drained tapioca to a clean bowl and set aside at room temperature while you prepare the mango mixture.
- Peel the mangoes using a sharp knife or vegetable peeler. Cut the flesh away from the flat pit by slicing along each side, then trim any remaining fruit from the edges of the pit. Reserve one third of the mango in cubes for topping.
- Add two thirds of the mango flesh to your blender along with the sugar and vanilla extract. Blend on high speed for 60 seconds until completely smooth with no visible chunks remaining.
- Pour the cold coconut milk and evaporated milk into the blender with the mango puree. Blend on medium speed for 20 seconds just until everything combines into a uniform golden mixture.
- Taste the mixture and add more sugar one tablespoon at a time if the mixture tastes too tart, blending briefly after each addition. The mixture should taste slightly sweeter than you want the final dessert.
- Pour the mango mixture into a large bowl and fold in half of the cooked tapioca pearls using a rubber spatula. Cover the bowl and refrigerate for at least 30 minutes until thoroughly chilled.
- Divide the chilled mango sago among four serving glasses or bowls. Top each portion with the reserved mango cubes, remaining tapioca pearls, pomelo segments if using, and fresh mint leaves.


