Chili oil recipe transforms ordinary meals into something you will crave on repeat. This fiery, aromatic condiment takes less than thirty minutes to make and delivers complex heat that store-bought versions cannot match.
Once you master homemade chili oil, you will drizzle it on everything from dumplings to pizza. Let me show you exactly how to get it right.
What Makes This Recipe Worth Your Time
This chili oil delivers layered heat with toasted, nutty depth that commercial brands simply cannot replicate. You control the spice level and freshness.
- Customizable heat means you can make it mild for the family or scorching for yourself
- Shelf stable for months in your refrigerator with proper storage
- Fraction of the cost compared to specialty grocery store versions
- Ready in under 30 minutes with ingredients you can find at any supermarket
- Authentic restaurant quality that elevates every dish it touches
A Little Background on This Dish
Chili oil originated in the Sichuan province of China, where the numbing heat of local peppers became a culinary signature. The technique of blooming dried chilies in hot oil spread throughout Asia, with each region developing its own variation.
Korean gochugaru, Japanese rayu, and Chinese la jiao you all share DNA but bring distinct flavor profiles. The method remains remarkably consistent: hot oil meets dried chilies, and magic happens.
My Experience With This Recipe
I started making chili oil after my daughter became obsessed with the little containers we got from our local dumpling shop. Buying those tiny jars every week added up fast, so I figured I could learn to make my own.
My first three batches were disasters. I burned the oil twice, turning the whole thing bitter and acrid, and once I poured it too cool, which left me with greasy, flavorless red sludge.
The fourth attempt finally clicked, and the smell that filled my kitchen told me I had nailed it. Now we go through a jar every couple of weeks, and my kids fight over who gets the last spoonful for their noodles.
Before You Start: Key Things to Know
This recipe suits cooks of all levels, but the oil temperature is everything. Get it wrong and you will either burn your chilies or fail to bloom their flavor.
- Difficulty level: Beginner friendly with one critical technique to master
- Active time vs passive time: 15 minutes active, 15 minutes cooling and infusing
- Most important equipment: An instant read thermometer for accurate oil temperature
- Step requiring most attention: Heating the oil to exactly the right temperature before pouring
Recipe at a Glance
- Recipe Name: Homemade Chili Oil
- Yield: About 1.5 cups (12 servings)
- Prep Time: 10 minutes
- Cook Time: 15 minutes
- Total Time: 25 minutes
- Resting Time: 1 hour minimum before use
- Difficulty: Easy
- Course: Condiment
- Cuisine: Chinese, Asian
- Calories per Serving: 120
How to Source the Best Ingredients
The quality of your chili flakes determines 80 percent of your final result. Use fresh, vibrant red flakes and neutral oil for the cleanest flavor.
- Gochugaru or Sichuan chili flakes: Look for bright red color with no brown spots, stored in sealed packaging, ideally purchased within the last six months
- Neutral oil: Choose refined avocado oil, vegetable oil, or peanut oil with a high smoke point and no added flavors
- Sesame seeds: Buy raw white sesame seeds and toast them yourself for maximum freshness and aroma
- Star anise: Select whole pods that smell strongly aromatic when you open the package
- Sichuan peppercorns: Look for reddish brown color with strong citrusy, floral scent and avoid dusty, faded specimens
Ingredients for Chili Oil
For the Chili Base
- 1 cup Korean chili flakes (gochugaru) or Sichuan chili flakes
- 2 tablespoons sesame seeds, raw
- 1 teaspoon kosher salt
- 1 teaspoon sugar
- 1 tablespoon soy sauce
For the Infused Oil
- 1.5 cups neutral oil (vegetable, avocado, or peanut)
- 3 whole star anise pods
- 1 cinnamon stick
- 2 bay leaves
- 1 tablespoon Sichuan peppercorns
- 5 cloves garlic, smashed
- 3 shallots, sliced thin
- One 2 inch piece fresh ginger, sliced
Smart Substitutions and Swaps
- Gochugaru: Provides mild, fruity heat with subtle sweetness. Substitute crushed red pepper flakes for more aggressive heat, but reduce quantity by half.
- Sichuan peppercorns: Deliver the signature numbing sensation. Omit entirely if unavailable; the oil will still taste good but lack that characteristic tingle.
- Neutral oil: Carries flavor without competing with aromatics. Extra virgin olive oil will work but adds a distinct flavor that changes the profile significantly.
- Star anise: Adds warm, licorice depth to the background. Substitute a quarter teaspoon of fennel seeds for a similar anise note.
- Fresh ginger: Provides sharp, bright heat that complements the chilies. Use one teaspoon of ground ginger if fresh is unavailable, adding it directly to the chili base.
- Shallots: Contribute sweet, mild onion flavor that mellows in the hot oil. Substitute half a small yellow onion, sliced thin.
Tools and Equipment You Will Need
Mise en place matters here because once you start heating oil, you need to move quickly. Have everything measured and ready before you turn on the stove.
- Heavy bottomed saucepan or small Dutch oven (distributes heat evenly to prevent hot spots)
- Instant read thermometer (non negotiable for hitting the right temperature)
- Heat proof bowl, preferably metal or tempered glass (receives hot oil safely)
- Fine mesh strainer (removes aromatics for smooth oil)
- Heat proof spatula or wooden spoon
- Clean glass jar with tight fitting lid for storage
- Measuring cups and spoons
How to Make Chili Oil
Read through all steps before starting and have your chili flake mixture ready in the heat proof bowl. The pour happens fast once the oil reaches temperature.
Step 1: Prepare the Chili Base
Add the chili flakes, sesame seeds, salt, and sugar to your heat proof bowl. Stir to combine everything evenly.
Mixing dry ingredients first ensures the sugar and salt distribute throughout, preventing any pockets of unseasoned oil in the final product.
The mixture should look uniformly red with visible sesame seeds scattered throughout. Set this bowl close to your stove for quick access.
Step 2: Toast the Sesame Seeds
Place a dry pan over medium heat and add the sesame seeds. Stir constantly for about 2 minutes until golden and fragrant.
Toasting activates the natural oils in sesame seeds and creates a nutty depth that raw seeds cannot provide.
Watch for a light golden color and a distinct nutty aroma. Remove immediately when you see the first hint of browning because they continue cooking off heat.
Step 3: Combine Oil and Aromatics
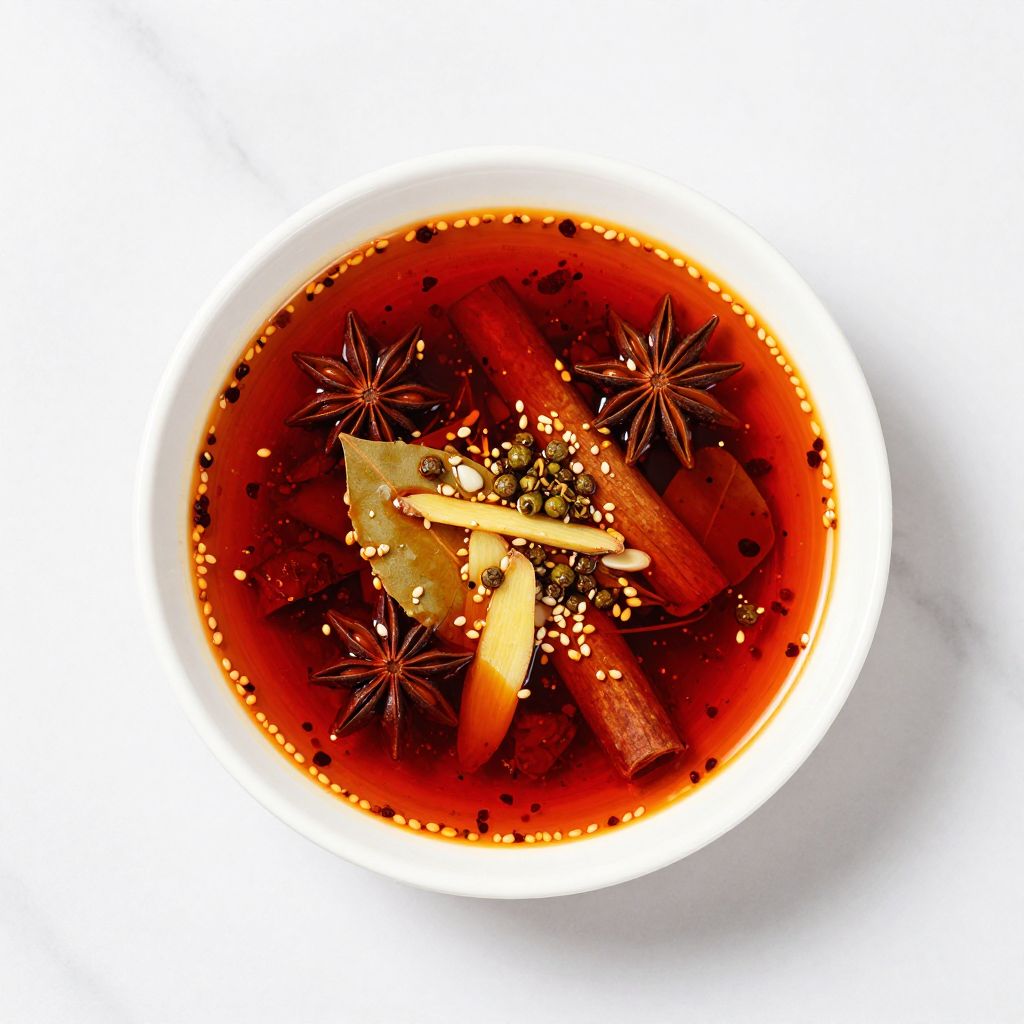
Add the neutral oil to your saucepan along with the star anise, cinnamon stick, bay leaves, and Sichuan peppercorns. Place over medium low heat.
Starting with cold oil and aromatics together allows a slow, gentle extraction of flavors without burning the delicate spices.
You will see tiny bubbles forming around the spices as the oil warms. This indicates the infusion process has begun.
Step 4: Add the Fresh Aromatics
Once small bubbles appear, add the smashed garlic, sliced shallots, and ginger slices to the oil. Stir gently to submerge.
Fresh aromatics release moisture as they cook, which is why you hear that gentle sizzle. This moisture carries volatile flavor compounds into the oil.
Listen for a steady, quiet sizzle. If it sounds aggressive or you see smoke, reduce your heat immediately.
Step 5: Infuse the Oil Slowly
Let the aromatics cook in the oil for 8 to 10 minutes over medium low heat, stirring occasionally. The garlic and shallots should turn golden, not brown.
Slow infusion extracts maximum flavor while keeping the oil below its smoke point. Rushing this step produces bitter, harsh oil.
The aromatics should be uniformly golden and the oil should smell deeply fragrant. Any dark brown or black spots mean you have gone too far.
Step 6: Monitor the Temperature
Insert your instant read thermometer into the oil, avoiding contact with the pan bottom. You want the oil between 325 and 350 degrees Fahrenheit.
This temperature range is the sweet spot: hot enough to bloom the chili flakes instantly but not so hot that it burns them.
Hold at this temperature for one minute to ensure accuracy. The thermometer reading should stay stable.
Step 7: Strain the Aromatics
Set your fine mesh strainer over a heat proof measuring cup or bowl. Carefully pour the hot oil through the strainer to remove all solid aromatics.
Leaving aromatics in the final oil causes them to continue cooking and eventually turn bitter. Straining ensures a clean, balanced flavor.
The strained oil should be clear with a golden to light amber color. Discard the spent aromatics or save them for another use.
Step 8: Add the Soy Sauce
Drizzle the soy sauce over the chili flake mixture in your heat proof bowl. It will look wet and clumpy, which is perfect.
The soy sauce adds umami depth and helps the chili flakes absorb the hot oil more evenly. It also contributes to the glossy final texture.
Stir briefly to coat the flakes. They should be evenly moistened but not swimming in liquid.
Step 9: Pour the Hot Oil in Stages
Pour about one third of the hot oil over the chili mixture. You will hear an aggressive sizzle and see the mixture bubble up dramatically.
Pouring in stages prevents overflow and ensures even heat distribution. Each pour blooms a different layer of flavor from the chilies.
Wait about 30 seconds for the sizzling to calm before adding the next third. Repeat until all oil is incorporated.
Step 10: Stir and Bloom
Use a heat proof spatula to stir the mixture thoroughly, scraping the bottom of the bowl to ensure no dry flakes remain. Continue stirring for one full minute.
Agitation helps distribute heat evenly and ensures every chili flake makes contact with hot oil for full flavor extraction.
The color should deepen to a rich, brick red and the aroma should be intensely fragrant with no burnt smell.
Step 11: Cool to Room Temperature
Let the chili oil cool completely in the bowl, uncovered, for at least one hour. Do not cover it while still warm.
Covering hot oil traps condensation, which introduces water into your oil and dramatically shortens its shelf life.
The oil is ready when the bowl feels room temperature to the touch and no steam rises from the surface.
Step 12: Transfer and Store
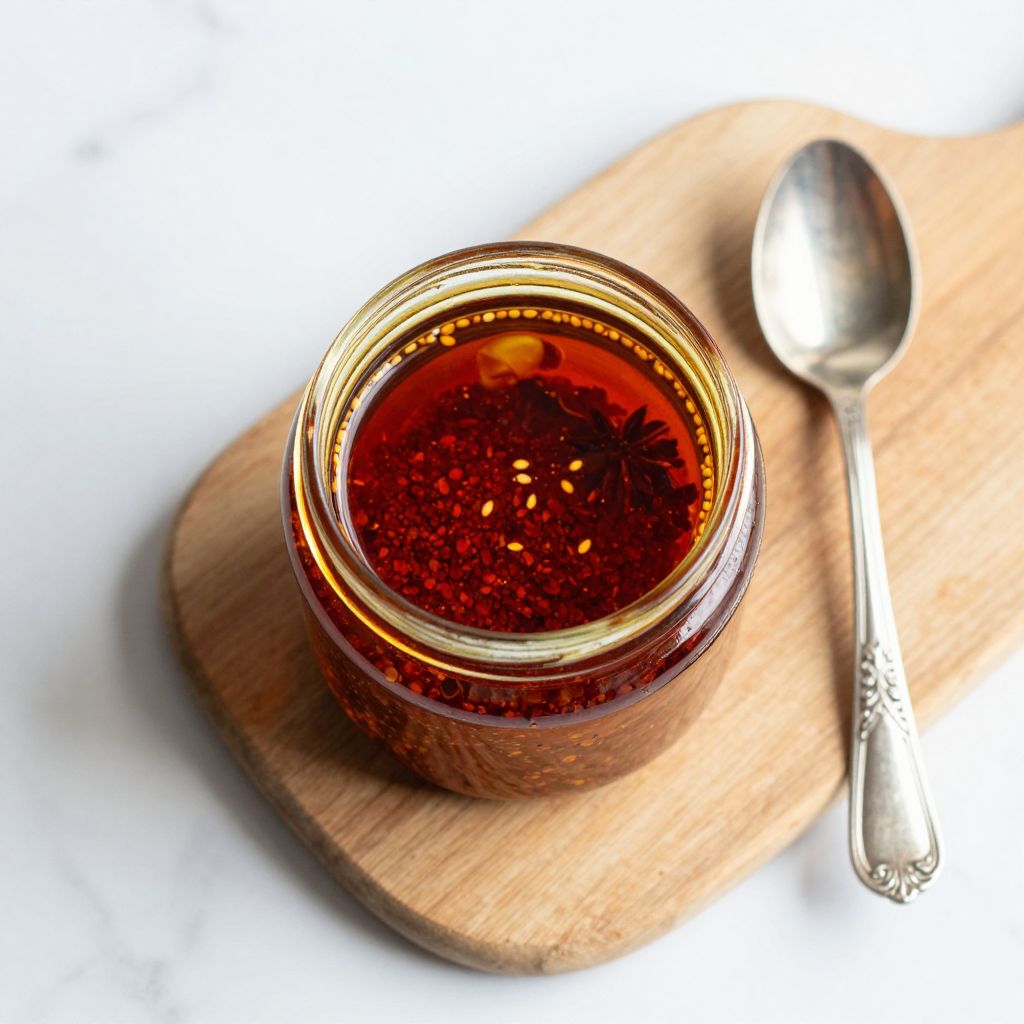
Pour the cooled chili oil into a clean glass jar, including all the sediment and chili flakes at the bottom. Seal tightly and refrigerate.
The sediment contains concentrated flavor and should be stirred back in before each use. Many people consider this the best part.
The oil should look glossy and vibrant red with a layer of flakes settled at the bottom. Label with the date for reference.
Pro Tip: Let your chili oil rest for at least 24 hours before using it. The flavors meld and deepen significantly overnight, transforming good chili oil into exceptional chili oil.
The Science Behind the Technique
The magic of chili oil happens through a process called blooming, where hot fat extracts and activates fat soluble flavor compounds from the dried chilies. Capsaicin, the molecule responsible for heat, dissolves readily in oil but not in water, which is why oil based hot sauces deliver different heat than vinegar based ones.
Temperature control matters because the Maillard reaction occurs in the chili flakes when hot oil hits them, creating hundreds of new flavor compounds. Go too hot and you push past Maillard into carbonization, which produces only bitterness.
Chef Note: The ideal blooming temperature of 325 to 350 degrees Fahrenheit sits right in the Maillard sweet spot, hot enough for rapid flavor development but cool enough to avoid burning.
Tips for Getting It Right Every Time
- Use a thermometer every single time; even experienced cooks cannot accurately judge oil temperature by sight alone
- Weigh your chili flakes by volume if you switch brands, as coarseness varies dramatically between products
- Keep your face back when pouring hot oil over chilies because the capsaicin vapors can irritate your eyes and throat
- Double the batch while you have everything out since the effort is the same and chili oil disappears fast
- Save spent aromatics for fried rice or stir fries; they still have plenty of flavor to give
- Stir before serving to redistribute the settled flakes and ensure balanced flavor in every spoonful
Mistakes That Will Ruin Your Dish
- Burning the oil: Oil heated past its smoke point turns bitter and cannot be salvaged; you must start over with fresh oil
- Using stale chili flakes: Old flakes produce dull, flat oil with muted color and weak heat
- Pouring all the oil at once: A single pour can overflow and creates uneven blooming with pockets of raw flakes
- Covering while hot: Trapped steam introduces water droplets that promote mold growth and spoilage
- Skipping the infusion: Aromatics build complexity; without them you just have spicy oil with no depth
Make Ahead and Meal Prep Tips
Chili oil is the ultimate make ahead condiment because it improves with time. I always make a double batch so I never run out.
- Finished chili oil: Make up to 3 months ahead, store refrigerated, and bring to room temperature before using
- Chili base mixture: Combine dry ingredients up to 1 week ahead and store in an airtight container
- Infused oil: Prepare the aromatics in oil up to 2 days ahead, strain, refrigerate, and reheat when ready to bloom
- Portioned jars: Divide into small jars for gift giving or to keep one at room temperature while the rest stays refrigerated
What to Serve With Chili Oil
This chili oil works as a finishing condiment for almost anything savory. I reach for it most often on weeknight noodle bowls and lazy Sunday dumplings.
- Steamed dumplings: The classic pairing; drizzle over potstickers or soup dumplings with a splash of black vinegar
- Plain rice: A spoonful transforms boring white rice into something you will eat by the bowlful
- Noodle soups: Float a tablespoon on ramen, pho, or any brothy noodle dish for instant depth
- Fried eggs: Drizzle over crispy edged eggs for a breakfast that wakes you up properly
- Pizza: Sounds odd but works brilliantly; try it on pepperoni or a simple cheese slice
Drink Pairings
Cold, crisp drinks cut through the oil and soothe the heat. A cold lager remains my go to choice for anything involving serious chili oil.
- Wine: Off dry Riesling or Gewürztraminer; the residual sugar balances capsaicin heat beautifully
- Beer: Japanese lager or light pilsner; clean, cold, and refreshing against the rich oil
- Non alcoholic: Iced barley tea or cold chrysanthemum tea; both traditional Chinese pairings that cleanse the palate
- Hot drink: Hot jasmine tea; the floral notes complement the warm spice notes in the oil
Flavour Variations Worth Trying
- Crispy Garlic Version: Add minced garlic directly to the chili base before pouring hot oil. The garlic fries in the oil and becomes addictively crunchy.
- Numbing Mala Style: Double the Sichuan peppercorns and add a tablespoon of ground roasted peppercorns to the base. The numbing sensation intensifies dramatically.
- Smoky Chipotle Fusion: Replace half the Korean chili flakes with ground chipotle powder. The smoky depth pairs brilliantly with Mexican and Tex Mex dishes.
- Black Bean Umami Bomb: Add two tablespoons of fermented black beans to the chili base. The funky, salty depth takes the umami factor through the roof.
- Sweet and Spicy: Increase the sugar to one tablespoon and add a tablespoon of honey to the base. Creates a glaze like consistency perfect for wings and ribs.
How to Adapt This Recipe for Your Diet
- Gluten free: Substitute tamari or coconut aminos for soy sauce. The flavor remains nearly identical with no texture change.
- Dairy free: This recipe contains no dairy as written. Ensure your oil is not butter blended.
- Vegan: Already fully vegan as written. Confirm your sugar is not processed with bone char if strictly observant.
- Low carb and keto: Omit the sugar or use a pinch of monk fruit sweetener. Negligible impact on the final flavor.
- High protein: Add crispy fried shallots or garlic chips to the final oil for textural protein. Pair with protein rich dishes for complete meals.
How to Store and Reheat
In the Refrigerator
Store in a clean glass jar with a tight fitting lid for up to 3 months. The oil may solidify slightly when cold, which is normal.
- Always use a clean, dry spoon to prevent introducing moisture or contaminants
- Keep the jar toward the back of the fridge where temperature stays most consistent
In the Freezer
Chili oil freezes well for up to 6 months, though refrigeration works fine for most home cooks. Freezing makes sense only for very large batches.
- Freeze in ice cube trays for portioned amounts, then transfer cubes to a freezer bag
- Leave headspace in jars if freezing to allow for expansion
Reheating
Chili oil does not require reheating; simply bring it to room temperature before using for best flow and flavor. If you prefer it warm, gentle heating works.
- Oven: Not recommended; unnecessary and risks overheating
- Stovetop: Warm gently in a small saucepan over low heat for 2 minutes, stirring occasionally
- Microwave: Heat in 10 second bursts, stirring between; watch carefully as oil heats unevenly
Cost Breakdown
Homemade chili oil costs a fraction of specialty store versions and tastes significantly better. One batch replaces at least four small commercial jars.
| Ingredient | Estimated Cost |
|---|---|
| Korean chili flakes (1 cup) | $3.00 |
| Neutral oil (1.5 cups) | $1.50 |
| Sesame seeds | $0.30 |
| Whole spices (star anise, cinnamon, peppercorns) | $0.75 |
| Garlic, shallots, ginger | $1.00 |
| Soy sauce | $0.15 |
| Total Per Serving (12 servings) | $0.56 |
Nutrition Information
| Nutrient | Amount |
|---|---|
| Calories | 120 |
| Total Fat | 13g |
| Saturated Fat | 1g |
| Trans Fat | 0g |
| Cholesterol | 0mg |
| Sodium | 95mg |
| Total Carbohydrates | 2g |
| Dietary Fiber | 1g |
| Total Sugars | 1g |
| Added Sugars | 0.5g |
| Protein | 0.5g |
| Vitamin D | 0mcg |
| Calcium | 8mg |
| Iron | 0.5mg |
| Potassium | 25mg |
Nutritional values are estimates based on standard ingredients and may vary depending on specific brands and portion sizes used.
Frequently Asked Questions
Can I use regular crushed red pepper flakes instead of Korean chili flakes?
Yes, but reduce the amount by half since standard crushed red pepper is much hotter. The flavor will be sharper and less fruity than traditional versions.
Can I make the infused oil ahead and bloom the chilies later?
Absolutely. Strain and refrigerate the infused oil for up to one week, then reheat to 325 degrees Fahrenheit when ready to complete the recipe.
How long does homemade chili oil last?
Properly stored in a clean glass jar in the refrigerator, chili oil keeps for up to 3 months. Always check for off smells before using older batches.
My chili oil tastes bitter. What went wrong?
Bitterness comes from burned chilies or oil heated past its smoke point. Start over with fresh ingredients and watch your temperature more carefully.
Can I double or halve this recipe?
The recipe scales easily in either direction. Just maintain the ratio of oil to chili flakes and adjust your vessel size accordingly.
Should I use coarse or fine chili flakes?
Medium coarse flakes work best for texture and visual appeal. Very fine powder dissolves too much, and very coarse flakes can remain raw in the center.
Is it safe to leave chili oil at room temperature?
For short periods of a week or two, room temperature storage works fine. Longer storage should be refrigerated to prevent rancidity.
My Final Word
This chili oil delivers the kind of addictive heat and depth that makes you want to put it on everything. The aroma alone is worth the thirty minutes of effort.
I have made this recipe more times than I can count, and it works every single time when you respect the temperature. Make it once and I promise you will never buy the jarred stuff again.
Give it a try this weekend and let me know how it turns out. Drop a comment below or tag me on social media; I love seeing what you create in your own kitchens.
Homemade Chili Oil
Ingredients
Equipment
Method
- Add the chili flakes, sesame seeds, salt, and sugar to a heat proof bowl. Stir to combine everything evenly and set close to your stove.
- Place a dry pan over medium heat and add the sesame seeds. Stir constantly for about 2 minutes until golden and fragrant. Remove immediately when you see the first hint of browning.
- Add the neutral oil to your saucepan along with the star anise, cinnamon stick, bay leaves, and Sichuan peppercorns. Place over medium low heat.
- Once small bubbles appear around the spices, add the smashed garlic, sliced shallots, and ginger slices to the oil. Stir gently to submerge.
- Let the aromatics cook in the oil for 8 to 10 minutes over medium low heat, stirring occasionally. The garlic and shallots should turn golden, not brown.
- Insert your instant read thermometer into the oil, avoiding contact with the pan bottom. Heat the oil to between 325 and 350 degrees Fahrenheit. Hold at this temperature for one minute.
- Set your fine mesh strainer over a heat proof measuring cup or bowl. Carefully pour the hot oil through the strainer to remove all solid aromatics. Discard the spent aromatics.
- Drizzle the soy sauce over the chili flake mixture in your heat proof bowl. Stir briefly to coat the flakes evenly.
- Pour about one third of the hot oil over the chili mixture. Wait about 30 seconds for the sizzling to calm, then add the next third. Repeat until all oil is incorporated.
- Use a heat proof spatula to stir the mixture thoroughly, scraping the bottom of the bowl. Continue stirring for one full minute until the color deepens to a rich brick red.
- Let the chili oil cool completely in the bowl, uncovered, for at least one hour. Do not cover while still warm.
- Pour the cooled chili oil into a clean glass jar, including all the sediment and chili flakes. Seal tightly and refrigerate.


