Crack burgers earned their name for a reason: one bite of that caramelized onion, tangy ranch, and melted cheese combination and you will understand why people cannot stop making them. This is the burger that turned my weeknight dinner rotation upside down.
The secret lives in the smash technique and the sauce that soaks into every crevice. Let me show you how to get it right.
What Makes This Recipe Worth Your Time
This burger delivers restaurant quality from a single skillet in under 30 minutes. No fancy equipment, no obscure ingredients, just technique that works.
- Crispy edges form when you smash the patty thin against screaming hot cast iron
- The crack sauce balances tangy ranch with sweet caramelized onions in every bite
- Budget friendly ground beef transforms into something that tastes twice as expensive
- Kids devour these without complaints about hidden vegetables in the onion mixture
- Leftovers reheat beautifully for next day lunches that coworkers will envy
A Little Background on This Dish
The crack burger emerged from the American smash burger renaissance of the 2010s, when home cooks rediscovered that thin, crispy patties beat thick pub burgers for flavor development. The name references the addictive quality of the signature sauce, a combination that spread through online cooking communities like wildfire.
The technique borrows from old school diner cooking where flat top griddles produced those legendary lacy edges. Ranch dressing entered the picture as the distinctly American addition that tied together the caramelized onions and sharp cheddar into something greater than its parts.
My Experience With This Recipe
I stumbled onto crack burgers after my regular go to burger recipe started feeling stale. My family had eaten the same thick patties for years, and I could see the enthusiasm fading around the dinner table.
My first three attempts produced decent burgers but nothing special because I kept the heat too low and the patties too thick. The onions steamed instead of caramelizing, and the whole thing tasted like a regular cheeseburger wearing a costume.
The night I finally cranked the heat and committed to really smashing those patties flat, the kitchen filled with that irresistible sizzle and char smell. My youngest asked for seconds before finishing the first, and that told me everything I needed to know.
Before You Start: Key Things to Know
This recipe suits confident beginners who can handle high heat cooking without flinching. The biggest challenge is resisting the urge to flip too early or move the patty around.
- Difficulty level: Intermediate, requires managing high heat and timing multiple components
- Active time vs passive time: 25 minutes active with no passive waiting periods
- Most important equipment: A cast iron skillet or heavy bottomed pan that holds heat
- Step requiring most attention: The initial smash and sear determines your crust quality
Recipe at a Glance
- Recipe Name: Crack Burger
- Yield: 4 servings
- Prep Time: 10 minutes
- Cook Time: 20 minutes
- Total Time: 30 minutes
- Resting Time: 2 minutes
- Difficulty: Intermediate
- Course: Main Dish
- Cuisine: American
- Calories per Serving: 680
How to Source the Best Ingredients
Ground beef quality makes or breaks this burger because the thin patty has nowhere to hide inferior meat. Spend an extra dollar per pound here and taste the difference.
- Ground beef: Look for 80/20 blend with bright red color and no gray patches; avoid anything labeled lean
- Yellow onion: Choose firm onions with dry papery skin and no soft spots or green sprouting
- Sharp cheddar: Buy a block and shred yourself; pre shredded contains anti caking agents that prevent proper melting
- Brioche buns: Squeeze gently; they should spring back and feel soft but not stale or overly dense
- Ranch dressing: Full fat bottled ranch works perfectly; avoid light versions that lack the tang and richness
Ingredients for Crack Burger
For the Patties
- 1.5 pounds ground beef, 80/20 blend, cold from refrigerator
- 1 teaspoon kosher salt
- 1/2 teaspoon black pepper, freshly ground
- 1 tablespoon vegetable oil
For the Crack Sauce
- 1/2 cup ranch dressing
- 2 tablespoons mayonnaise
- 1 tablespoon sriracha
- 1/2 teaspoon garlic powder
For the Caramelized Onions
- 2 large yellow onions, thinly sliced
- 2 tablespoons unsalted butter
- 1/2 teaspoon salt
- 1 teaspoon brown sugar
For Assembly
- 4 slices sharp cheddar cheese
- 4 brioche buns, split
- 2 tablespoons butter, softened, for toasting buns
- Pickle slices, for serving
Smart Substitutions and Swaps
- Ground beef: This provides the fat needed for flavor and moisture; ground turkey works but add 1 tablespoon olive oil to prevent dryness
- Ranch dressing: This gives the signature tang; substitute Greek yogurt mixed with dried dill and garlic for a lighter version
- Sharp cheddar: This melts smoothly while adding sharpness; American cheese melts better but loses the flavor complexity
- Brioche buns: These absorb juices without falling apart; potato buns substitute well with similar softness
- Sriracha: This adds heat to the sauce; use hot sauce or cayenne pepper adjusted to your tolerance
- Yellow onion: This caramelizes with the right sweetness; sweet onions work but require less brown sugar
Tools and Equipment You Will Need
Gather everything before you start because this recipe moves fast once the heat goes on. Missing a spatula mid sear means losing that perfect crust.
- 12 inch cast iron skillet (holds heat for proper searing)
- Sturdy metal spatula (must be rigid enough to press and scrape)
- Second skillet or pan for onions
- Small mixing bowl for sauce
- Kitchen scale (portion consistency affects cook time)
- Meat press or another heavy pan (creates even smash pressure)
- Instant read thermometer
- Sheet pan for toasting buns
How to Make Crack Burger
Read through every step before touching any ingredients. Bring the ground beef out 5 minutes before cooking to take the deep chill off while keeping it cold enough to hold shape.
Step 1: Make the Crack Sauce
Combine the ranch dressing, mayonnaise, sriracha, and garlic powder in a small bowl and whisk until completely smooth. Taste and adjust the sriracha level based on your heat preference.
Making the sauce first allows the flavors to marry while you handle everything else. Garlic powder needs time to hydrate and lose that raw powdery taste.
The sauce should taste tangy with a gentle heat that hits at the back of your throat. Set it aside in the refrigerator until assembly.
Step 2: Start the Caramelized Onions
Melt 2 tablespoons butter in a skillet over medium heat and add the sliced onions with 1/2 teaspoon salt. Stir to coat every strand with butter and spread them evenly across the pan.
Salt draws moisture from the onions, which is the first step in breaking down their structure for caramelization. Starting onions before patties gives them the 15 minutes they need.
You will hear a steady sizzle that should not pop or spatter aggressively. Stir every 3 minutes and watch for the edges turning translucent.
Step 3: Continue Building Onion Flavor
After 8 minutes, sprinkle the brown sugar over the onions and stir well. Reduce heat to medium low if they start to darken too quickly at the edges.
Brown sugar accelerates the Maillard reaction and adds a subtle molasses depth that plain sugar cannot match. The onions should cook a total of 15 to 18 minutes.
Watch for the onions turning deep golden brown and smelling sweet rather than sharp. They should feel soft and jammy when pressed with a spoon.
Step 4: Portion the Beef
Divide the cold ground beef into 4 equal portions of roughly 6 ounces each using a kitchen scale. Roll each portion into a loose ball without compacting the meat too tightly.
Overworking ground beef develops the proteins that make burgers tough and dense. Loose balls smash thinner and create more of those prized crispy edges.
Each ball should hold its shape when you set it down but feel delicate, not packed like a baseball. Press gently and you should see small cracks form.
Step 5: Preheat the Cast Iron
Place your cast iron skillet over high heat for a full 5 minutes until it begins to smoke lightly. Add 1 tablespoon vegetable oil and swirl to coat.
Cast iron stores massive amounts of thermal energy that transfers instantly into the meat surface. An insufficiently heated pan steams the beef instead of searing it.
Hold your hand 6 inches above the surface and you should feel intense radiating heat within 2 seconds. A drop of water should vaporize immediately on contact.
Step 6: Smash the First Patties
Place 2 beef balls in the skillet leaving 4 inches between them and immediately press each flat with your meat press or the bottom of a heavy pan. Press firmly for 10 seconds to achieve 1/4 inch thickness.
The smash must happen within 30 seconds of the meat hitting the pan before proteins set. Season the top of each smashed patty with salt and pepper right away.
You will hear aggressive sizzling and popping that sounds almost violent. The edges should spread thin and start turning brown within the first minute.
Step 7: Develop the Crust
Let the patties cook undisturbed for exactly 2.5 minutes without pressing or moving them. Watch the edges where you will see the brown crust climbing up the sides.
Leaving the patty alone allows the Maillard reaction to develop fully on the bottom surface. Moving or pressing again at this stage tears the forming crust away from the meat.
The edges should look deeply browned and lacy with visible crispy bits forming. Juices will start pooling on the raw top surface.
Step 8: Flip and Add Cheese
Slide your metal spatula under each patty with a firm scraping motion to preserve the crust and flip in one confident motion. Immediately place one slice of cheddar on each patty.
The flip should reveal a dark mahogany crust with irregular crispy edges. Cheese goes on immediately so it melts from residual heat while the second side cooks.
Cook the second side for only 1 minute since it needs less time. The cheese should look glossy and beginning to drape over the edges.
Step 9: Toast the Buns
While cheese melts, spread softened butter on the cut sides of each brioche bun and place them cut side down in a second skillet over medium heat. Press gently for even contact.
Toasted buns create a moisture barrier that prevents sogginess and adds a layer of texture contrast. Butter promotes even browning and adds richness.
Toast for 90 seconds until the surface looks golden brown with darker spots. The bun should feel crisp when you tap it but still soft throughout.
Step 10: Cook Remaining Patties
Transfer the first two patties to a plate and repeat the smash, sear, flip, and cheese process with the remaining two beef balls. Work quickly to maintain pan temperature.
The pan may need 30 seconds to recover heat between batches. Consistency between patties ensures everyone at the table gets the same quality burger.
Listen for that same aggressive sizzle on the second batch. Weaker sizzling means the pan cooled too much.
Step 11: Assemble the Burgers
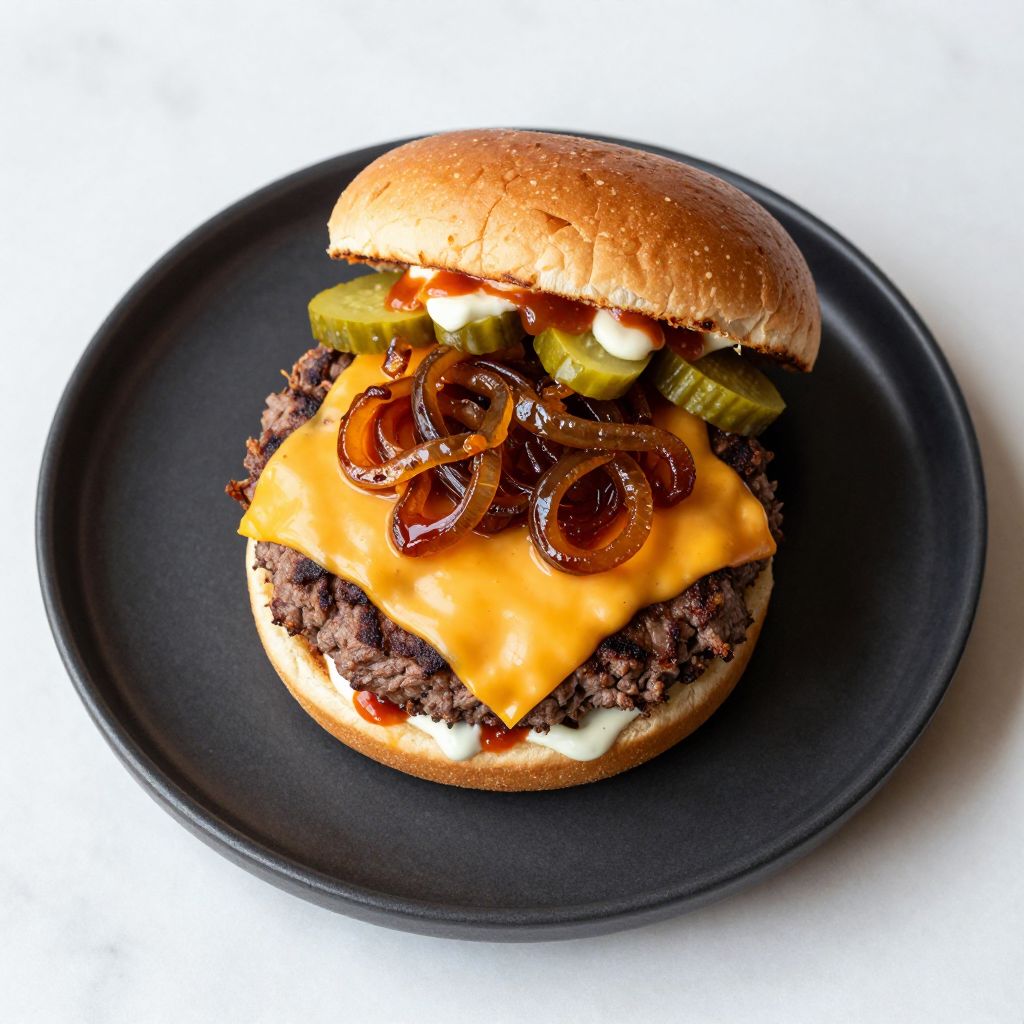
Spread a generous tablespoon of crack sauce on both cut sides of each toasted bun. Place the cheesy patty on the bottom bun and top with a heaping spoonful of caramelized onions.
Sauce on both sides ensures flavor in every bite rather than concentrating it in one spot. The onions go on top of the cheese where residual heat keeps them warm.
Add pickle slices if using and close with the top bun. Press down gently until the burger compresses about 1/4 inch.
Step 12: Rest and Serve
Let the assembled burgers rest for 2 minutes before serving to allow juices to redistribute and the bun to absorb just enough sauce. Cut in half if desired for easier eating.
Resting prevents the first bite from releasing all the juices onto the plate. The brief wait also lets the cheese set slightly so it does not slide off completely.
Serve immediately while the patty remains warm and the bun stays crisp. These burgers do not improve with waiting.
Pro Tip: Press the patty once and only once within the first 30 seconds; every additional press after that squeezes out juice and costs you flavor.
The Science Behind the Technique
The smash technique works because it maximizes surface area contact between meat and hot metal, accelerating the Maillard reaction that creates those complex savory flavors. A thin patty reaching 350°F across its entire bottom surface develops more crust in 2 minutes than a thick patty develops in 10.
The cold beef hitting screaming hot cast iron creates instant temperature differential that chars the surface before the interior overcooks. This is why thin smashed patties can be fully cooked through while still tasting juicy rather than dry.
Chef Note: The 80/20 fat ratio provides enough fat to lubricate the meat and carry flavor compounds while leaving enough lean protein to hold the patty together during the smash.
Tips for Getting It Right Every Time
- Keep beef cold until the moment it hits the pan so it holds shape during the smash
- Commit to high heat even when your instincts tell you to turn it down; the sear happens fast
- Season after smashing because seasoning the ball beforehand draws out moisture before cooking
- Use a rigid spatula made of metal because flexible plastic cannot scrape up the crust properly
- Do not crowd the pan with more than 2 patties or you will drop the temperature and steam the meat
- Scrape confidently when flipping because hesitation tears the crust and leaves the best bits stuck to the pan
Mistakes That Will Ruin Your Dish
- Using lean ground beef produces dry cardboard patties that crack during smashing and taste like nothing
- Smashing too late after proteins set creates a patty that springs back thick instead of staying flat and crispy
- Flipping too early before the crust forms means the patty tears apart and you lose the signature texture
- Skipping the bun toast results in a soggy bottom that falls apart before you finish eating
- Rushing the onions produces bitter, unevenly cooked strands instead of sweet caramelized ribbons
Make Ahead and Meal Prep Tips
Crack burgers work beautifully for meal prep when you separate the components. The sauce and onions improve with time while the patties need last minute cooking.
- Crack sauce can be made 5 days ahead and stored covered in the refrigerator; the flavors deepen overnight
- Caramelized onions keep refrigerated for 1 week; reheat gently in a skillet with a splash of water
- Beef portions can be shaped into balls and refrigerated overnight between parchment sheets
- Buns can be butter spread up to 4 hours ahead and held at room temperature until toasting
What to Serve With Crack Burger
This burger demands sides that can stand up to its bold flavors without competing for attention. Think crispy, salty, and refreshing.
- Crispy french fries provide the classic pairing with enough crunch to contrast the soft bun
- Coleslaw adds cool crunch and vinegar brightness that cuts through the richness
- Pickle spears deliver the acid hit that refreshes your palate between bites
- Onion rings double down on the onion theme with a satisfying fried crunch
- Simple green salad offers a lighter option that balances the indulgence
Drink Pairings
A cold lager with gentle bitterness cuts through the richness and cleanses your palate for the next bite. The carbonation lifts the fat coating from your tongue.
- Wine: A juicy Zinfandel with berry notes and mild tannins complements the charred beef
- Beer: An American amber lager with caramel malt sweetness echoes the caramelized onions
- Non alcoholic: Sparkling water with lemon provides the effervescence and acid without alcohol
- Hot drink: Skip this course; hot beverages do not suit the burger experience
Flavour Variations Worth Trying
- Bacon Crack Burger: Add 2 strips of crispy bacon per patty under the cheese. The smoky pork adds another layer of umami that intensifies the addictive quality.
- Jalapeño Crack Burger: Mix diced pickled jalapeños into the sauce and top with fresh slices. The heat amplifies and the vinegar brine adds brightness.
- Mushroom Crack Burger: Sauté sliced cremini mushrooms with the onions until deeply browned. The earthiness creates a more complex savory profile.
- BBQ Crack Burger: Swirl 2 tablespoons BBQ sauce into the crack sauce and add a pinch of smoked paprika. The sweetness and smoke transform the flavor completely.
- Breakfast Crack Burger: Top the patty with a fried egg and use the sauce on a toasted English muffin. The runny yolk becomes an extra sauce layer.
How to Adapt This Recipe for Your Diet
- Gluten free: Use certified gluten free buns and verify the ranch dressing contains no wheat thickeners; the texture remains nearly identical
- Dairy free: Substitute vegan cheddar slices and use dairy free ranch; expect slightly less melt and tang
- Vegetarian: Replace beef with a plant based ground alternative and smash the same way; cook time reduces by about 30 seconds per side
- Low carb: Skip the bun and serve the patty over shredded lettuce as a bowl; the sauce and onions carry all the flavor
- High protein: Use 93/7 lean beef and add a second thin patty; compensate for less fat with extra sauce
How to Store and Reheat
In the Refrigerator
Store components separately in airtight containers for best results. Assembled burgers become soggy within hours and should be avoided for storage.
- Cooked patties keep 3 days stacked between parchment paper in a sealed container
- Sauce, onions, and toasted buns should each have their own container to prevent moisture transfer
In the Freezer
Cooked patties freeze well for up to 2 months when wrapped individually. Thaw overnight in the refrigerator before reheating.
- Wrap each patty tightly in plastic wrap then aluminum foil to prevent freezer burn
- Label with the date and use within 2 months for best texture
Reheating
A hot skillet produces the best reheat by re crisping the exterior while warming the center. Target 165°F internal temperature.
- Oven method: 350°F for 8 minutes preserves the crust texture best
- Stovetop method: Medium heat in a dry skillet for 2 minutes per side re crisps the edges
- Microwave method: Use only as a last resort at 50% power for 45 seconds; the crust will soften
Cost Breakdown
Making crack burgers at home costs roughly one third of ordering a similar quality burger at a restaurant. The sauce ingredients do double duty in other recipes.
| Ingredient | Estimated Cost |
|---|---|
| Ground beef (6 oz) | $2.25 |
| Sharp cheddar (1 slice) | $0.40 |
| Brioche bun | $0.75 |
| Yellow onion (1/2) | $0.30 |
| Ranch dressing portion | $0.25 |
| Butter and oil | $0.20 |
| Seasonings and condiments | $0.15 |
| Total Per Serving | $4.30 |
Nutrition Information
| Nutrient | Amount |
|---|---|
| Calories | 680 |
| Total Fat | 42g |
| Saturated Fat | 16g |
| Trans Fat | 1g |
| Cholesterol | 125mg |
| Sodium | 980mg |
| Total Carbohydrates | 34g |
| Dietary Fiber | 2g |
| Total Sugars | 8g |
| Added Sugars | 4g |
| Protein | 38g |
| Vitamin D | 0.5mcg |
| Calcium | 220mg |
| Iron | 4.5mg |
| Potassium | 520mg |
Nutritional values are estimates based on standard ingredients and may vary depending on specific brands and portion sizes used.
Frequently Asked Questions
Can I use ground turkey instead of beef?
Ground turkey works but lacks the fat content needed for moisture. Add 1 tablespoon olive oil to the pan and expect a slightly drier patty.
Can I make the onions ahead of time?
Caramelized onions actually improve over 2 to 3 days in the refrigerator. Reheat gently in a skillet with a splash of water to restore texture.
How long do leftover patties last in the fridge?
Properly stored in an airtight container, cooked patties last 3 days. Reheat in a skillet rather than the microwave to preserve the crust.
Why did my patty stick to the pan?
Either the pan was not hot enough or you tried to flip before the crust released. Wait 30 seconds longer and the crust will lift cleanly.
Can I double this recipe for a party?
Double all ingredients and cook in batches of 2 patties maximum. Keep finished burgers warm in a 200°F oven while you cook the rest.
What if I do not have cast iron?
A heavy bottomed stainless steel pan works as a backup. Avoid nonstick pans because they cannot reach the temperatures needed for proper searing.
Can I serve this as lettuce wraps instead?
Absolutely, and it works beautifully for low carb eating. Use large butter lettuce leaves doubled up to hold the juicy patty.
My Final Word
The crack burger delivers everything a great burger should: crispy edges that shatter, cheese that stretches, and a sauce that makes you scrape the plate. It is the kind of recipe that becomes a household standard after you make it once.
I tested this recipe more times than my family probably wanted, but the result is something I trust completely. Make it your own, adjust the heat level, pile on extra onions, or add bacon if that is your style.
If you give this a try, I would love to hear how it turns out for you. Drop a comment below or tag Recipe Papa when you post your crack burger creation.
Crack Burger
Ingredients
Equipment
Method
- Make the Crack Sauce: Combine the ranch dressing, mayonnaise, sriracha, and garlic powder in a small bowl and whisk until completely smooth. Taste and adjust the sriracha level based on your heat preference. Set aside in the refrigerator until assembly.
- Start the Caramelized Onions: Melt 2 tablespoons butter in a skillet over medium heat and add the sliced onions with 1/2 teaspoon salt. Stir to coat every strand with butter and spread them evenly across the pan. Stir every 3 minutes.
- Continue Building Onion Flavor: After 8 minutes, sprinkle the brown sugar over the onions and stir well. Reduce heat to medium low if they start to darken too quickly. Cook a total of 15 to 18 minutes until deep golden brown and jammy.
- Portion the Beef: Divide the cold ground beef into 4 equal portions of roughly 6 ounces each using a kitchen scale. Roll each portion into a loose ball without compacting the meat too tightly.
- Preheat the Cast Iron: Place your cast iron skillet over high heat for a full 5 minutes until it begins to smoke lightly. Add 1 tablespoon vegetable oil and swirl to coat.
- Smash the First Patties: Place 2 beef balls in the skillet leaving 4 inches between them and immediately press each flat with your meat press or the bottom of a heavy pan. Press firmly for 10 seconds to achieve 1/4 inch thickness. Season the top with salt and pepper right away.
- Develop the Crust: Let the patties cook undisturbed for exactly 2.5 minutes without pressing or moving them. Watch the edges where you will see the brown crust climbing up the sides.
- Flip and Add Cheese: Slide your metal spatula under each patty with a firm scraping motion and flip in one confident motion. Immediately place one slice of cheddar on each patty. Cook the second side for only 1 minute.
- Toast the Buns: While cheese melts, spread softened butter on the cut sides of each brioche bun and place them cut side down in a second skillet over medium heat. Toast for 90 seconds until golden brown.
- Cook Remaining Patties: Transfer the first two patties to a plate and repeat the smash, sear, flip, and cheese process with the remaining two beef balls.
- Assemble the Burgers: Spread a generous tablespoon of crack sauce on both cut sides of each toasted bun. Place the cheesy patty on the bottom bun and top with a heaping spoonful of caramelized onions. Add pickle slices if using and close with the top bun.
- Rest and Serve: Let the assembled burgers rest for 2 minutes before serving. Cut in half if desired for easier eating. Serve immediately.


