Boat dip recipe delivers the ultimate crowd-pleasing appetizer that combines creamy layers of seasoned cream cheese, tangy salsa, and melted cheese into one irresistible dish. This quick and easy dip takes just minutes to prepare and transforms any gathering into a flavor-packed event. Whether you’re hosting game day, a backyard barbecue, or a casual get-together, this versatile recipe guarantees empty bowls and happy guests.
The genius of this dip lies in its simple layered approach that creates maximum flavor with minimal effort. You can customize every layer to match your taste preferences, making it as mild or spicy as you want.
Why You’ll Love This Recipe
This boat dip combines convenience with serious flavor impact in one shareable dish. The contrasting textures and complementary flavors create an addictive appetizer you’ll make again and again.
- Ready in under 30 minutes from start to finish
- Requires just 6 basic ingredients you probably have on hand
- Easily doubles or triples for larger crowds
- Travels well to potlucks and picnics
- Customizable heat level suits every palate
My Experience Making This Recipe
I first made this dip for a last-minute gathering when I realized I had nothing prepared. The transformation from basic ingredients to a beautiful layered appetizer felt almost too easy to be real.
The room went silent when I brought it out, followed quickly by the sounds of chips crunching and people asking for the recipe. My brother-in-law, who claims to hate “fancy dips,” scraped the dish clean with his third helping.
I’ve since made variations with different cheeses and toppings, but the original version remains my go-to for its foolproof reliability. The leftovers, when there are any, taste even better the next day after the flavors meld together.
Recipe Overview
- Recipe Name: Boat Dip
- Servings: 8-10
- Prep Time: 10 minutes
- Cook Time: 15 minutes
- Total Time: 25 minutes
- Course: Appetizer
- Cuisine: American
- Calories per Serving: 245
Equipment You Will Need
- 9×13 inch baking dish or similar oven-safe serving dish
- Medium mixing bowl
- Rubber spatula or spoon
- Hand mixer or stand mixer (optional but helpful)
- Measuring cups and spoons
- Sharp knife and cutting board
- Cheese grater
Ingredients for Boat Dip Recipe
- 16 oz cream cheese, softened to room temperature
- 1 cup sour cream
- 1 packet (1 oz) taco seasoning
- 1 1/2 cups salsa, your preferred heat level
- 2 cups shredded Mexican blend cheese, divided
- 1/2 cup sliced green onions
- 1/2 cup sliced black olives (optional)
- 1/2 cup diced tomatoes
Ingredient Notes and Substitutions
- Cream cheese: Provides the rich, creamy base that holds everything together. Greek yogurt mixed with a bit of mayo can substitute in a pinch, though the texture will be slightly tangier and less rich.
- Sour cream: Adds tanginess and helps lighten the cream cheese layer for better spreading. Plain Greek yogurt works perfectly as a one-to-one substitute with nearly identical results.
- Taco seasoning: Delivers the essential Tex-Mex flavor profile without measuring individual spices. Make your own blend with chili powder, cumin, paprika, garlic powder, and onion powder if you prefer.
- Salsa: Creates a flavorful moisture layer that prevents the dip from being too dense. Pico de gallo or drained diced tomatoes with green chiles work beautifully as alternatives.
- Mexican blend cheese: Melts smoothly and adds the classic Tex-Mex flavor. Cheddar, Monterey Jack, or pepper jack alone all work, or use whatever melting cheese you have available.
- Green onions: Add fresh bite and color contrast to the finished dish. Chopped fresh cilantro or chives provide similar brightness with different flavor notes.
How to Make Boat Dip Recipe
Step 1: Prepare the Cream Cheese Base
Beat the softened cream cheese, sour cream, and taco seasoning together in a medium bowl until completely smooth and well combined. Make sure your cream cheese is truly soft, or you’ll end up with lumps that refuse to blend no matter how long you mix.
This seasoned cream cheese layer forms the flavorful foundation, so blend it thoroughly to distribute the spices evenly. The mixture should look uniform in color without any white streaks remaining.
Step 2: Create the Base Layer
Spread the cream cheese mixture evenly across the bottom of your baking dish, creating a smooth layer that reaches all corners. Use a rubber spatula to get an even thickness, which helps the dip heat uniformly during baking.
Spreading it to the edges prevents dry spots and gives every scoop a bit of that creamy base. Aim for a consistent layer about half an inch thick.
Step 3: Add the Salsa Layer
Spoon the salsa evenly over the cream cheese layer, spreading it gently to avoid disturbing the base underneath. If your salsa seems particularly watery, drain off excess liquid first to prevent a soggy dip.
The salsa provides moisture and bright flavor that cuts through the richness of the cheese layers. Leave a small border around the edges so you can see the pretty layers when serving.
Step 4: Add the First Cheese Layer
Sprinkle 1 cup of the shredded cheese evenly over the salsa layer, covering it completely. This middle cheese layer melts into the salsa and creates pockets of gooey goodness throughout the dip.
Save the remaining cup of cheese for the top, where it will brown beautifully and create that irresistible golden crust everyone fights over. Don’t skip this division or you’ll miss out on textural contrast.
Step 5: Bake the Dip
Place the dish in a preheated 350°F oven and bake for 15 minutes, or until the cheese is fully melted and the edges are bubbling. The dip is ready when the cheese on top turns golden in spots and you can see bubbles forming around the perimeter.
Baking at this moderate temperature melts everything together without drying out the cream cheese base or making the edges crusty. Watch it during the final few minutes to catch it at peak golden perfection.
Step 6: Add the Remaining Cheese
Remove the dish from the oven and immediately sprinkle the remaining cup of cheese over the hot surface. The residual heat will melt this final layer into a glossy, smooth topping.
This double-cheese technique gives you melted cheese throughout plus a fresh cheese flavor on top. Return it to the oven for 2-3 minutes if you want extra browning on the final layer.
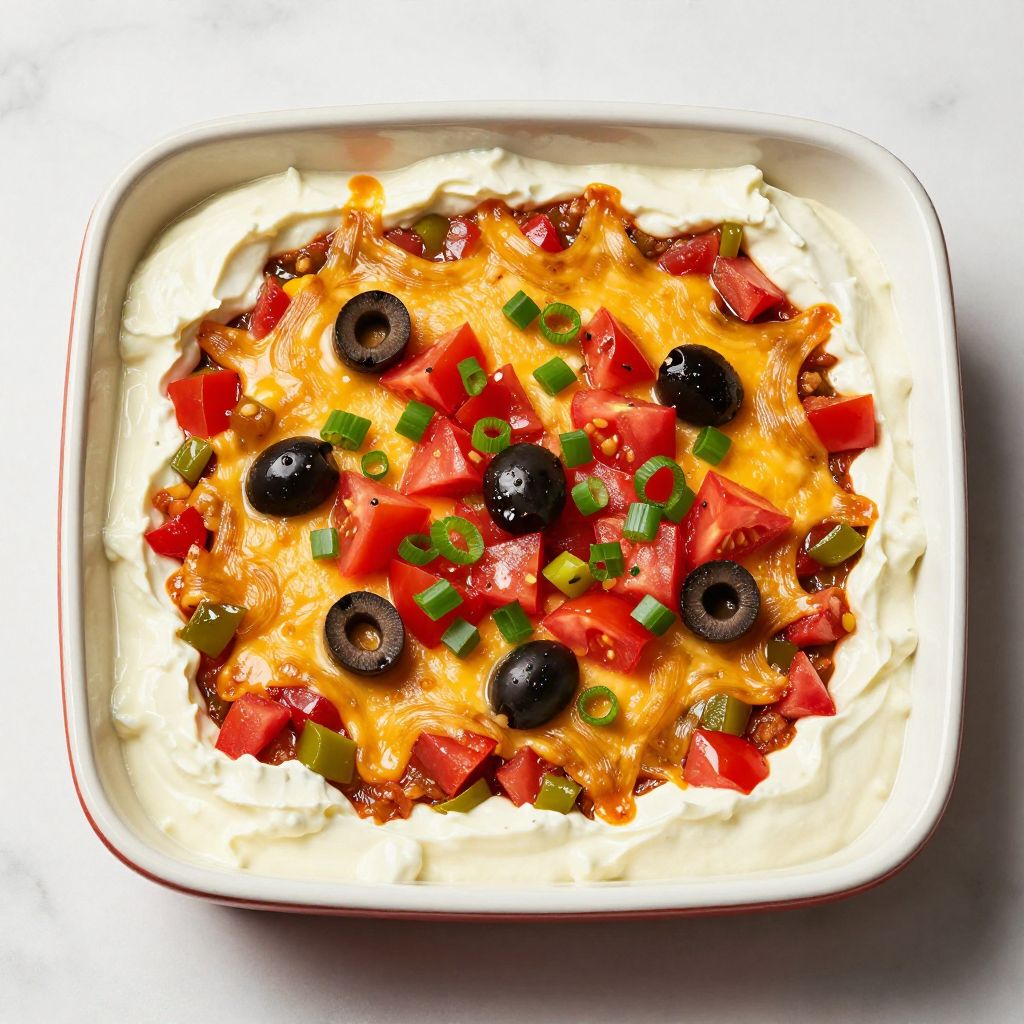
Step 7: Add Fresh Toppings
Scatter the sliced green onions, black olives, and diced tomatoes over the top while the dip is still hot. The contrast of cool, fresh toppings against the warm, melted cheese creates an appealing temperature and texture variation.
These toppings add color, freshness, and little bursts of flavor that keep each bite interesting. Arrange them attractively since this layer becomes your presentation.
Step 8: Let Rest and Serve
Allow the dip to rest for 5 minutes before serving to let the layers settle and make scooping easier. This brief waiting period also prevents anyone from burning their mouth on molten cheese straight from the oven.
Serve with sturdy tortilla chips, crackers, or vegetable sticks for dipping. The dip stays warm and scoopable for about 30 minutes at room temperature, perfect for grazing.
Pro Tip: Soften your cream cheese completely at room temperature for at least an hour before mixing. Cold cream cheese creates lumps that never fully disappear, ruining the smooth texture that makes this dip so appealing.
Tips for the Best Boat Dip Recipe
- Use a glass or ceramic baking dish that can go from oven to table for easy serving and fewer dishes to wash. The dish retains heat well and shows off the pretty layers.
- Drain excess liquid from your salsa if it pools when you spoon it out. Too much moisture makes the dip soupy instead of thick and scoopable.
- Shred cheese from a block rather than buying pre-shredded for better melting. Pre-shredded cheese contains anti-caking agents that prevent the smooth, creamy melt you want.
- Customize the heat level by choosing mild, medium, or hot salsa and adjusting the cheese types. Pepper jack adds kick while Monterey Jack keeps things mellow.
- Make the cream cheese layer ahead and refrigerate it in the baking dish. When guests arrive, just add the remaining layers and bake.
- Double the recipe in a larger dish for big parties, but increase baking time by 5-7 minutes. The thicker layers need extra time to heat through completely.
Common Mistakes to Avoid
- Using cold cream cheese straight from the refrigerator creates an impossible-to-mix lumpy mess. Room temperature cream cheese blends smoothly and creates the silky texture you want.
- Overloading the dip with too much salsa makes it watery and difficult to scoop. Stick to the measured amount for proper consistency.
- Skipping the resting period after baking makes the layers slide apart when scooping. Those few minutes let everything set into cohesive, scoopable bites.
- Adding fresh toppings before baking wilts the green onions and makes tomatoes mushy. Fresh toppings added after baking provide textural contrast and visual appeal.
- Baking at too high a temperature dries out the edges and can make the cream cheese layer grainy. Moderate heat melts everything smoothly without creating texture issues.
Serving Suggestions
This versatile dip pairs beautifully with sturdy dippers that can handle its thick, creamy texture. Choose options that complement the Tex-Mex flavors without overwhelming them.
- Thick restaurant-style tortilla chips for the classic pairing
- Warm flour tortillas cut into triangles for a softer option
- Bell pepper strips and celery sticks for a lighter, crunchy alternative
- Pita chips or naan bread pieces for an unexpected twist
- Scoop-shaped corn chips that hold extra dip in every bite
Variations to Try
- Buffalo Chicken Boat Dip: Mix shredded rotisserie chicken tossed in buffalo sauce into the cream cheese layer and top with blue cheese crumbles. The tangy, spicy combination transforms this into a hearty, protein-packed appetizer.
- Pizza Boat Dip: Replace taco seasoning with Italian seasoning, use marinara instead of salsa, and top with pepperoni and mozzarella. You get all the pizza flavors in dippable form.
- Greek-Style Boat Dip: Swap taco seasoning for oregano and garlic, use diced cucumbers and tomatoes, and top with feta and kalamata olives. The Mediterranean flavors create a refreshing alternative to the Tex-Mex version.
- BBQ Bacon Boat Dip: Mix barbecue sauce into the cream cheese layer, add crispy bacon bits, and use sharp cheddar on top. The smoky-sweet profile appeals to barbecue lovers.
- Loaded Baked Potato Dip: Use ranch seasoning instead of taco, add sour cream, and top with bacon, cheddar, and chives. It tastes like your favorite steakhouse side in dip form.
Dietary Adaptations
- Gluten-Free: This recipe is naturally gluten-free as long as you verify your taco seasoning contains no wheat-based fillers and serve with certified gluten-free chips or vegetables.
- Dairy-Free: Substitute dairy-free cream cheese and sour cream alternatives plus dairy-free shredded cheese, though the texture will be slightly less creamy and the cheese won’t melt quite as smoothly.
- Vegetarian: The base recipe is already vegetarian, but check that your taco seasoning doesn’t contain any hidden animal products if you follow a strict vegetarian diet.
- Low-Carb/Keto: The dip itself fits low-carb eating perfectly with about 4g net carbs per serving when you skip the beans, just serve with celery, cucumber, or low-carb crackers instead of tortilla chips.
Storage and Reheating
Refrigerator
Store leftover boat dip in an airtight container or cover the baking dish tightly with plastic wrap or foil. The dip keeps well for 3-4 days in the refrigerator.
- Let the dip cool completely before covering to prevent condensation
- The fresh toppings may lose some crunch but the flavor remains good
- Separate fresh toppings before storing if you want them crispy when reheating
Freezer
Freezing is not recommended for this dip because the cream cheese and sour cream separate and become grainy when thawed. The fresh toppings also turn mushy and unappetizing after freezing.
- If you must freeze, prepare only the cream cheese layer without toppings
- Freeze for up to 1 month in an airtight container
- Thaw overnight in the refrigerator and stir well before adding other layers
Reheating
Reheat boat dip in a 300°F oven for about 10-15 minutes until warmed through and the cheese melts again. Microwave reheating works in a pinch but can create hot spots and make the texture less appealing.
- Cover with foil during reheating to prevent the top from drying out
- Add fresh toppings after reheating for better texture and appearance
- Stir gently before serving if the layers have separated during storage
Nutrition Information
| Nutrient | Amount |
|---|---|
| Calories | 245 |
| Total Fat | 21g |
| Saturated Fat | 12g |
| Carbohydrates | 7g |
| Fiber | 1g |
| Sugar | 3g |
| Protein | 9g |
| Sodium | 485mg |
| Cholesterol | 58mg |
Nutritional values are estimates based on standard ingredient measurements and may vary depending on specific brands used and portion sizes. These calculations do not include chips or other dippers served alongside the boat dip.
Frequently Asked Questions
Can I make boat dip ahead of time?
You can assemble the cream cheese layer up to 24 hours ahead and refrigerate it covered. Add the salsa, cheese, and toppings right before baking for the freshest results and best texture.
Why is my boat dip watery?
Excess liquid usually comes from watery salsa or not draining the tomatoes properly. Next time, drain your salsa if it’s thin and pat fresh tomatoes dry with paper towels before adding them.
Can I use low-fat cream cheese and sour cream?
Low-fat versions work but create a less creamy, slightly more tangy result with a thinner texture. Full-fat dairy products provide the rich, smooth consistency that makes this dip so addictive.
How do I prevent the cream cheese layer from being lumpy?
The secret is completely softened cream cheese at room temperature, not cold from the fridge. Leave it out for at least an hour, or microwave it in short 10-second bursts if you’re in a hurry.
Can I serve boat dip cold instead of hot?
You can serve it cold as a layered dip, though the texture won’t be as smooth and the cheese won’t have that appealing melted quality. The flavors are still good, but baking transforms it into something special.
What size baking dish works best for this recipe?
A 9×13 inch dish provides the right depth for attractive layers without making the dip too thick or too shallow. An 8×8 inch dish works for a thicker version, while a larger dish makes it more spread out.
How long does boat dip stay warm at a party?
The dip stays pleasantly warm and scoopable for about 30 minutes at room temperature in a ceramic or glass dish. Use a small slow cooker set on warm if you need to keep it hot for longer periods.
Final Thoughts
This boat dip recipe proves that impressive appetizers don’t require complicated techniques or exotic ingredients. The
Boat Dip Recipe
Ingredients
Equipment
Method
- Preheat oven to 350°F.
- Beat the softened cream cheese, sour cream, and taco seasoning together in a medium bowl until completely smooth and well combined.
- Spread the cream cheese mixture evenly across the bottom of your 9x13 inch baking dish, creating a smooth layer that reaches all corners.
- Spoon the salsa evenly over the cream cheese layer, spreading it gently to avoid disturbing the base underneath.
- Sprinkle 1 cup of the shredded cheese evenly over the salsa layer, covering it completely.
- Place the dish in the preheated 350°F oven and bake for 15 minutes, or until the cheese is fully melted and the edges are bubbling.
- Remove the dish from the oven and immediately sprinkle the remaining 1 cup of cheese over the hot surface.
- Scatter the sliced green onions, black olives, and diced tomatoes over the top while the dip is still hot.
- Allow the dip to rest for 5 minutes before serving.
- Serve with sturdy tortilla chips, crackers, or vegetable sticks for dipping.


